
CertiDwell — user guide
Every screen, written for someone using CertiDwell for the first time. Installing, configuring and administering it are covered in the technical and administration guide.
- Generate a property report
- The mitigation checklist — gathering proof over time
- Build the evidence packet (single-sitting flow)
- Your saved records
- Leaving a review
- Plans, credits and pay-per-report
- Placement intelligence
- Book management
- Common questions and problems
- Quick reference
Starting the application, configuring it and administering users are covered in the separate Technical & administration guide. This document assumes it is already running and you have been given the address.
New in the September 2026 release. CertiDwell now has two surfaces: agents and admins work in the dark console, homeowners work in the cream Doorstep on their phone. In brief:
- Homeowners walk their property one measure at a time with the phone's camera, or upload the original document, and can say when a measure does not apply. The walk resumes at the next unresolved measure.
- The three status words are the same on both surfaces: Accepted by agent, In review, More proof needed. A new upload on an accepted measure puts it back in review. "Accepted by agent" is not insurer approval.
- Send to my agent requests a review; it does not start or stop access. Access comes from an accepted invitation and ends with Remove agent access. Downloaded copies cannot be recalled.
- An agent's free trial includes one new property assessment; further new addresses use a report credit or a subscription. Everything already assessed, and every invited collaboration, stays open.
- Enter the actual renewal or non-renewal date on a case, or import dates for existing properties.
- Five short preparation guides and a fictional sample packet are readable without an account.
1. Signing in and creating an account
Everything is behind a login. Your reports and documents are private to your account — other users cannot see them.
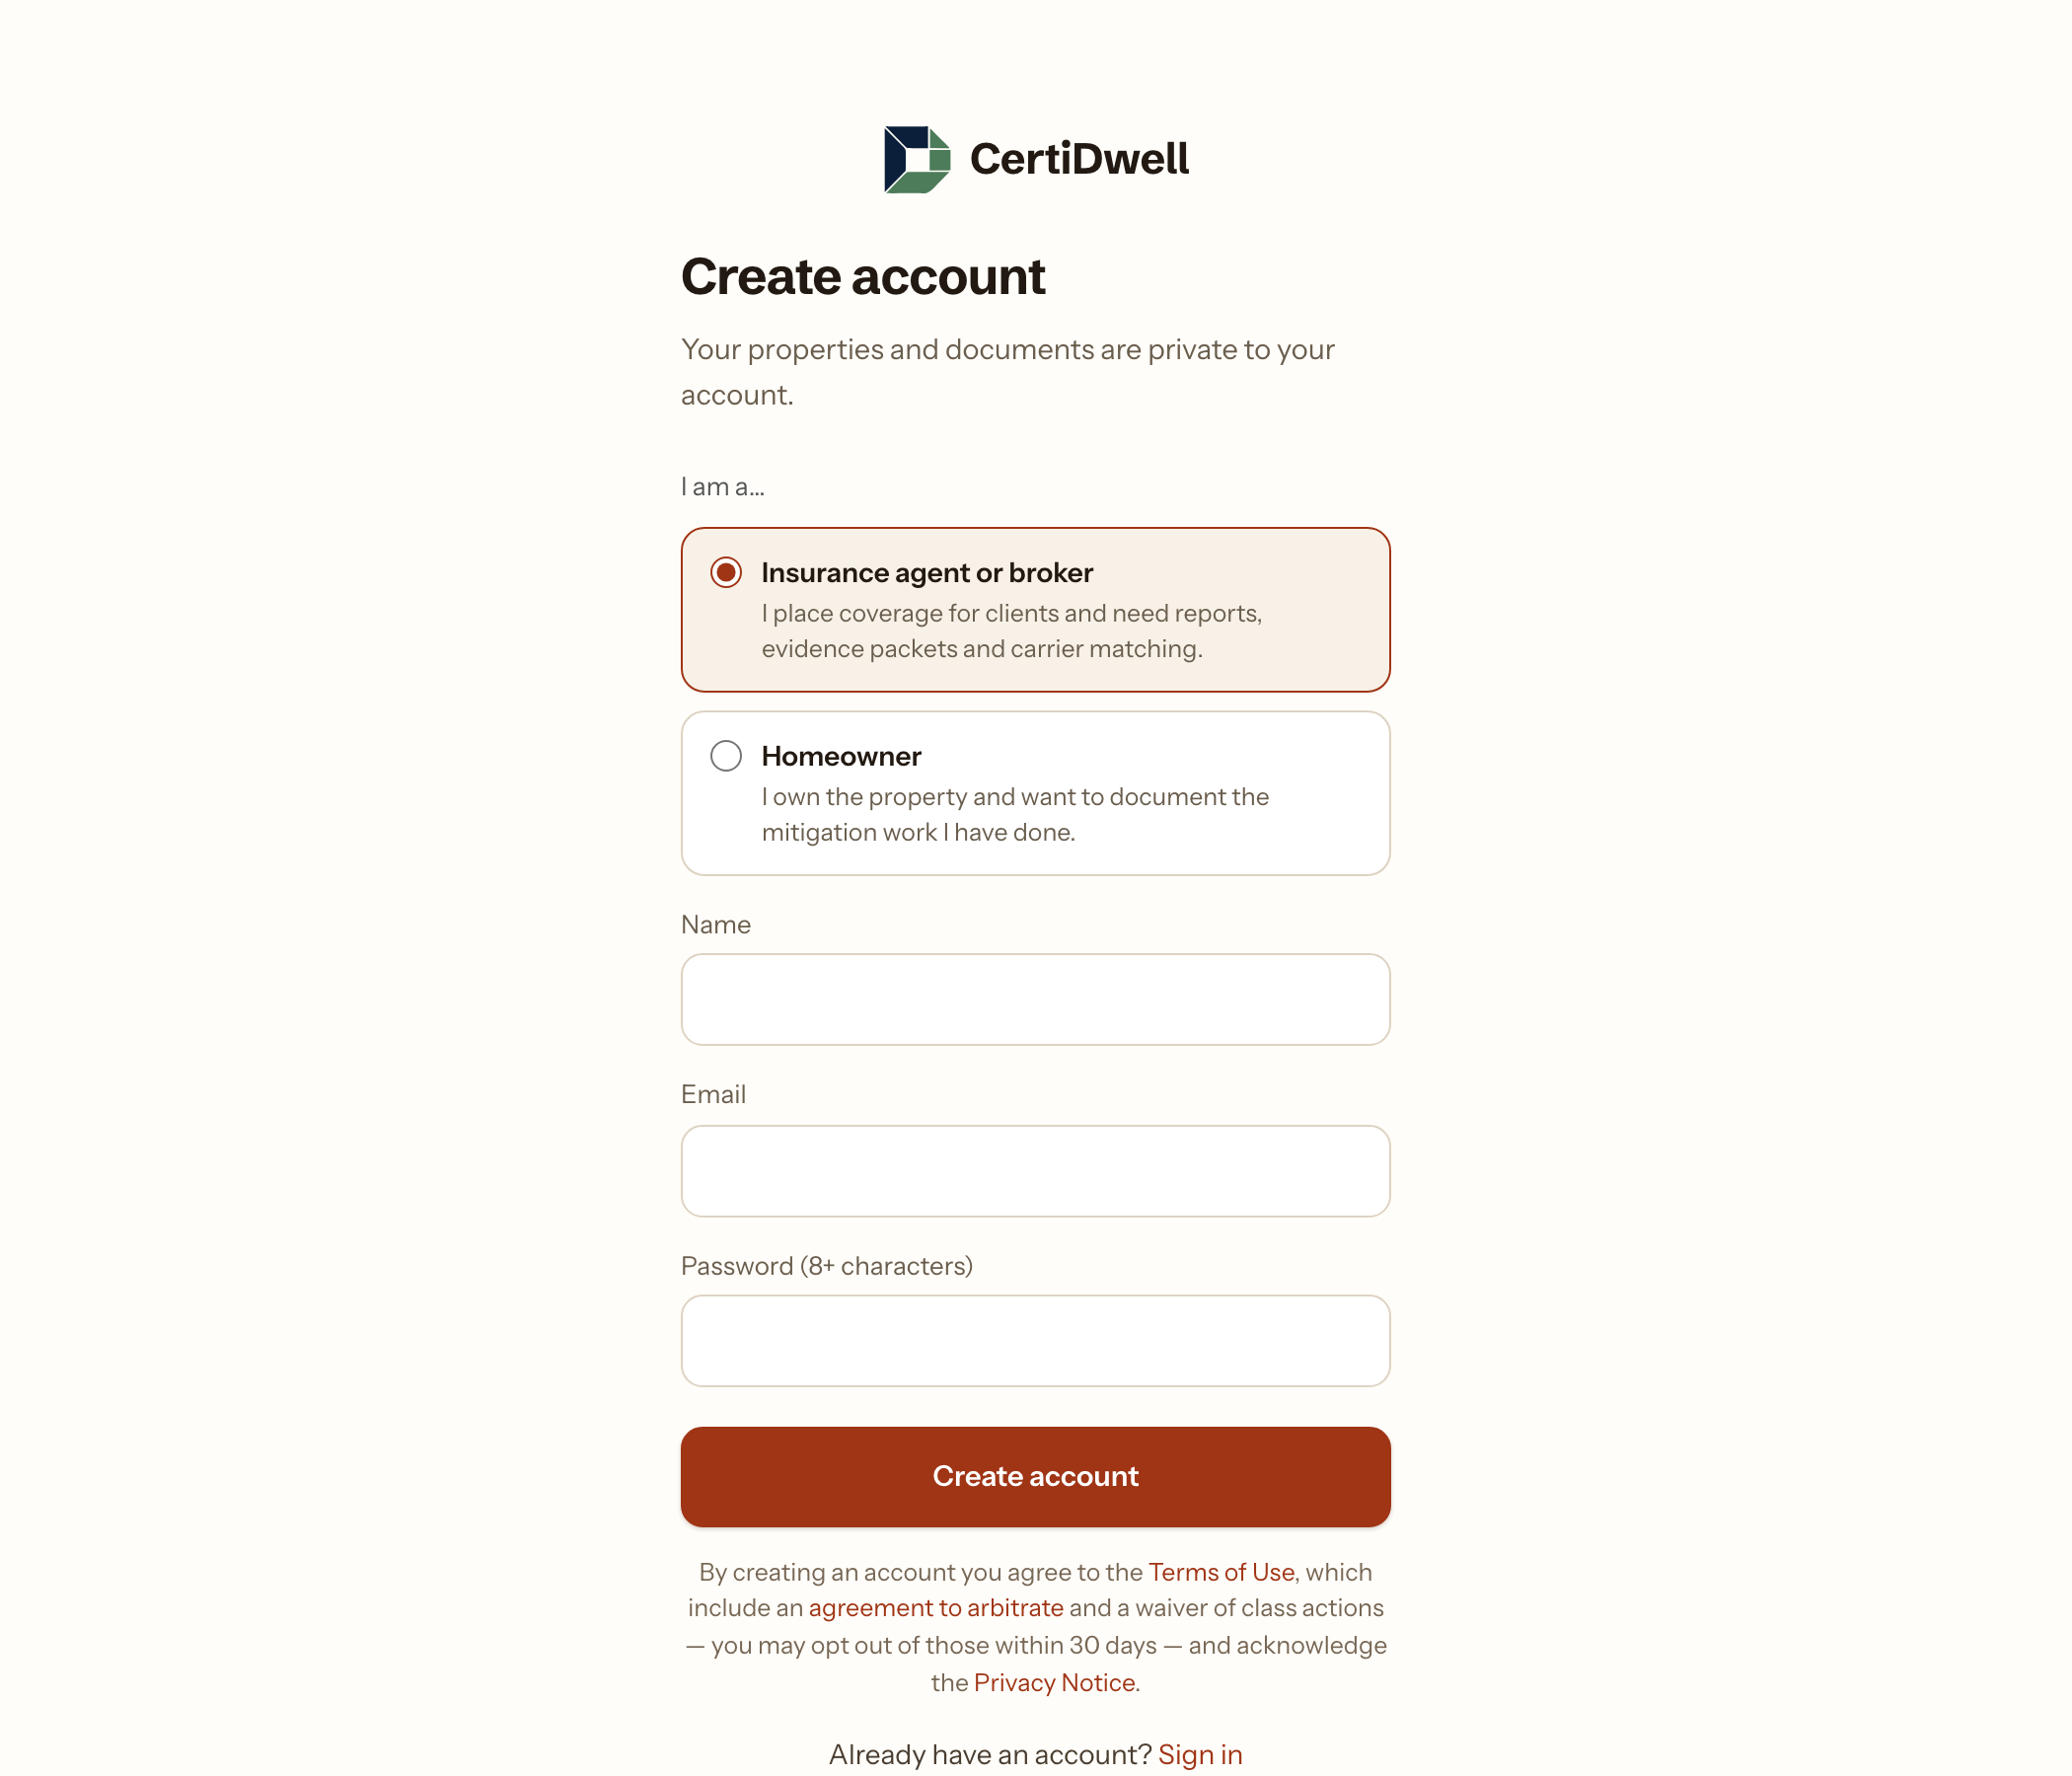
Create your account
- Open the application address. You will be sent to the sign-in page.
- Click Create one at the bottom.
- Choose whether you are an agent or a homeowner. This decides what you see — see the table below.
- Enter your name (optional), your email, and a password of at least 8 characters, then click Create account.
| Role | What it means |
|---|---|
| Agent or broker | You place coverage for clients. You get reports, evidence packets, carrier matching and the placement tools. This is the paid seat. |
| Homeowner | You own the property. You can add your addresses and upload proof of the mitigation work you have done. Free — you are a collaborator on the agent's work, not a separate customer. |
| Administrator | Runs the system. Assigned by configuration, not chosen here. |
If you were invited
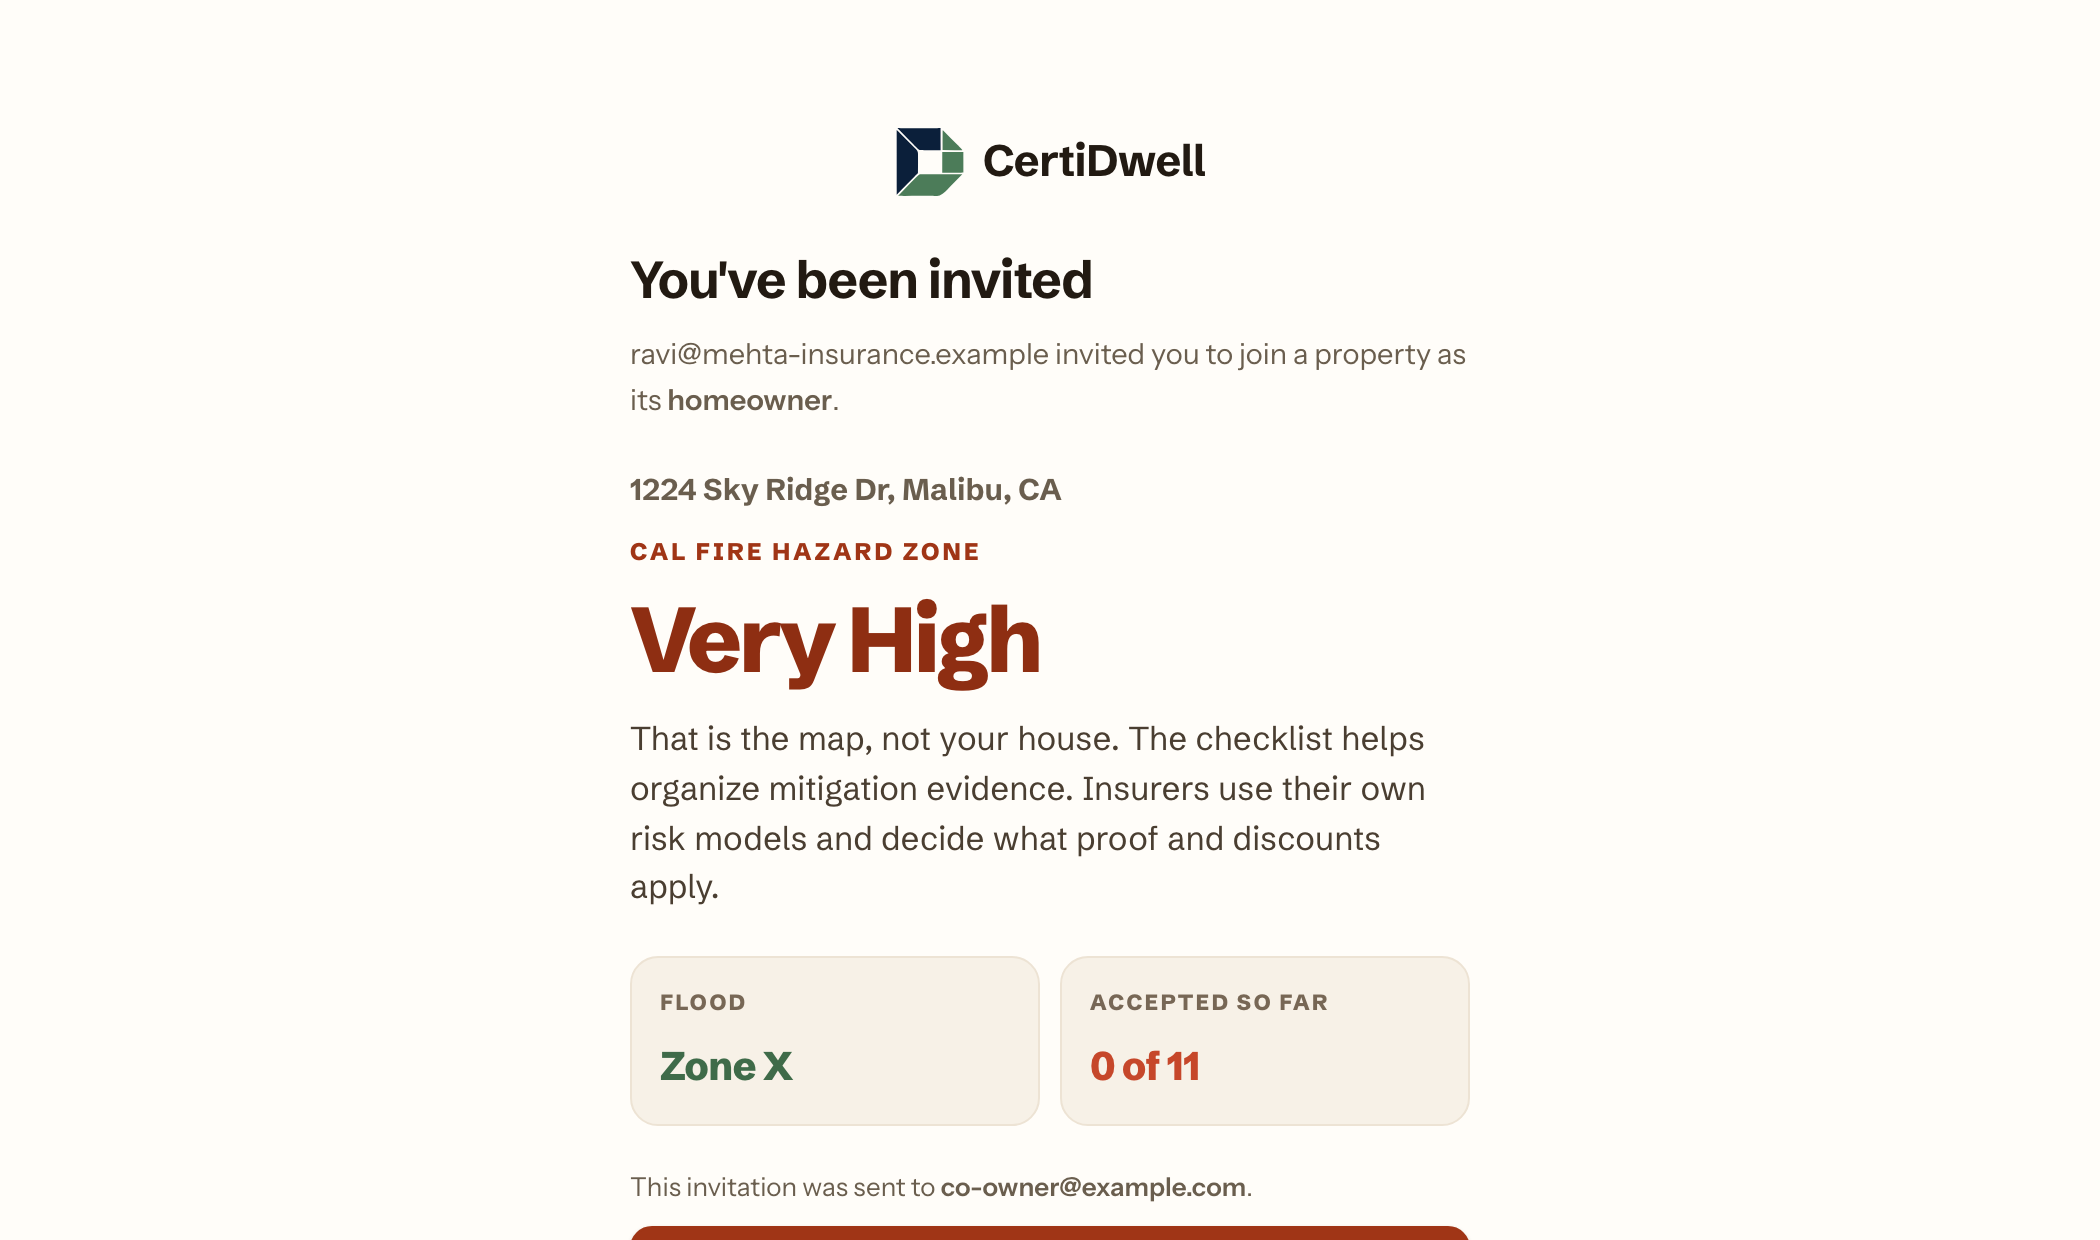
If someone sent you an invitation link, open that link instead of registering directly. It walks you through creating an account and joining their property in one go — see section 4.
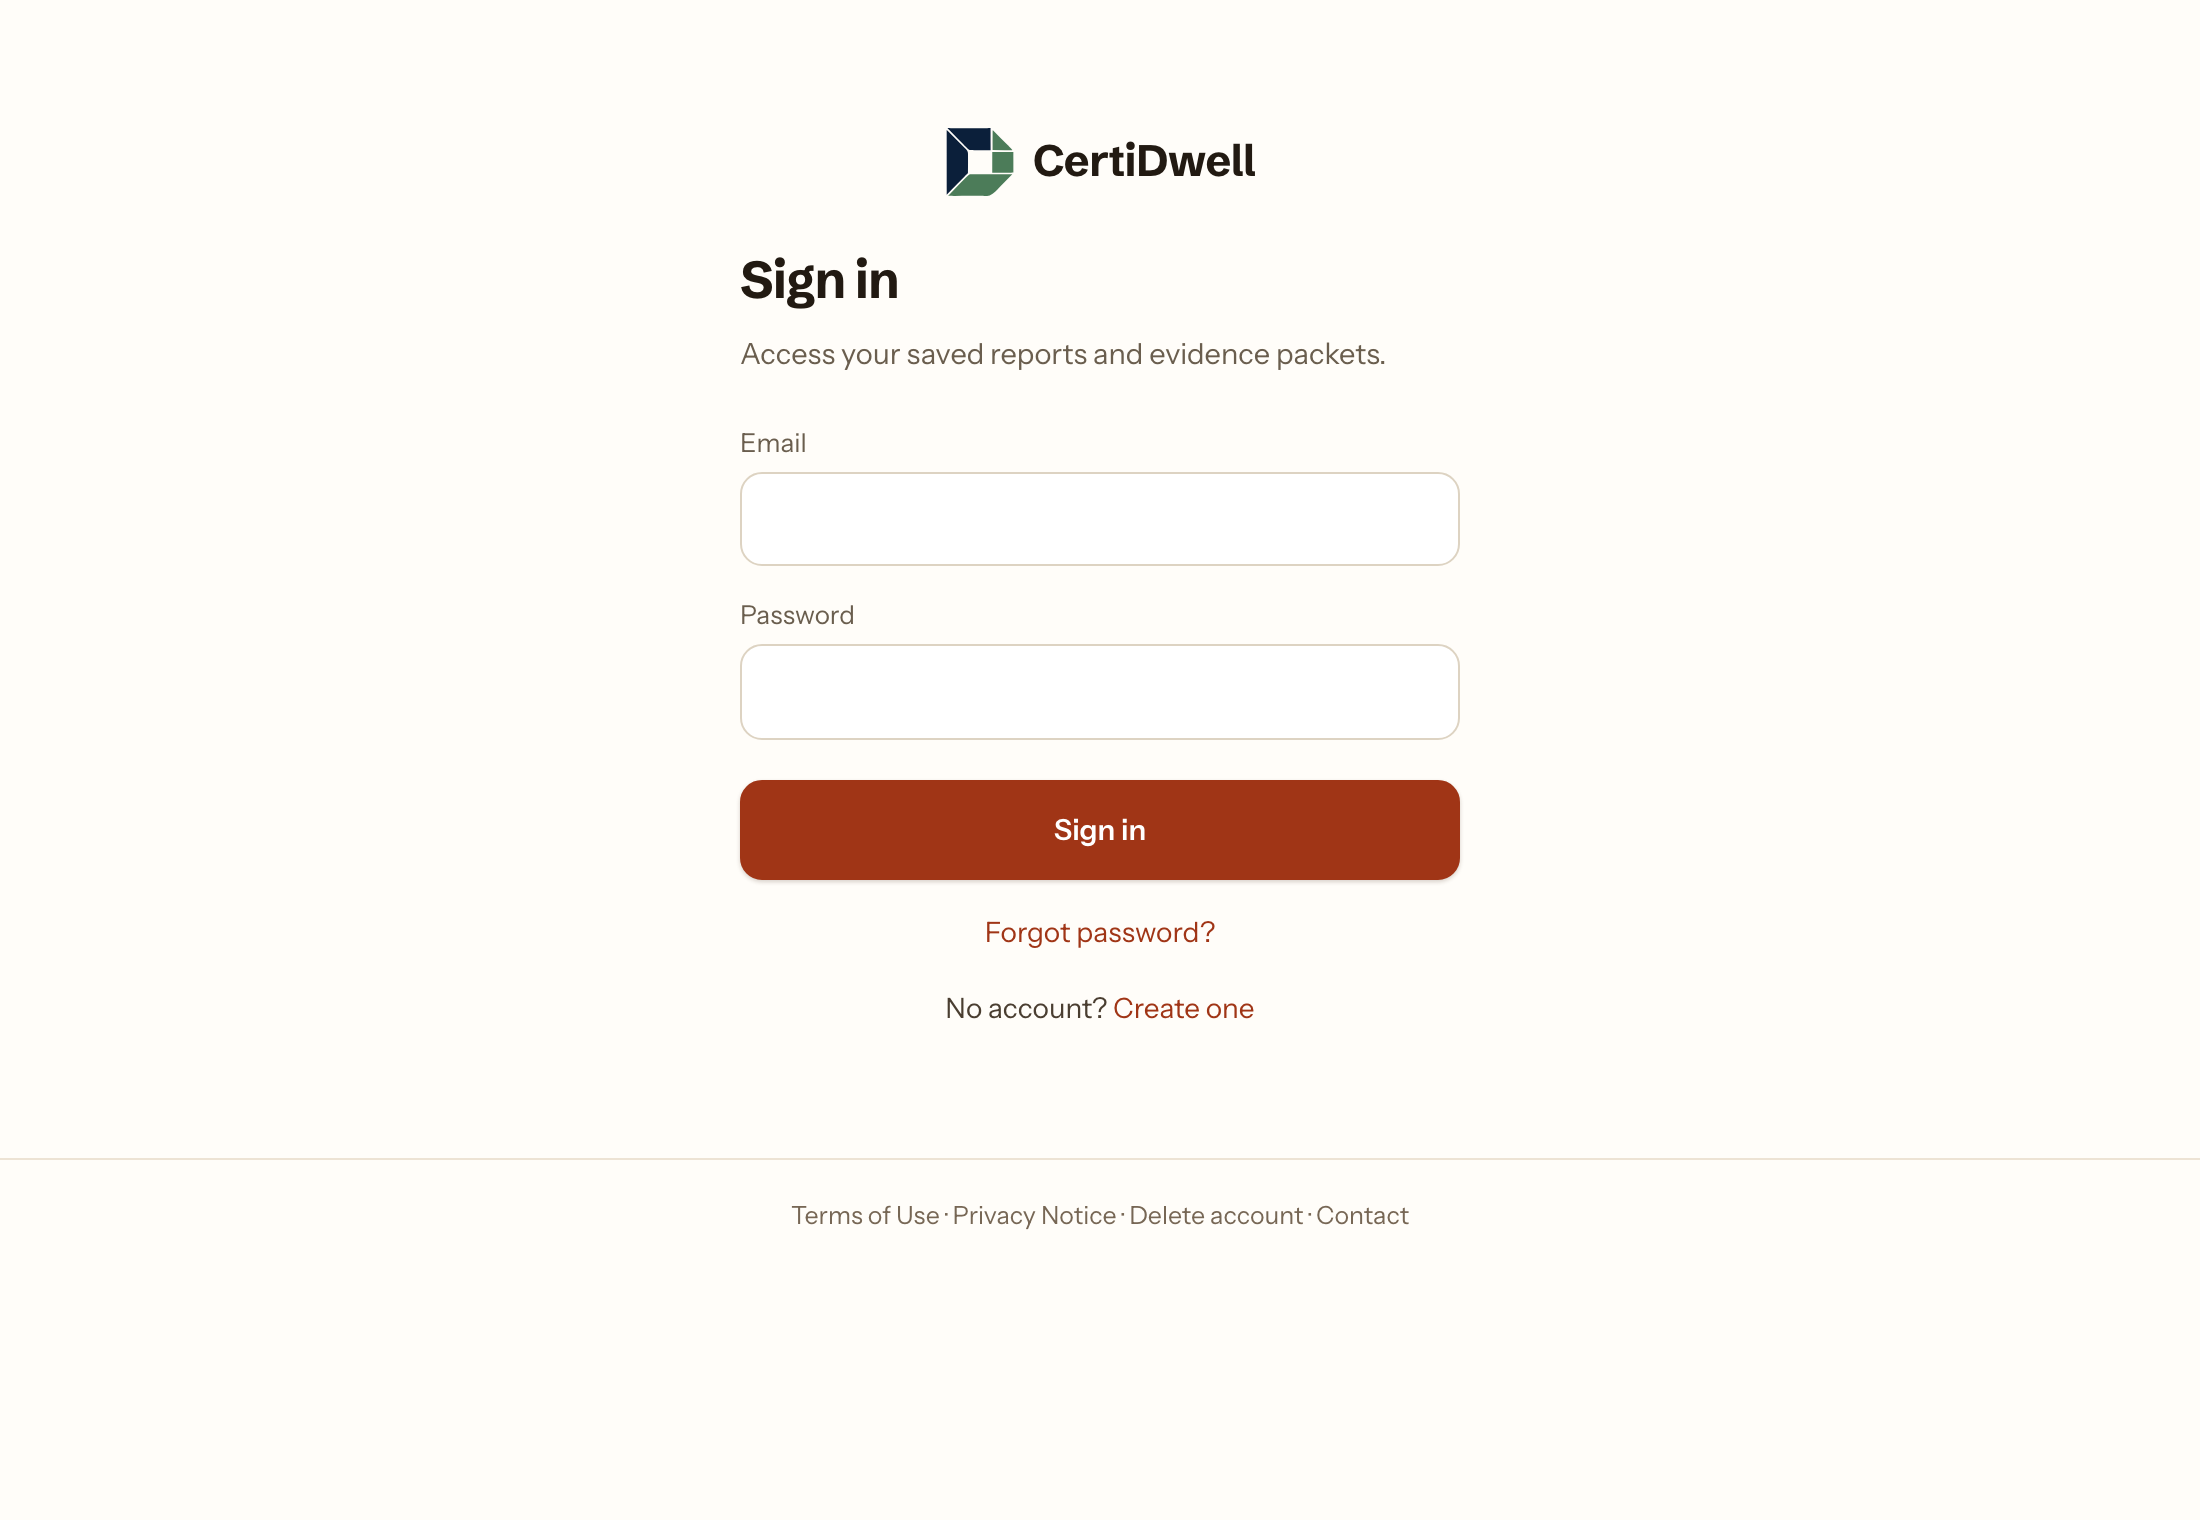
If you forget your password
- Click Forgot password? on the sign-in page.
- Enter your email and submit. The page shows the same message whether or not an account exists — that is deliberate, so nobody can use it to discover who has an account.
- Open the emailed link, choose a new password, and you are signed in.
The reset link works once and expires after one hour. If email has not been configured on your installation, the link is printed in the server's terminal window instead — ask whoever runs the system.
2. Your first sign-in
The first time you sign in, CertiDwell opens a short walkthrough of the four steps a property goes through: look up the address, work the checklist, collect the proof, hand underwriting one file. Each step links straight into the screen it describes.
It takes about a minute to read and you can leave at any point. Skip closes it for good. If you want it again later, Account has a link to reopen it.
3. Securing your account
Click your name at the top of the page, then Account.
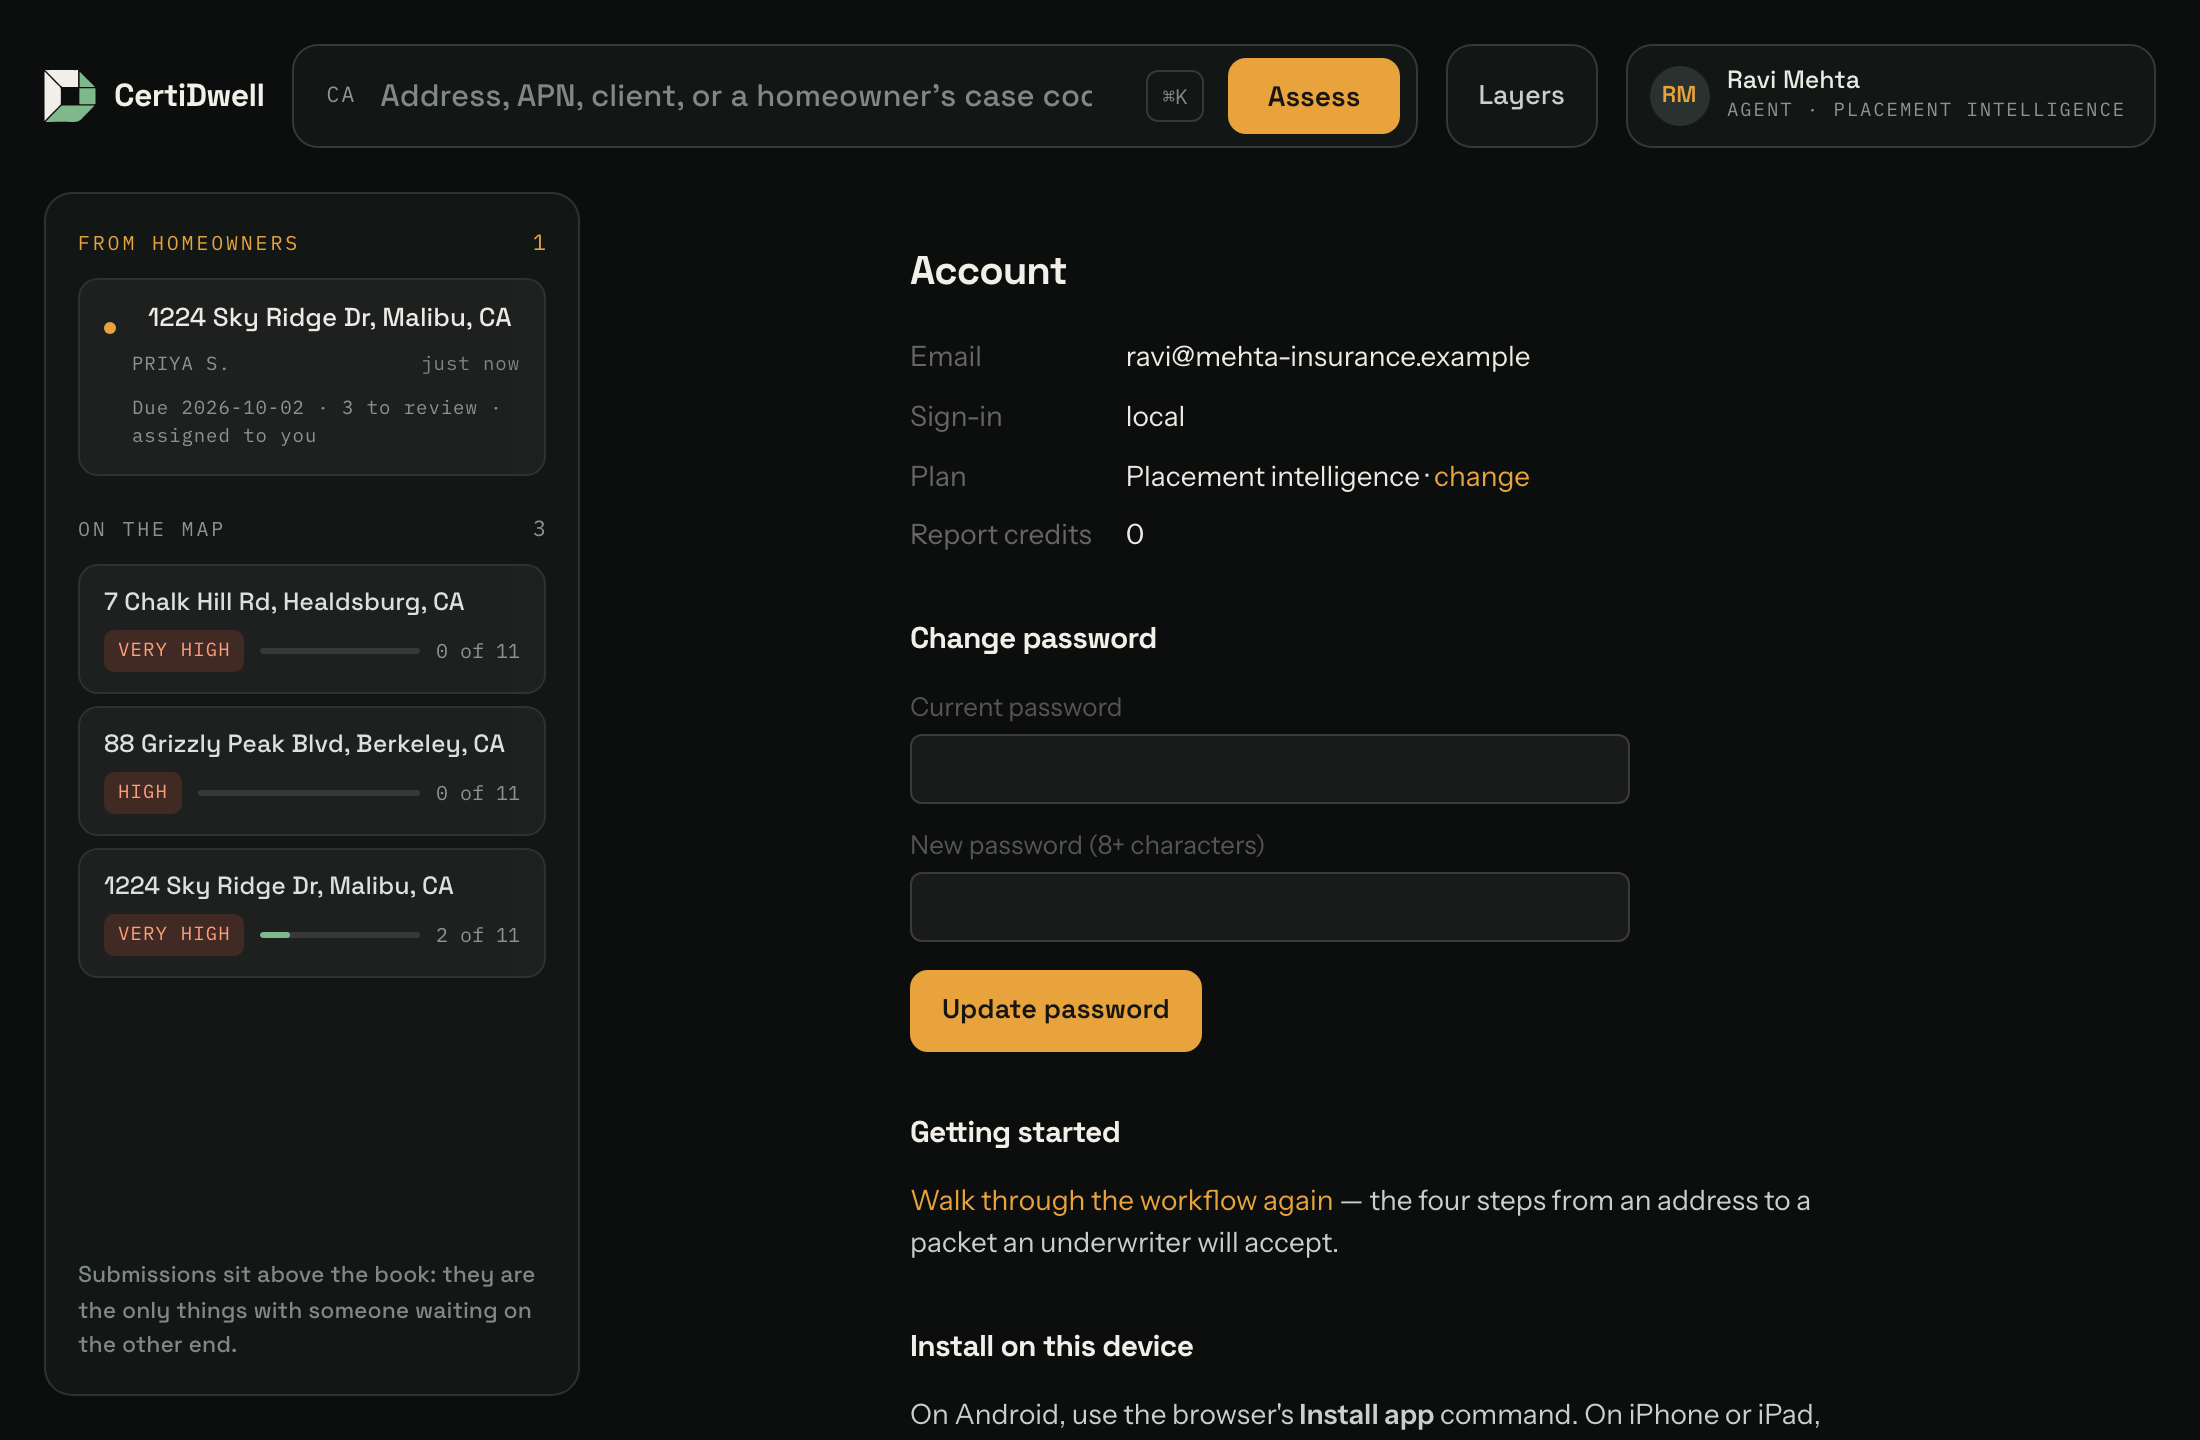
Change your password
Enter your current password, then the new one (8+ characters), and click Update password. If you signed in with Google and have never set a password, the form asks only for a new one.
Turn on two-factor authentication
- Click Enable 2FA.
- A setup key appears. In your authenticator app — Google Authenticator, Authy, 1Password — add a new account and paste that key.
- Type the 6-digit code your app shows and click Confirm & enable.
From then on, signing in takes two steps: password, then the 6-digit code. To switch it off, enter a current code on the Account page and click Turn off 2FA.
Locked out? An administrator can reset your two-factor, which returns you to password-only sign-in.
Install CertiDwell on a phone or tablet
CertiDwell is an installable web app. On Android, use the browser's Install app prompt. On iPhone or iPad, open the Share menu in Safari and choose Add to Home Screen. The installed app opens without the browser toolbar and uses the same account and server data as the website.
The offline screen is intentionally limited: it keeps only the logo and application shell on the device. Property pages, addresses, reports and evidence are never stored in the ordinary offline cache. If the connection drops, reconnect and try again; anything already saved remains on the server.
Device deadline notifications
When Web Push is configured, the Account page offers Enable on this device. Permission is requested only after you select it. The nightly deadline process can then send the same book reminder as a device notification, deep-linked to your book. Use Disable on this device or the operating system's notification settings to stop them. Email reminders continue independently.
Delete your account
At the bottom of Account, open Start permanent deletion, confirm your email, current password and authenticator code when applicable, and submit. Private properties, assessments, packets and evidence are removed. A property shared with another active participant remains available to them, but your identity is detached. Active subscriptions must be cancelled first, and the last administrator must transfer that role before deleting.
The same instructions are available without signing in at /delete-account, which is also the account-deletion URL used for mobile-store listings.
4. Finding your way around
Your account type decides what you see. There is no setting to switch; the role you registered with, or were invited as, picks the surface.
The console (agents and administrators)
Everything floats over one dark screen.
| Part | What it does |
|---|---|
| Command bar (top) | The one place to start anything. Type an address to assess it, an address already in your book to open that property, or a case code such as CD-4471 to jump to it. Press ⌘K (or Ctrl+K) to focus it from anywhere; Esc leaves it. |
| Layers | The destinations the old sidebar held: Console, Properties, My records, Book (when your plan includes it), Pricing, Account, and Admin for administrators. |
| Your name (top right) | Account, sign out, and for administrators the Users layer: accounts, audit log, contact requests, reviews, placement, roadmap, database. |
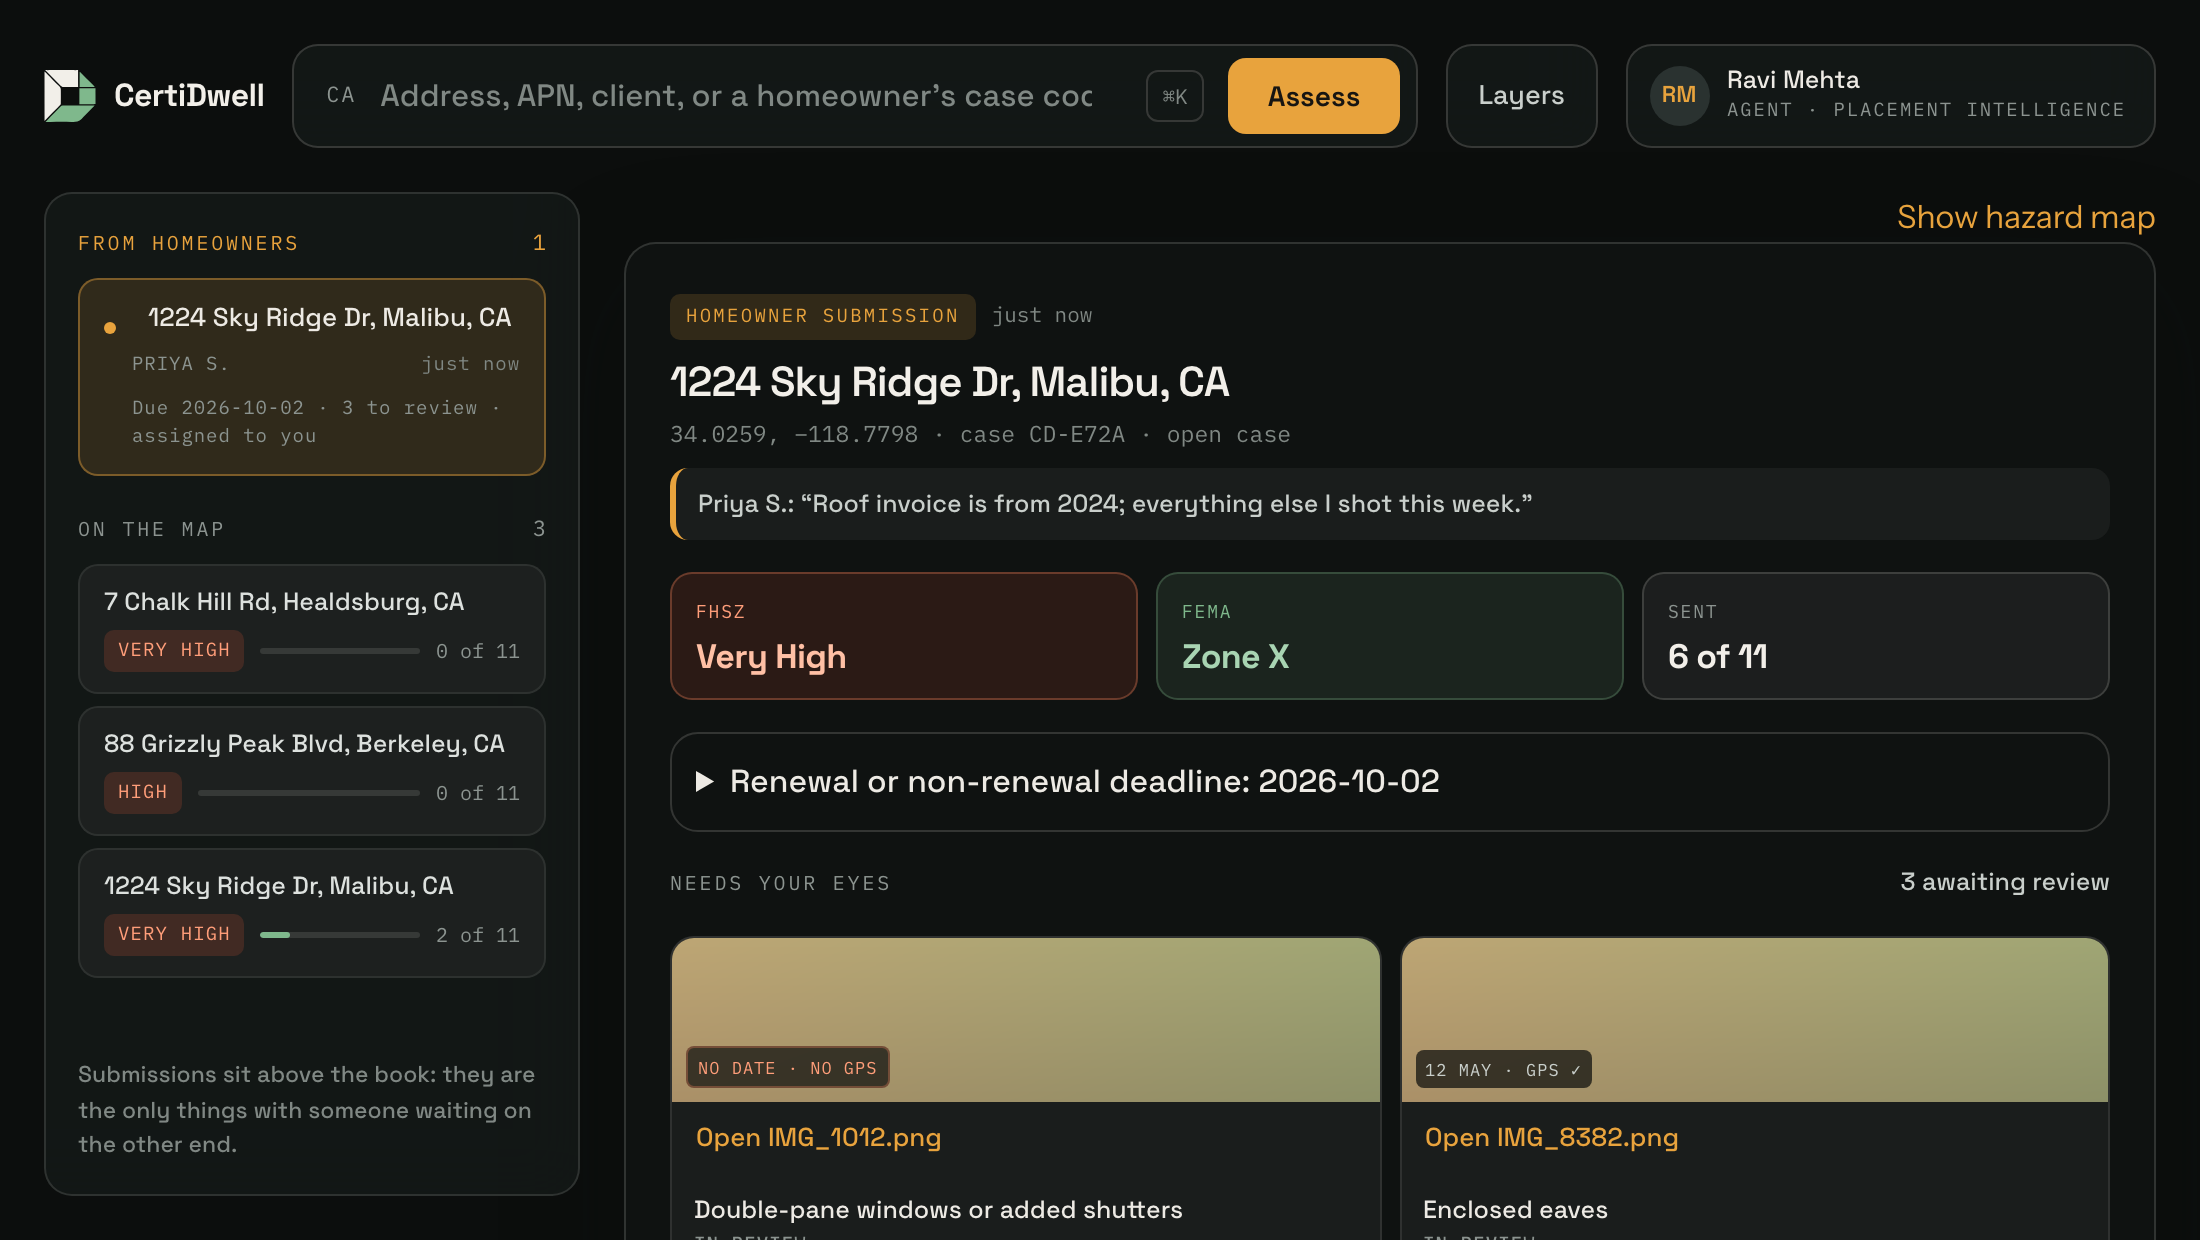
| From homeowners (left rail) | Cases with someone waiting on you: an open review request, or evidence nobody has reviewed. Ordered by the case deadline you entered, then by who has waited longest. Each row shows the homeowner's first name and initial, when it arrived, and how many items need a look. |
| On the map (left rail) | Every property you are the agent for, with its hazard zone and how many measures the agent has accepted. |
| Review panel (centre) | The selected case: zones, deadline, every piece of evidence with the date and GPS the camera recorded, and the Accept / Ask again buttons. Show hazard map puts the live map behind it; the map is optional so the evidence stays legible. |
Every other page you already know — Properties, records, the mitigation checklist, the admin pages — still exists and now renders inside the console.
Doorstep (homeowners)
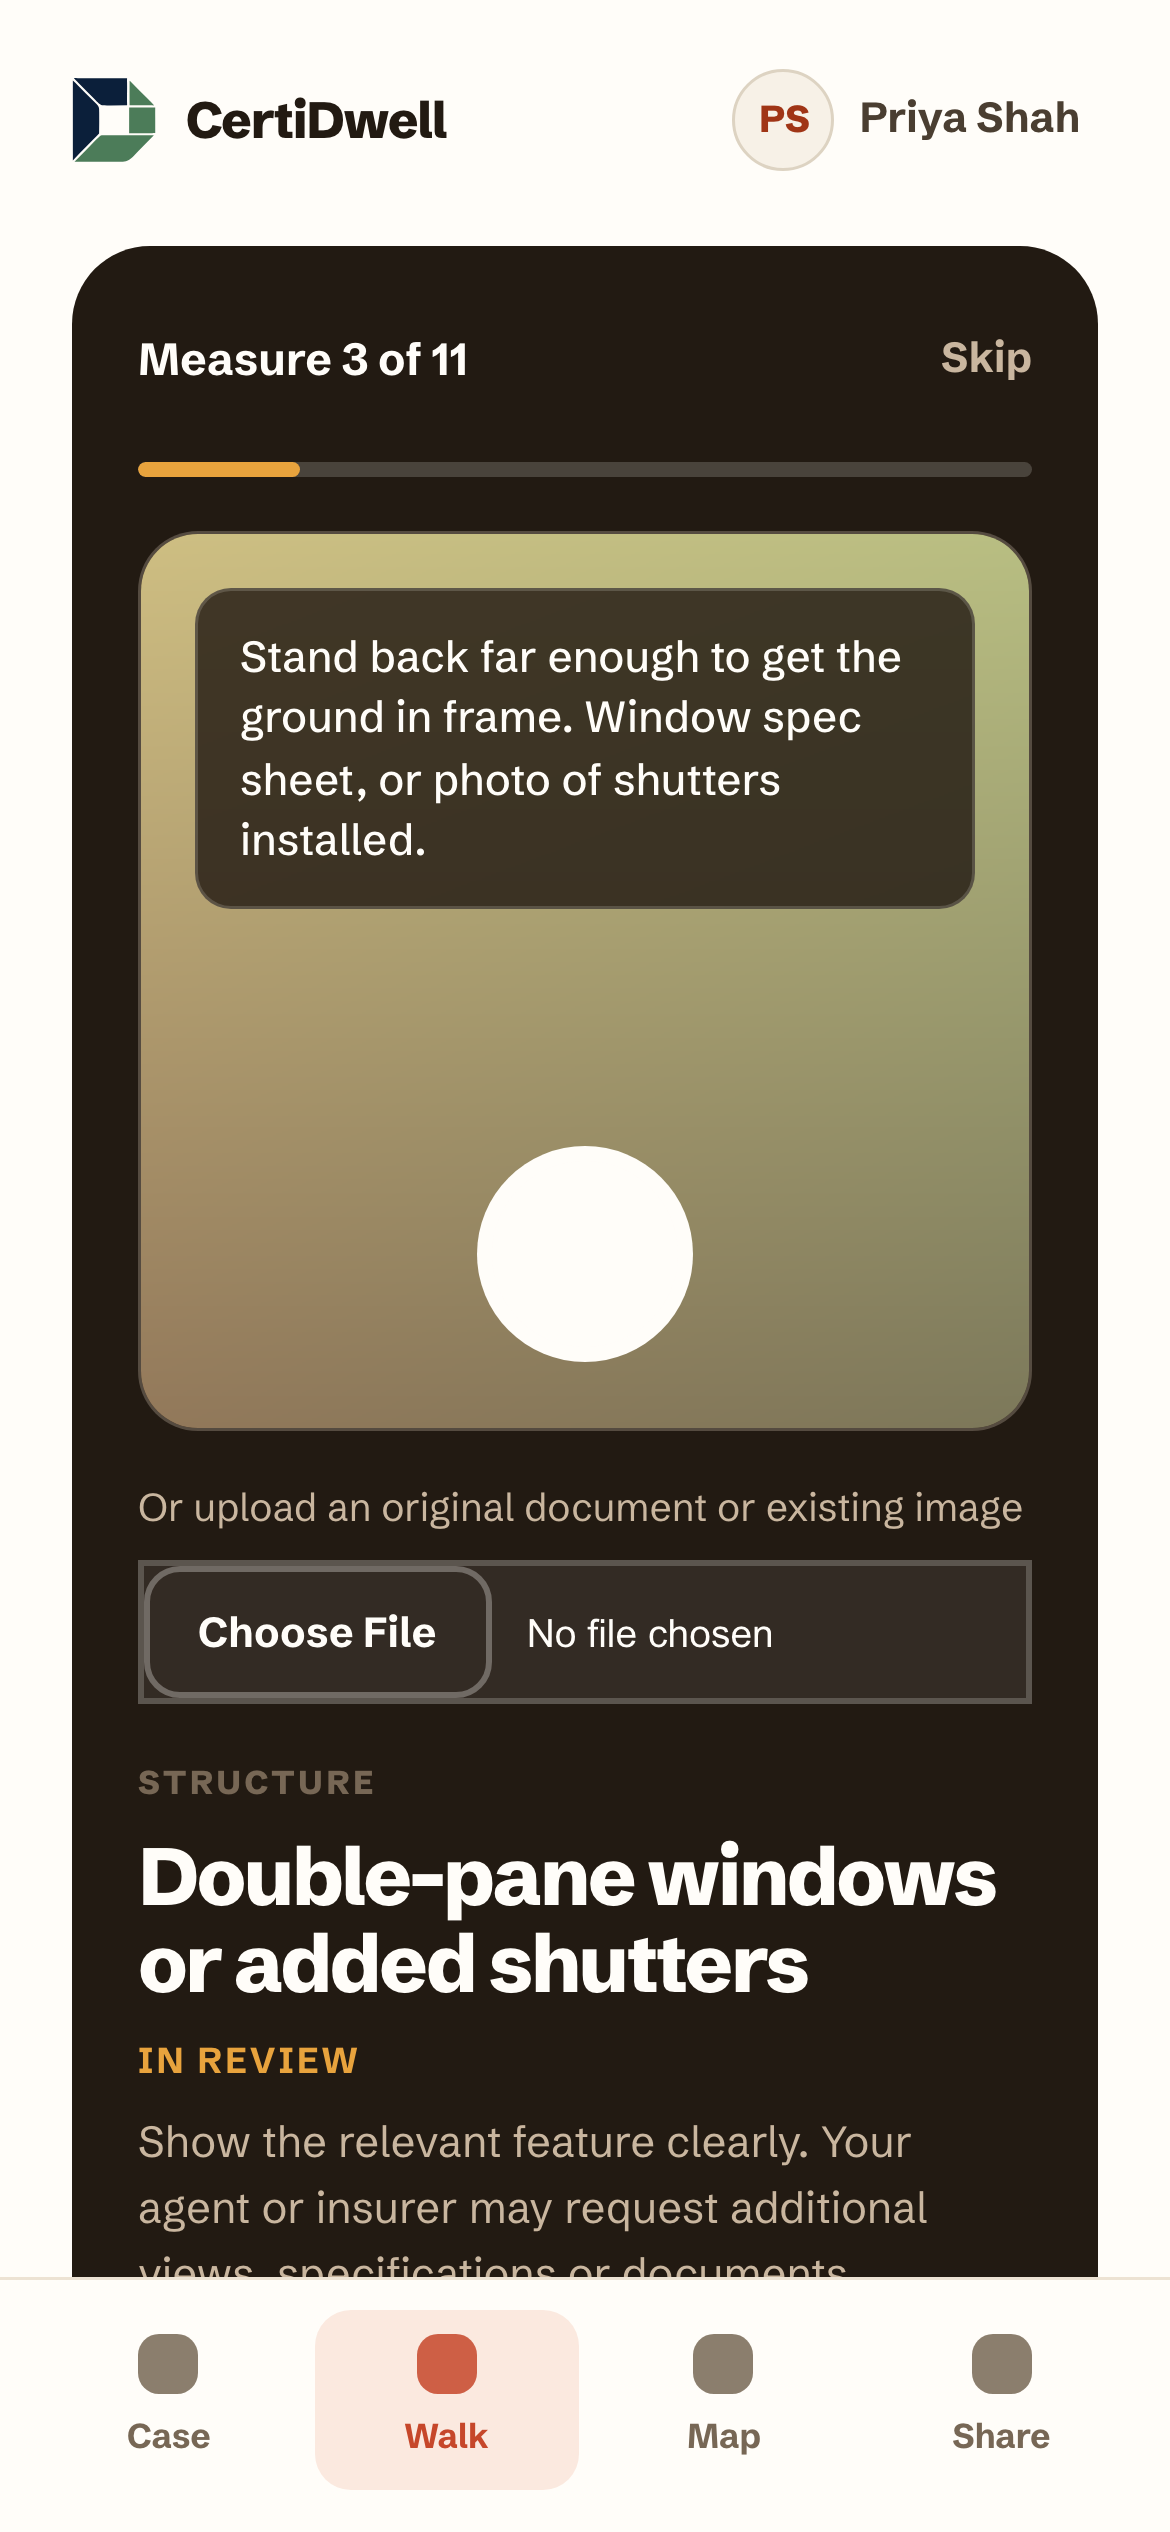
One question per screen, four tabs along the bottom:
| Tab | What it shows |
|---|---|
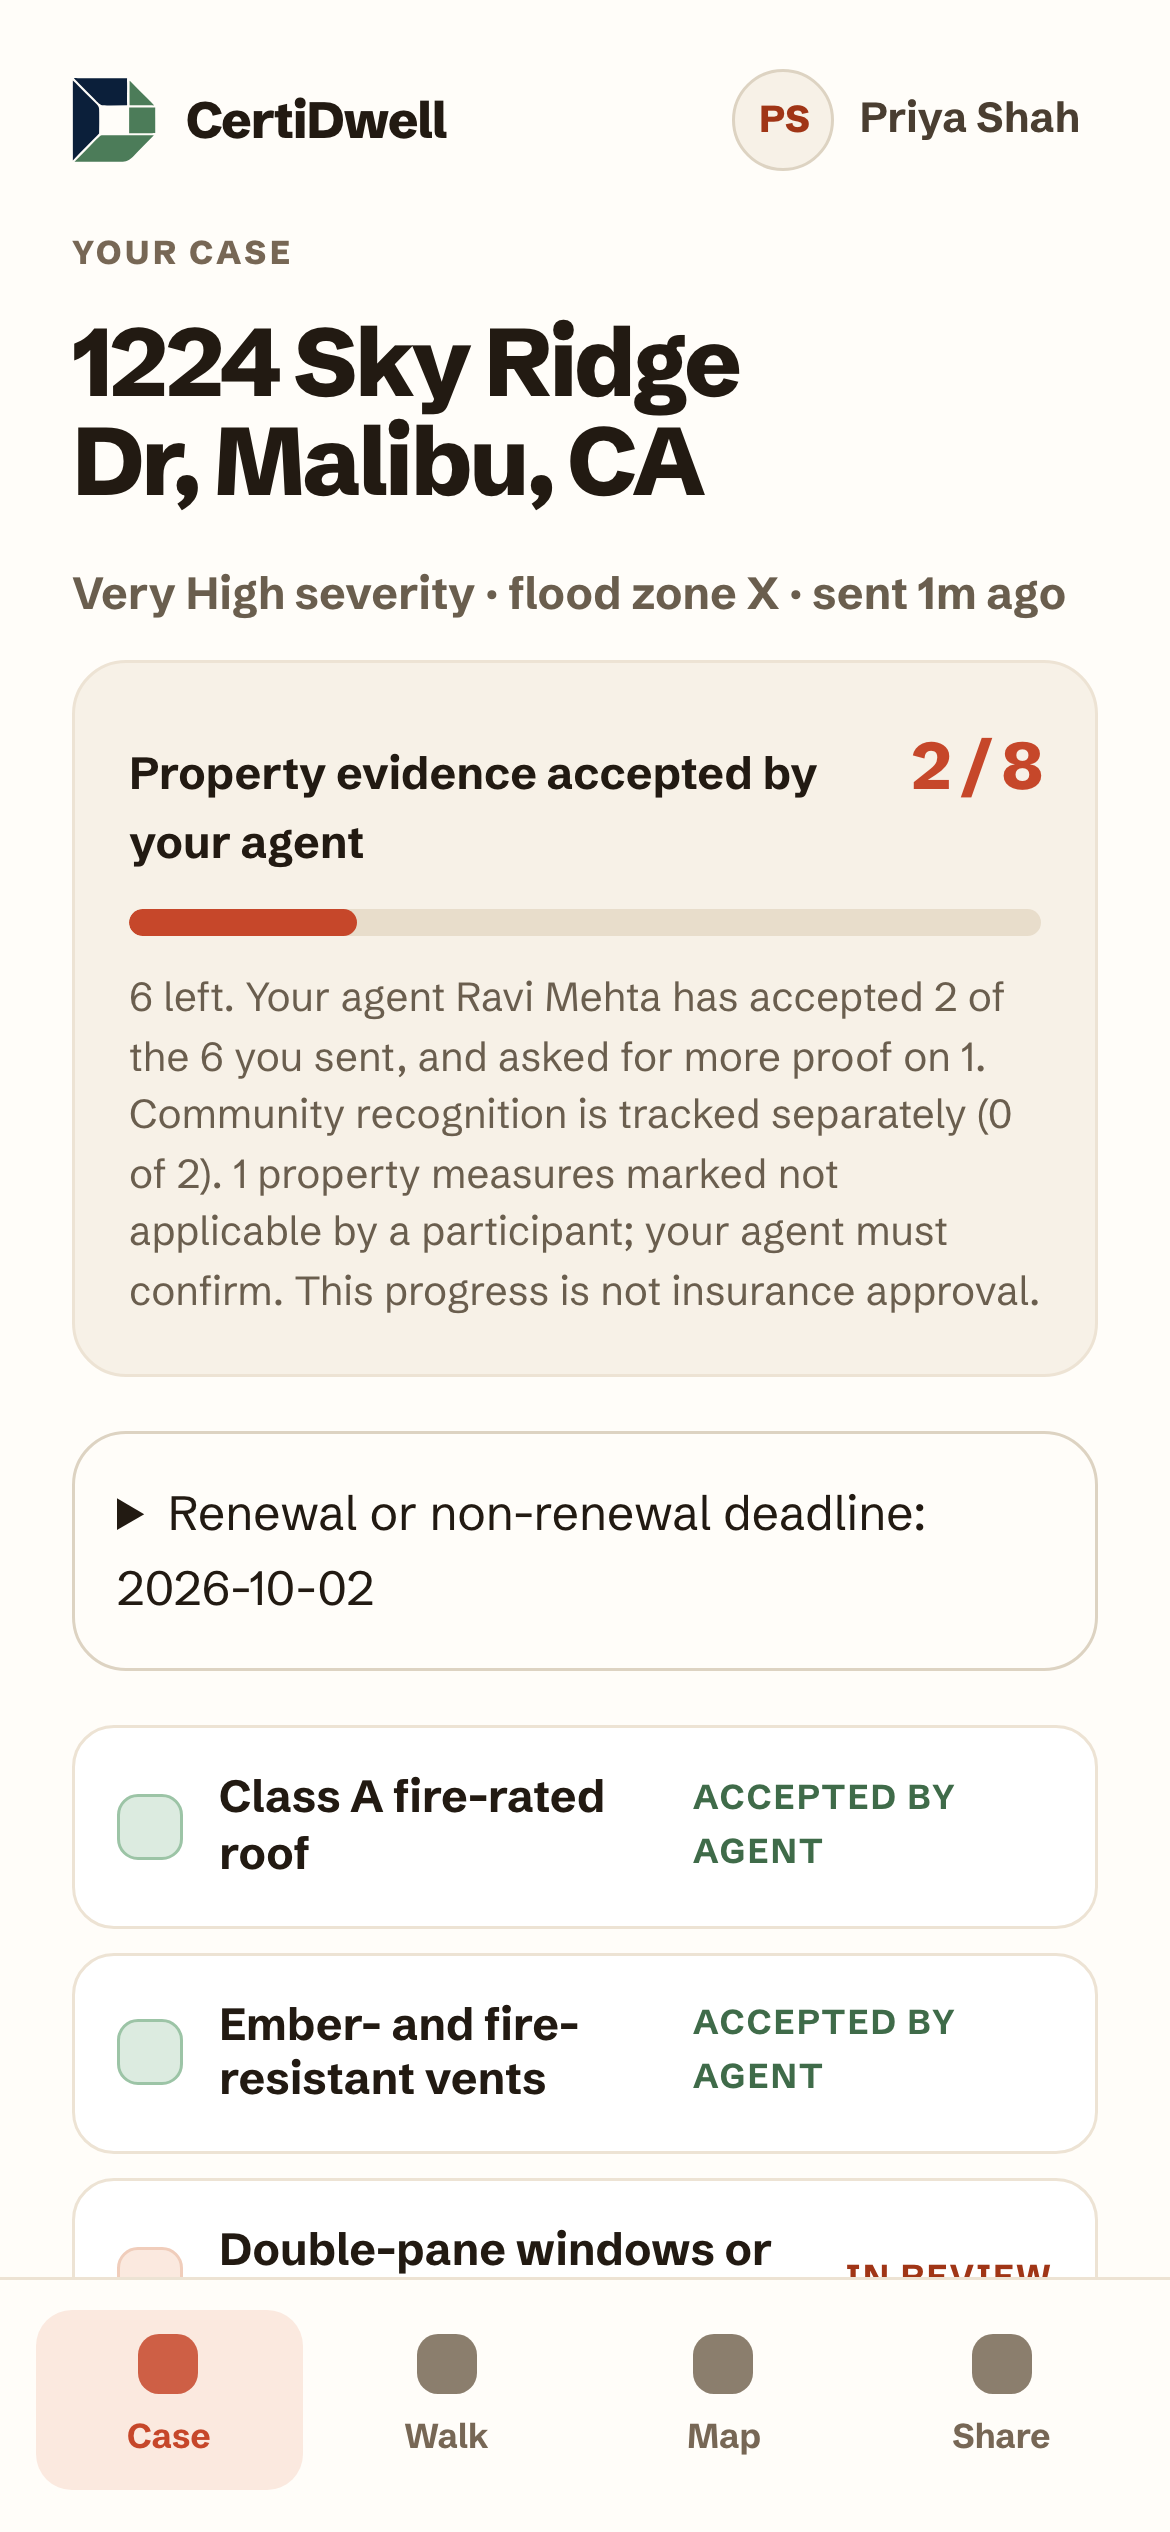
| Case | Your address, how much evidence your agent has accepted, every measure in the shared status words, and the deadline you entered. |
| Walk | The eleven measures, one at a time, with the camera. |
| Map | The CAL FIRE hazard zone and FEMA flood zone for your address, in plain language, on the map. |
| Share | Send a review request to your agent, withdraw it, or remove the agent's access. |
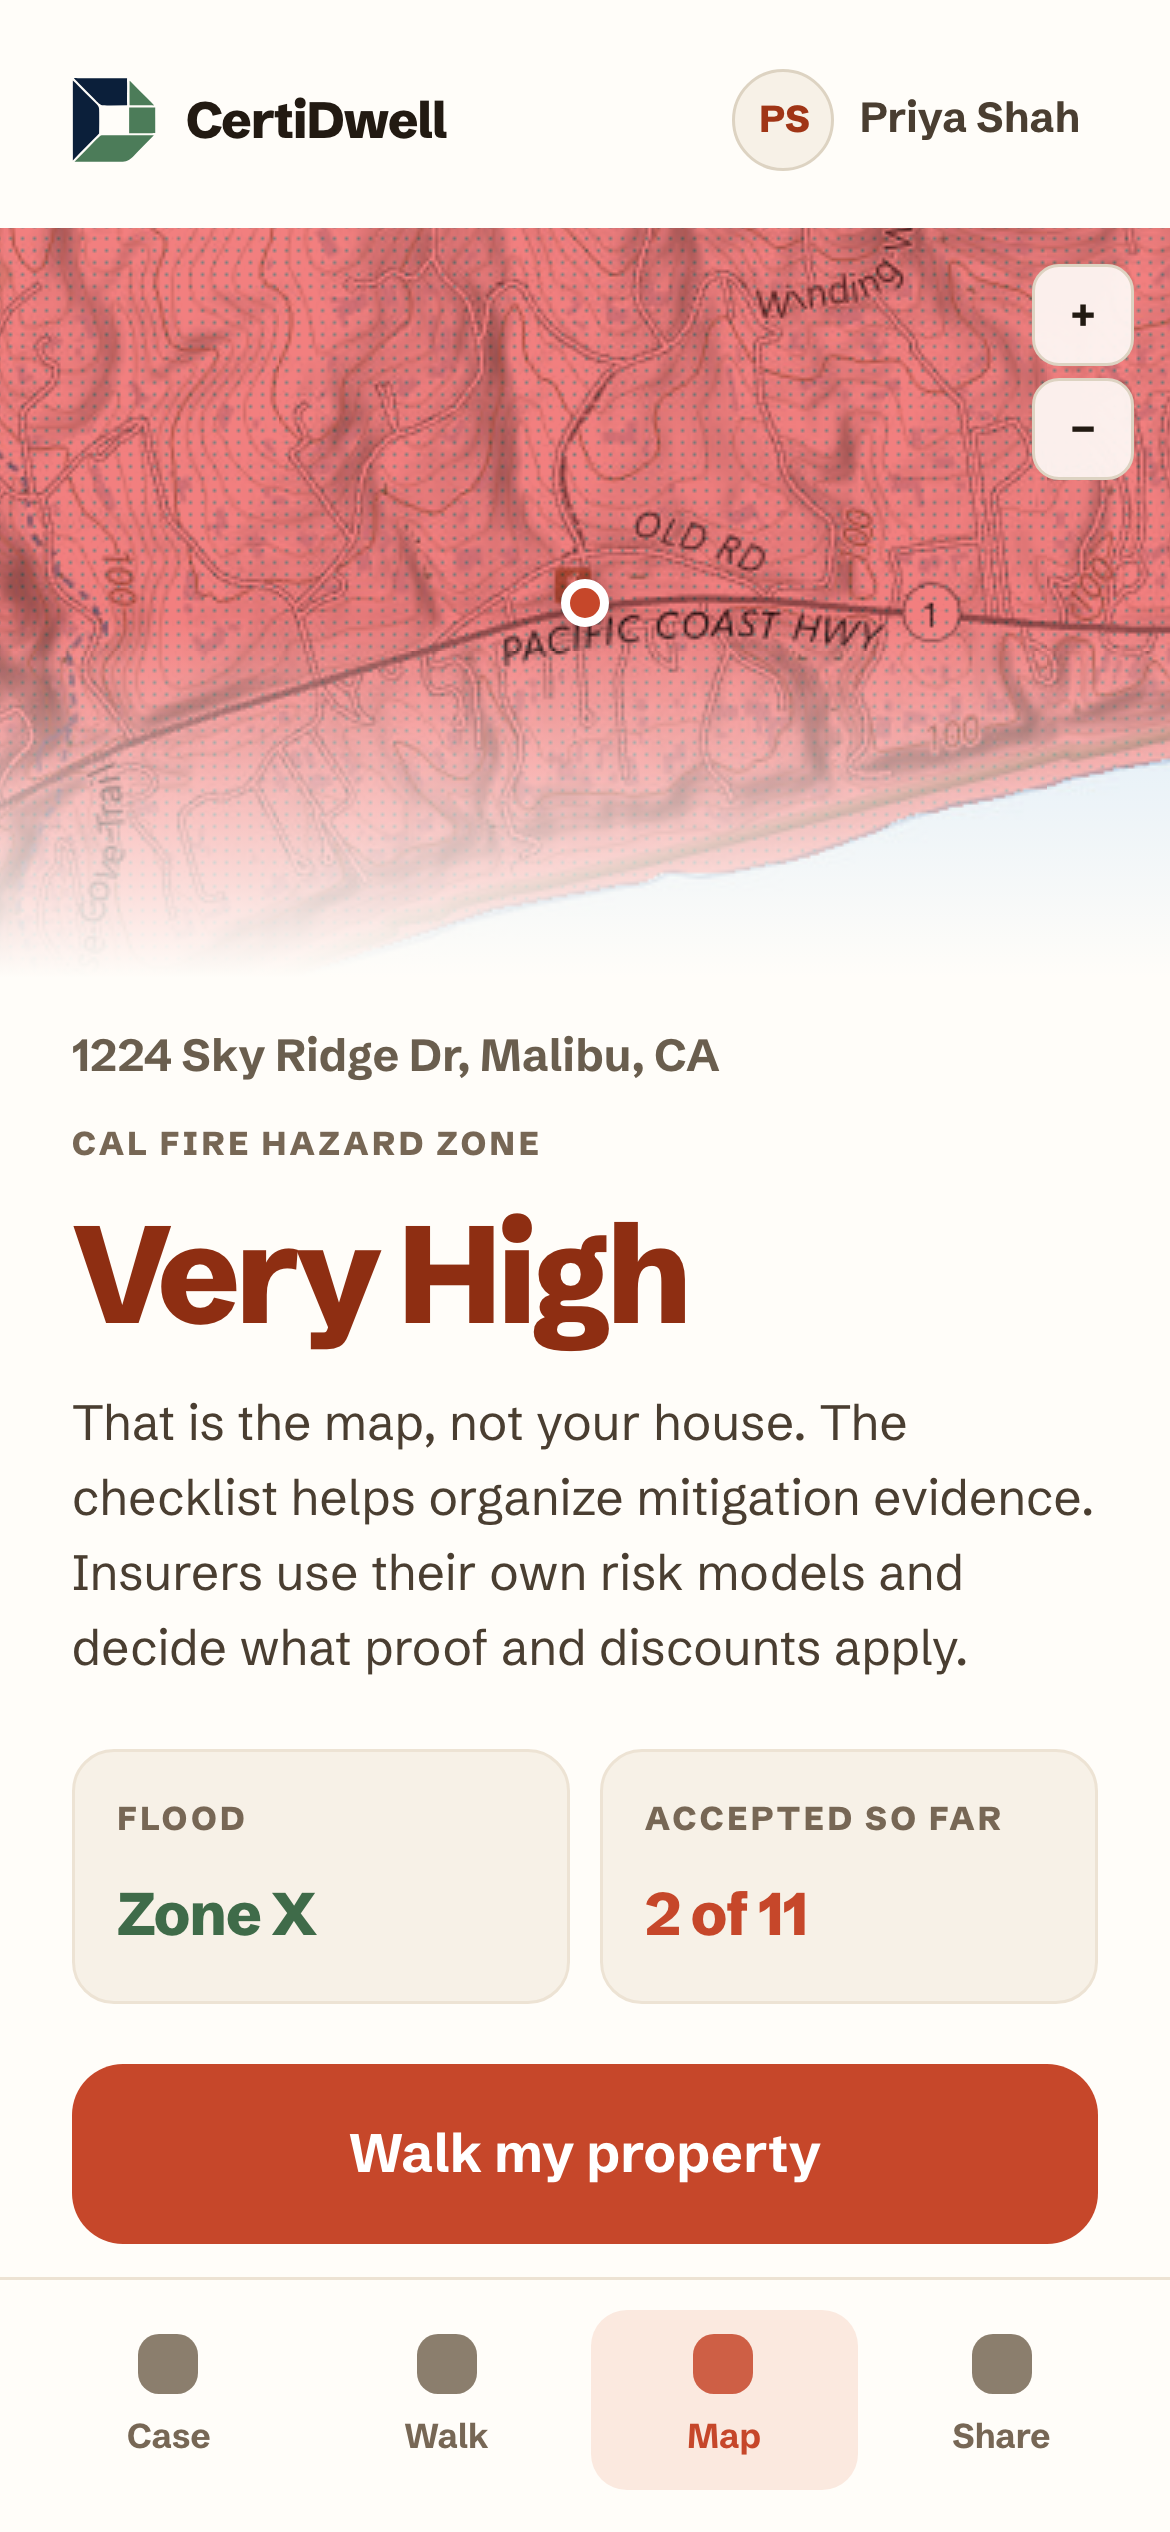
Your name at the top opens My properties, My records, Account and Log out. The full mitigation checklist with every document is still there, linked from the Case tab.
Public pages
The header on the public pages links to the wildfire hazard map by county, the eleven measures, who it's for, what it doesn't do, pricing and contact. The current section is underlined as you scroll. Five preparation guides and a fictional sample packet are linked from Read up first on the home page and need no account.
5. Properties — working together
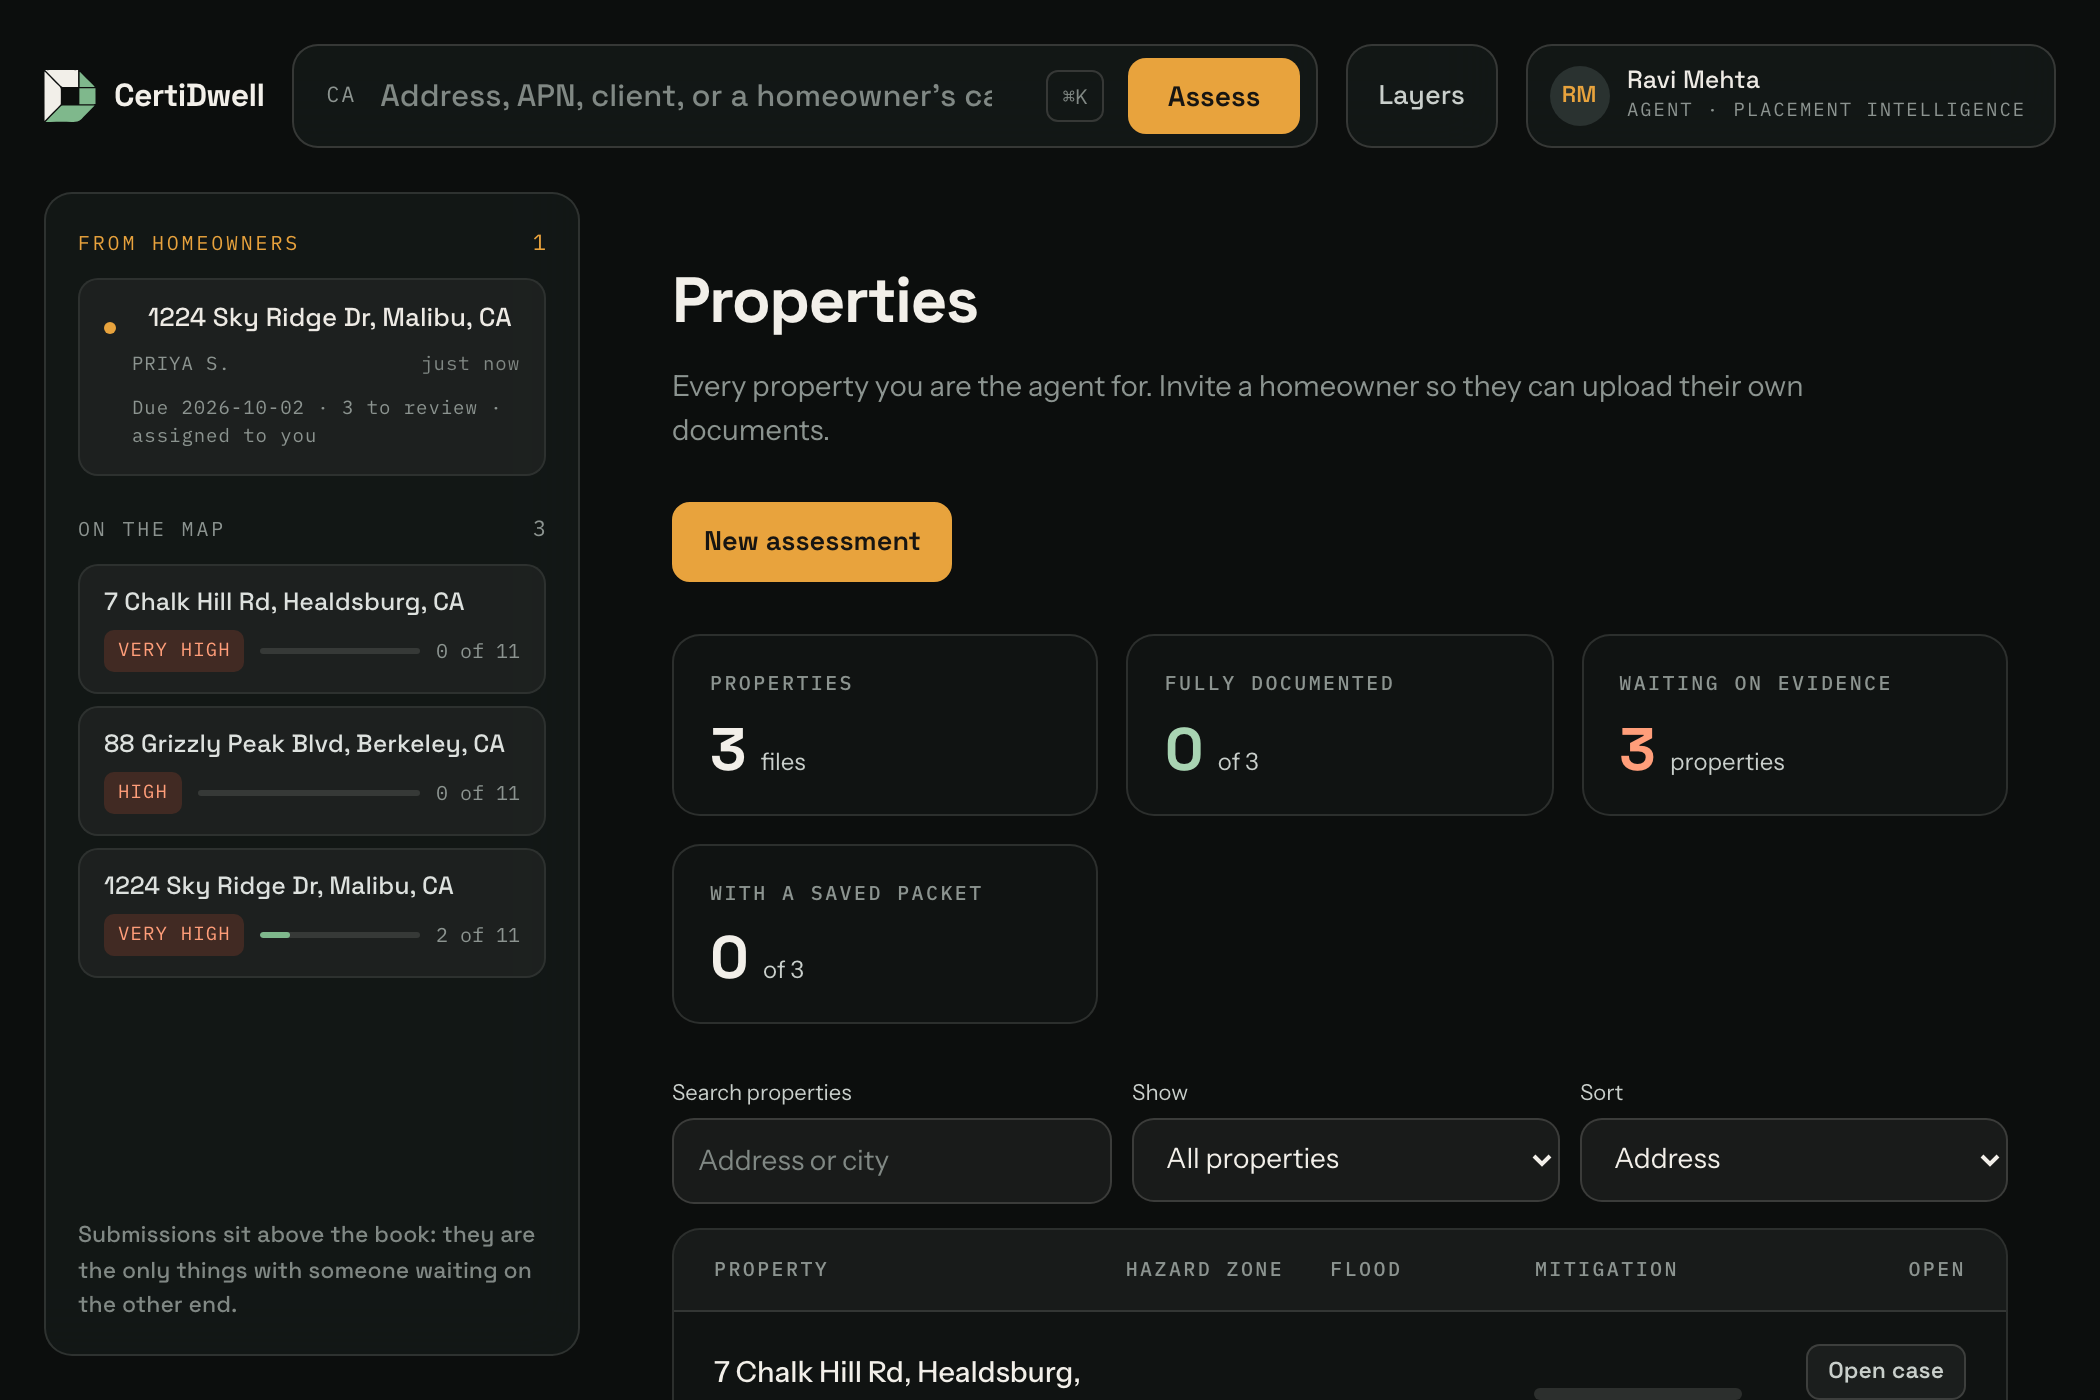
A property is one address, shared between the homeowner who owns it and the agent working it. Both see the same reports, packets and documents. Click Properties in the navigation.
Adding a property
Type the address into Add a property and submit. The fire and flood zones are looked up automatically, and you are added as its agent or homeowner depending on your account type. A homeowner's property is still created if the lookup fails, with the zones left blank until a report is run; an agent is asked to retry instead, so no credit is spent on a failed lookup.
Agents: one new address on the free trial. Adding or assessing a new address counts against the same allowance as a report (see section 11). Properties you already hold, and any property a homeowner invites you to, never count.
Two people can have the same address without seeing each other's files. If you enter an address someone else already has — a duplex, a missing unit number, another agent working the same lead — you get your own separate record. The only way to share a property is an invitation.
Inviting the other party
Open a property and use the invite form under People on this property.
| If you are the… | You can invite |
|---|---|
| Homeowner | An agent — one at a time. Also other homeowners (e.g. a spouse or co-owner). |
| Agent | Homeowners. You cannot invite another agent — only the homeowner chooses who represents them. |
The invitation is emailed as a single-use link that expires in 14 days. If email is not configured on your installation, the link is shown in the Pending invitations table — copy it and send it yourself. You can revoke a pending invitation at any time.
If the person you invite already has an account
That works — and a homeowner can hold as many properties as they own, so being invited to an additional one is entirely normal. It works — they do not need to register again. Opening the link while signed in takes them straight to the consent step. If they are signed out, the link sends them to sign in and then returns them to the invitation automatically.
An invitation only works for the address it was sent to. If you open a link while signed in as a different account, CertiDwell refuses it and offers to sign you out so the invited account can accept. This stops a forwarded link — or simply being signed in to the wrong account — from quietly putting the wrong person on someone's property. If the address is wrong, revoke the invitation and re-send it.
Accepting an invitation
- Open the link. It shows who invited you, the property, and the role.
- Sign in, or create an account — the role and email are filled in for you.
- Read and tick the consent statement, then click Accept invitation. You cannot join without it.
Why the consent tick matters. A homeowner's address and documents becoming visible to an agent is a real sharing decision, so it is never implied by signing up. What you agreed to, and when, is stored on the property in the Consent record — visible to everyone on it.
Changing agent, or removing someone
The homeowner can remove any participant, including the agent; an agent can only remove homeowners. Removal is immediate — the person loses access to the property, its documents and its packet snapshots straight away, and any open review request is closed with it. Once the agent slot is empty, the homeowner can invite a new one. Homeowners can also do this from the Share tab with Remove agent access.
What removal cannot do. A packet the agent already downloaded stays downloaded, and a share link issued to an underwriter is a separate thing — revoke those in the mitigation checklist under Share with an underwriter.
One agent per property, deliberately. Two agents can never see the same property at once, so your research is never visible to a competitor. If a homeowner wants to switch, the existing agent must be removed first.
Property details
Year built and square feet can be entered by hand. These are typed in, not pulled from county records — carriers often ask for them, so having them on the property saves a phone call.
Case overview — see the next handoff
For an agent or administrator, opening a property takes you to Case overview. This is the concise, source-backed view of the file: it connects the hazard record, mitigation proof, evidence packet and placement follow-through without replacing the detailed screens where that work happens. Use People & settings for invitations, participants and manually entered property details. A homeowner opening the same property sees the Doorstep Case tab instead — the same record, in the shared status words.
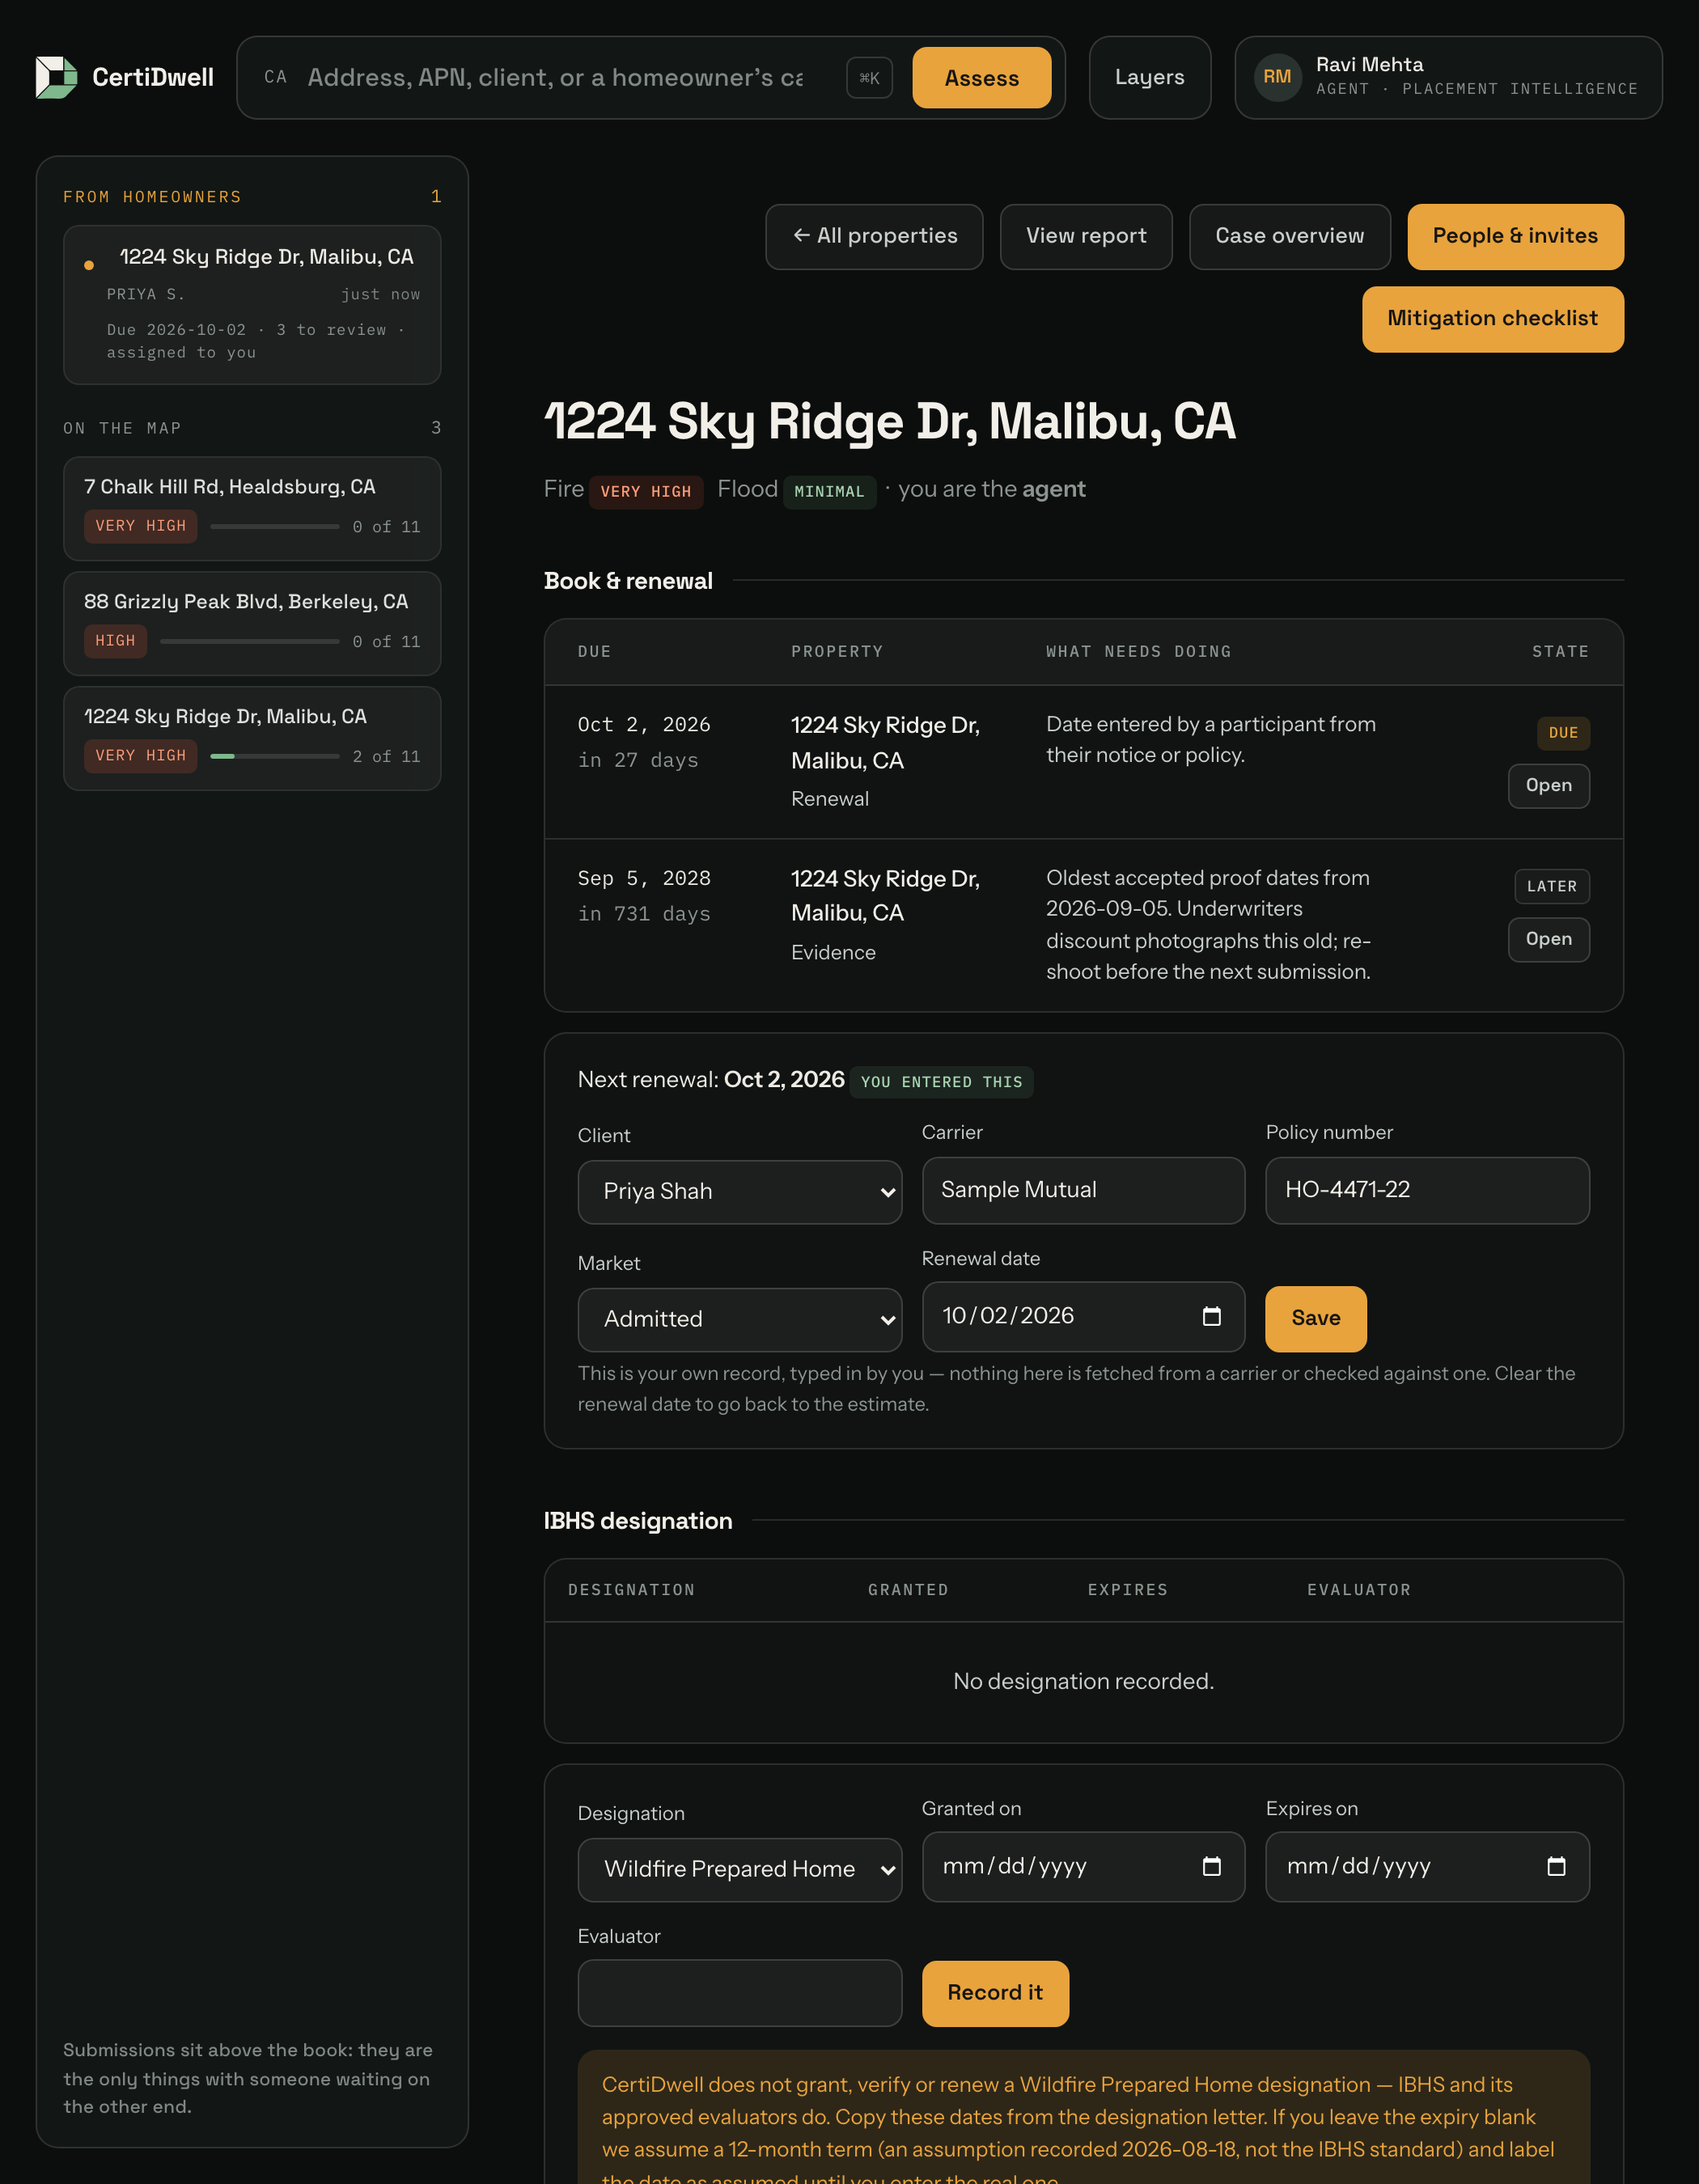
Renewal or non-renewal deadline
Both the case overview and the Doorstep case carry a Renewal or non-renewal deadline box. Enter the date from your notice or policy and whether it is a renewal or a non-renewal; leave it blank to clear it. This is a date you typed, not one verified with the insurer. Once a date is entered it takes precedence over any estimate the book would otherwise make, and it moves the case up the agent's rail.
Agents with a book of existing properties can enter dates in one go at /deadlines: a CSV with the header property_id,deadline,kind, dates as YYYY-MM-DD, kind renewal or non_renewal, up to 200 rows. Every row is checked first; one bad or unauthorised row rejects the whole import, so nothing is half-saved.
The page has four parts:
| Area | What it shows |
|---|---|
| Action path | The current sequence: saved hazard information, the next checklist action, the evidence packet and placement follow-through. The current action links to the screen where you complete it. |
| Why this matters | What the current record can support — for example, whether a saved packet exists or how many measures have accepted proof. It never promises coverage, eligibility, a discount or a renewal outcome. |
| Supporting sources | The saved assessment, uploaded documents and evidence-packet snapshots that support the view. Click Open source to inspect the underlying record. |
| Waiting on | The meaningful handoff: a homeowner needs to supply better proof, an agent needs to review a document, or an assessment needs to be run. If there is no active handoff, CertiDwell says so plainly. |
| Case activity receipt | A newest-first chronology of saved assessments, evidence uploads, proof-review decisions and evidence-packet snapshots. The receipt is assembled from saved records; it is not a separate editable narrative. |
When at least two assessments exist, Assessment change places the newest result beside the previous one. A change is a reason to inspect the public source and speak with the carrier; it is not proof that coverage or policy terms changed.
On the Properties page, search by address or city, filter by evidence state, and sort by address or checklist progress. These controls only change the current view; they do not alter case records.
The view adapts to your role. A homeowner sees their proof request and when an agent review is pending. An agent sees the same shared record, with their own review handoff highlighted. Administrators can inspect the same case record but do not gain new access through this screen.
The overview is a record, not a prediction. It uses only saved CertiDwell data. It does not invent a renewal date, infer a carrier requirement, or claim that a carrier will offer coverage. Open the linked source whenever you need the original document or assessment.
6. Generate a property report
- Put the cursor in the command bar at the top of the console (⌘K or Ctrl+K), or open the console with nothing selected.
- Type the address including city and state — for example
1224 Sky Ridge Dr, Malibu, CA. A ZIP code helps. An address already in your book opens that property instead of running a new report. - Click Assess. Addresses you have already looked up appear as chips when nothing is selected — those re-open the existing report by coordinates, so they never cost a report credit.
What a new address costs. The free agent trial includes one new property assessment. After that, a new address needs a report credit (pay-per-report) or a book-management or higher subscription, and you are sent to Pricing if you have neither. Re-opening any address you have already assessed is always free, whether by chip, by coordinates, or from a property page.
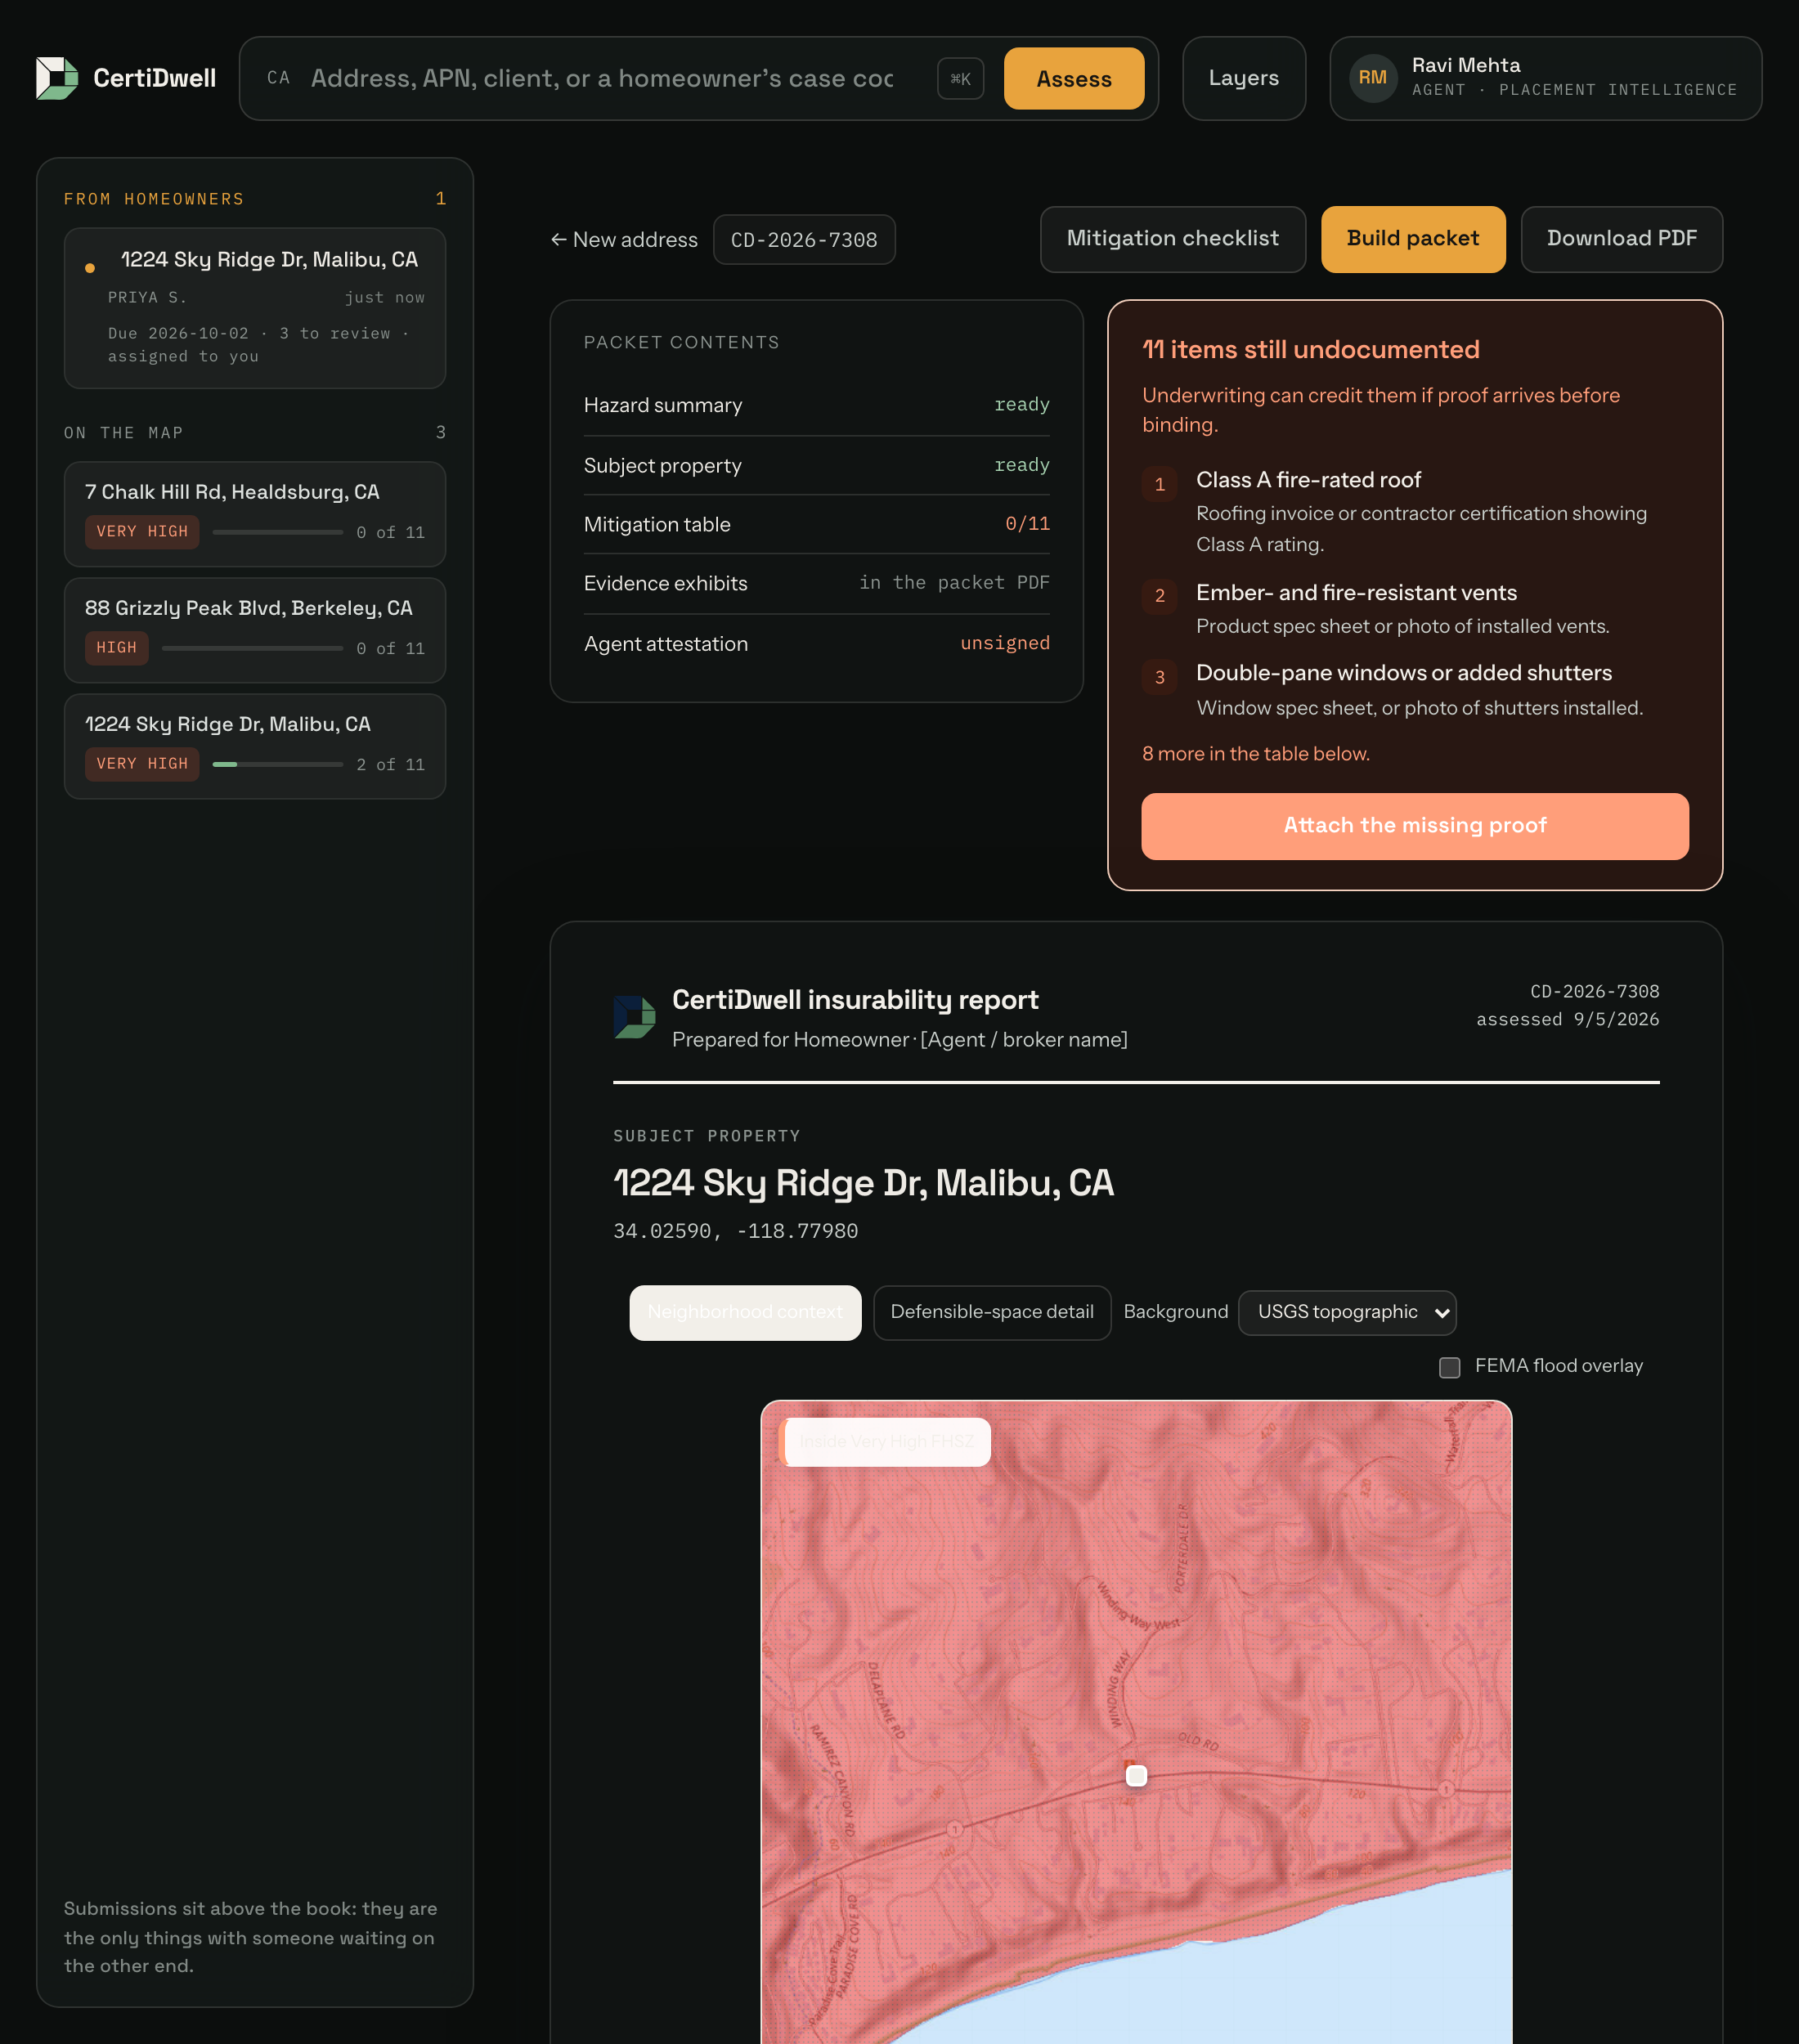
What is still open, at the top
Above the report itself sit the only two things you can act on: Packet contents, which lists what this document already carries and the state of each part, and beside it the count of measures still undocumented — with the first three named, what would evidence each one, and a button straight to where you attach it. When every measure has proof, that card inverts to confirm the packet is complete rather than sitting there empty.
The property maps
Inside the report, under the address, is a two-scale map. Neighborhood context shows the official hazard polygons around the wider area. Defensible-space detail zooms to the property point and adds the 5 ft, 30 ft and 100 ft distance guides. Choose a USGS topographic or imagery background and optionally add the FEMA flood overlay. A summary under the map states the saved fire classification, responsibility area, flood result and source edition.
CAL FIRE supplies the fire polygons, FEMA supplies the flood overlay and the U.S. Geological Survey's National Map supplies the background. CertiDwell requests all three through its own server. The public services receive the property coordinates needed to draw the map, but not your account identity or evidence files; the Privacy Notice explains this sharing.
The rings are distance guides, not a measurement of the parcel. They show where Zone 0, 1 and 2 fall around the geocoded point. They do not locate the building footprint or property line, are not a survey or site inspection, and say nothing about what has actually been cleared. What has been cleared is the checklist's job, evidenced by dated photos.
An empty official layer is never left unexplained: the map distinguishes a mapped polygon, no polygon at the point, a California lookup that was not performed and an unavailable service. If FEMA does not respond after its automatic retry, CertiDwell still generates the CAL FIRE report and checklist with a prominent Flood lookup needs a retry notice. Rerun the assessment before relying on the flood result.
The reference number
Every report carries a reference like CD-2026-A3F1, shown in the toolbar, in the printed header, and as a column under My records. It is derived from the saved assessment, so re-opening the same property produces the same reference — a packet an underwriter already has never gets renumbered. Quote it when someone asks which report you mean.
What the report contains
| Section | What it tells you |
|---|---|
| Fire Hazard Severity Zone | CAL FIRE's official rating for the location |
| FEMA flood zone | The federal flood rating and its risk level |
| Coordinates | The exact point that was looked up |
| Mitigation checklist | Every Safer from Wildfires measure, grouped into structure, immediate surroundings, and whole community |
| Signature block | For the homeowner and the agent |
The three buttons at the top
- ← New address — start over with a different property
- Build evidence packet — continue to step 2
- Download PDF — opens your browser's print dialog; choose "Save as PDF"
Tip. If an address will not resolve, you can look a property up by coordinates instead: /api/assess?lat=34.05&lng=-118.75&format=html
7. The mitigation checklist — gathering proof over time
Documents rarely arrive in one sitting. The mitigation checklist is a living workspace for a property: either party uploads proof as it becomes available, nothing is lost between visits, and you generate a packet only when you are ready. Open it from a property with Mitigation checklist.
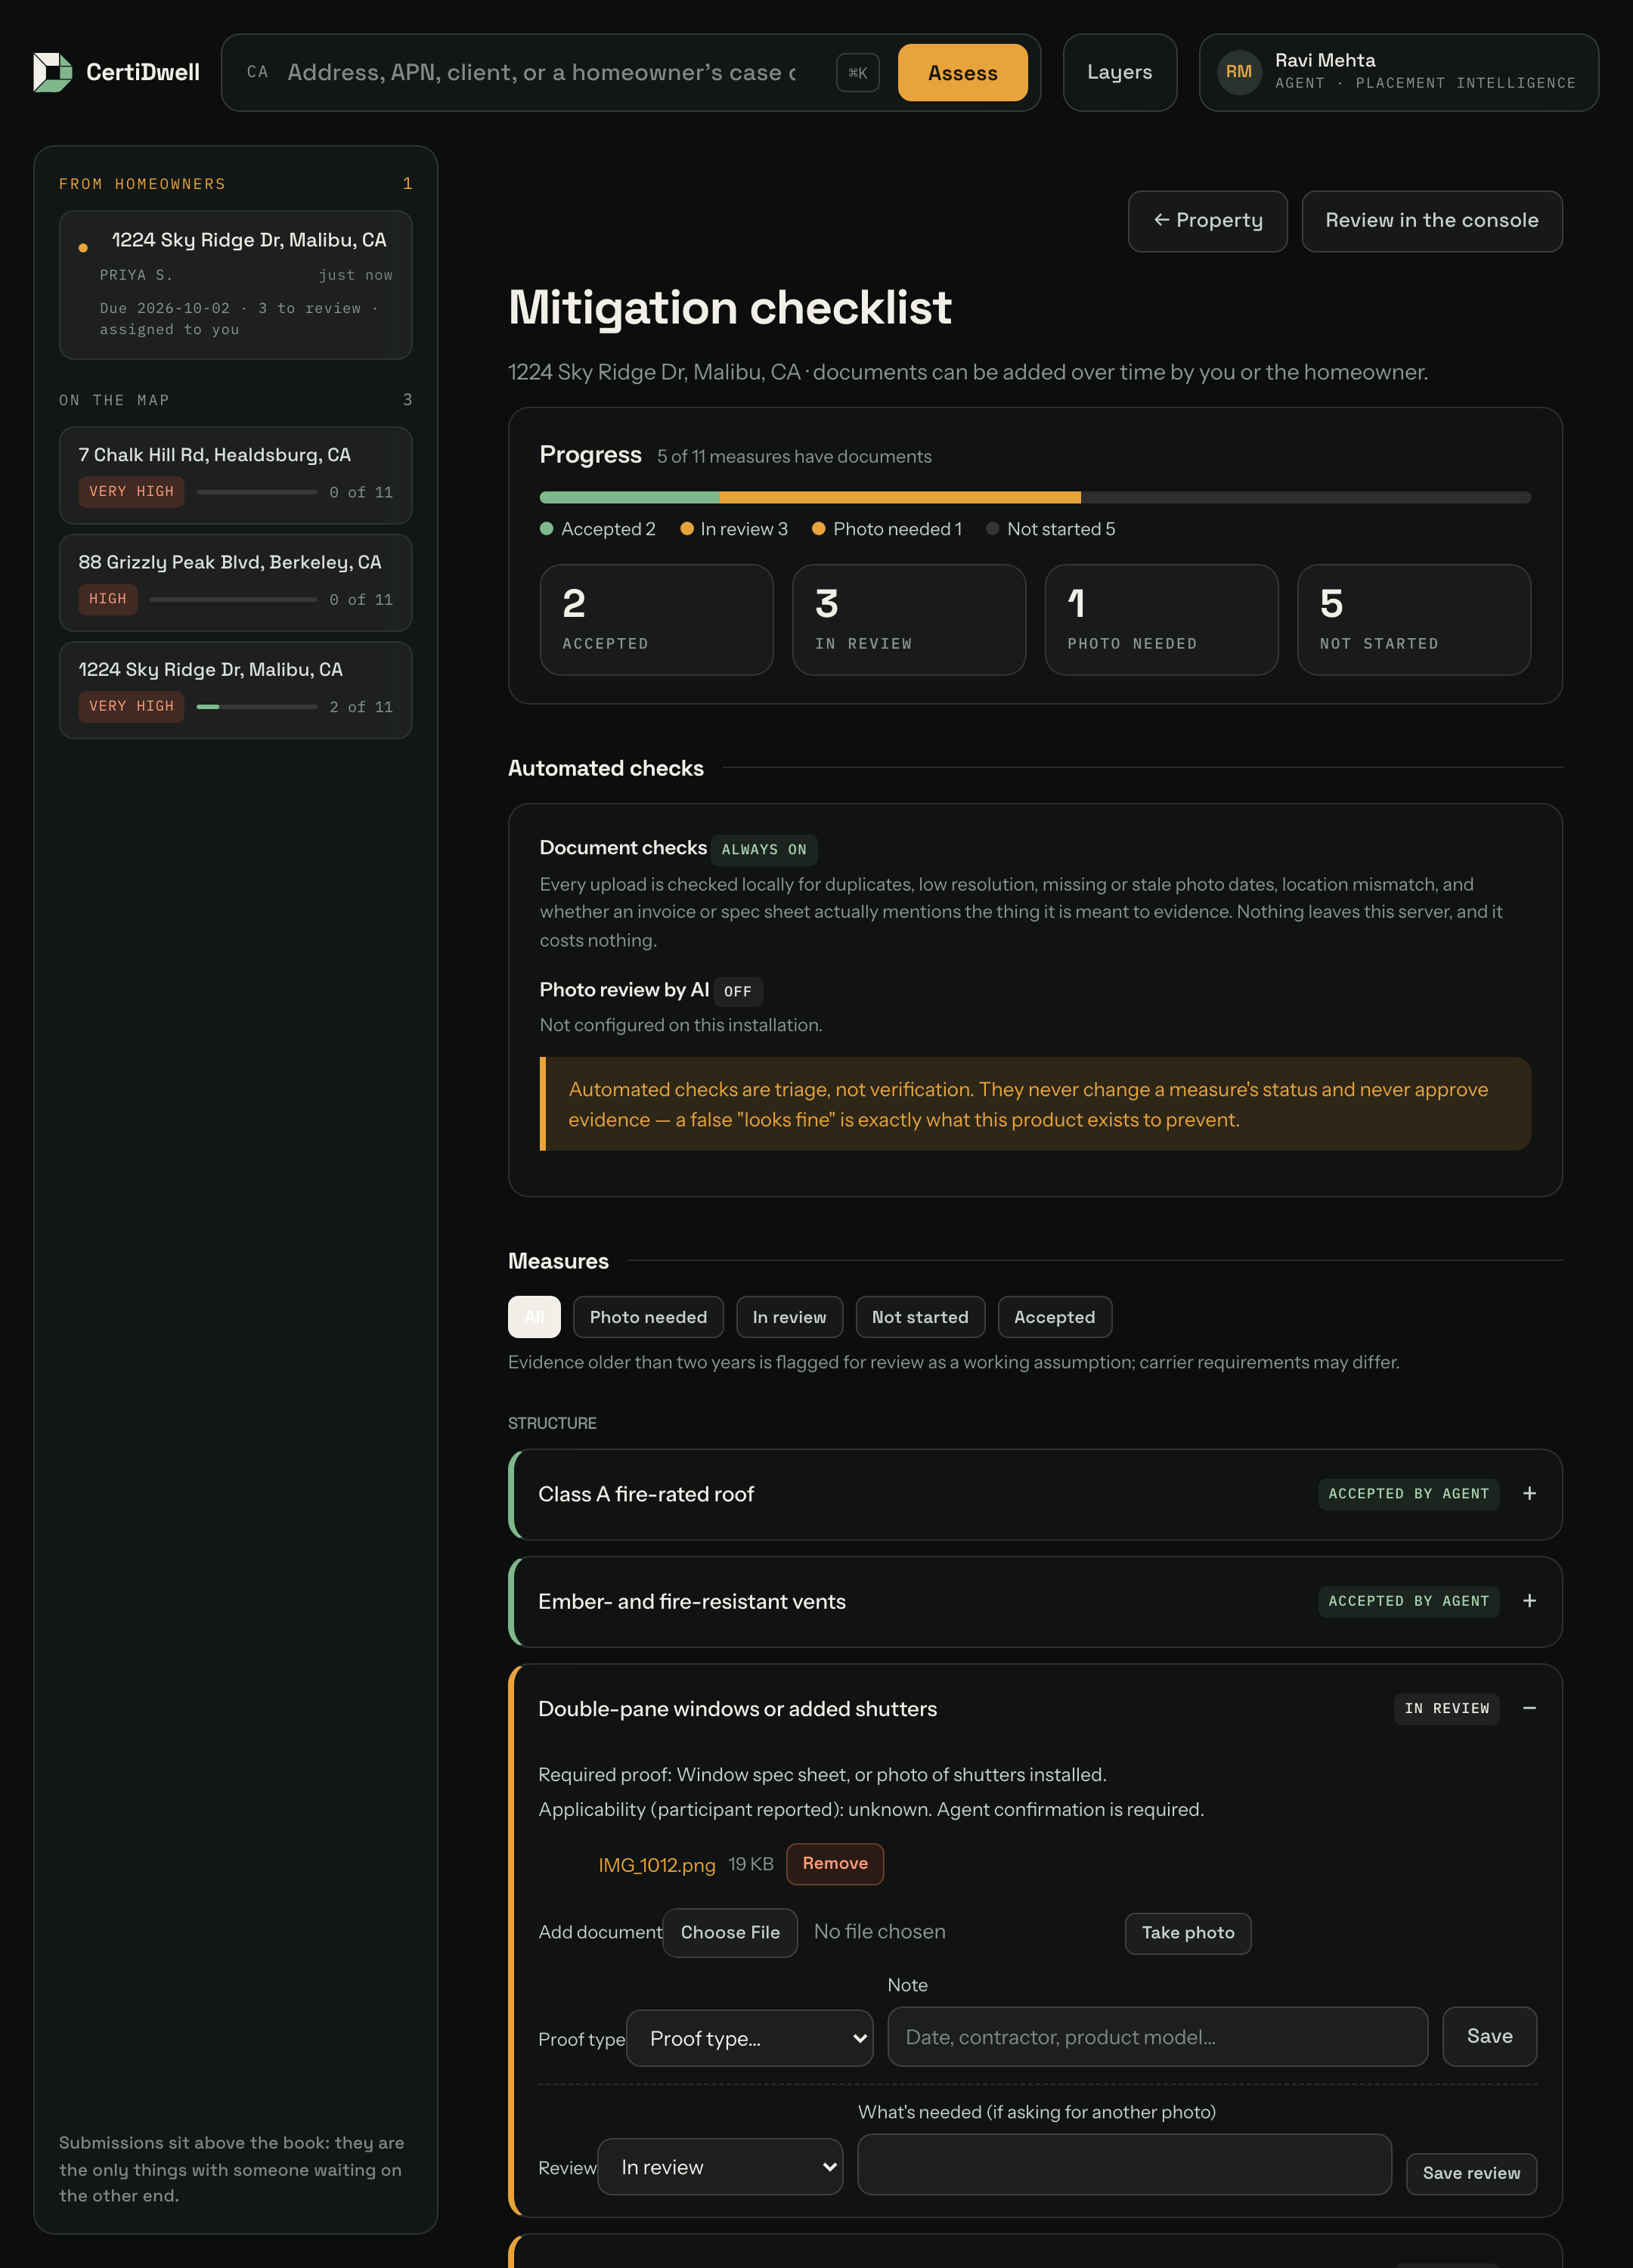
Progress at a glance
The bar and counters show where the property stands. Every measure sits in one of four states:
| Status | Meaning |
|---|---|
| Accepted by agent | The agent reviewed the proof and is satisfied. This is the agent's review, not the insurer's decision |
| In review | A document is attached, awaiting the agent's review. Uploading new evidence on an accepted measure returns it here |
| More proof needed | The agent looked and asked for something specific; their note says what |
| Not started | Nothing attached yet |
The same four words appear on the homeowner's phone, in the agent's console and on this page, so nobody has to translate.
A homeowner can also record whether a measure applies to the property — I don't know yet, Applies, or Not applicable with a reason. "Not applicable" is a participant's statement and is shown as such; the agent confirms it, and community measures (Firewise USA, Fire Risk Reduction Community) are counted separately from the property's own measures because no single homeowner can complete them alone.
Adding a document
Under any measure: choose the file (JPG, PNG or PDF, one at a time), pick the proof type, add an optional note, and click Save. It is stored immediately — there is no "generate" step to reach first, and you can close the page and come back tomorrow. Uploading moves the measure to In review automatically, even if it had already been accepted: new evidence is always reviewed again.
The walk (homeowners)
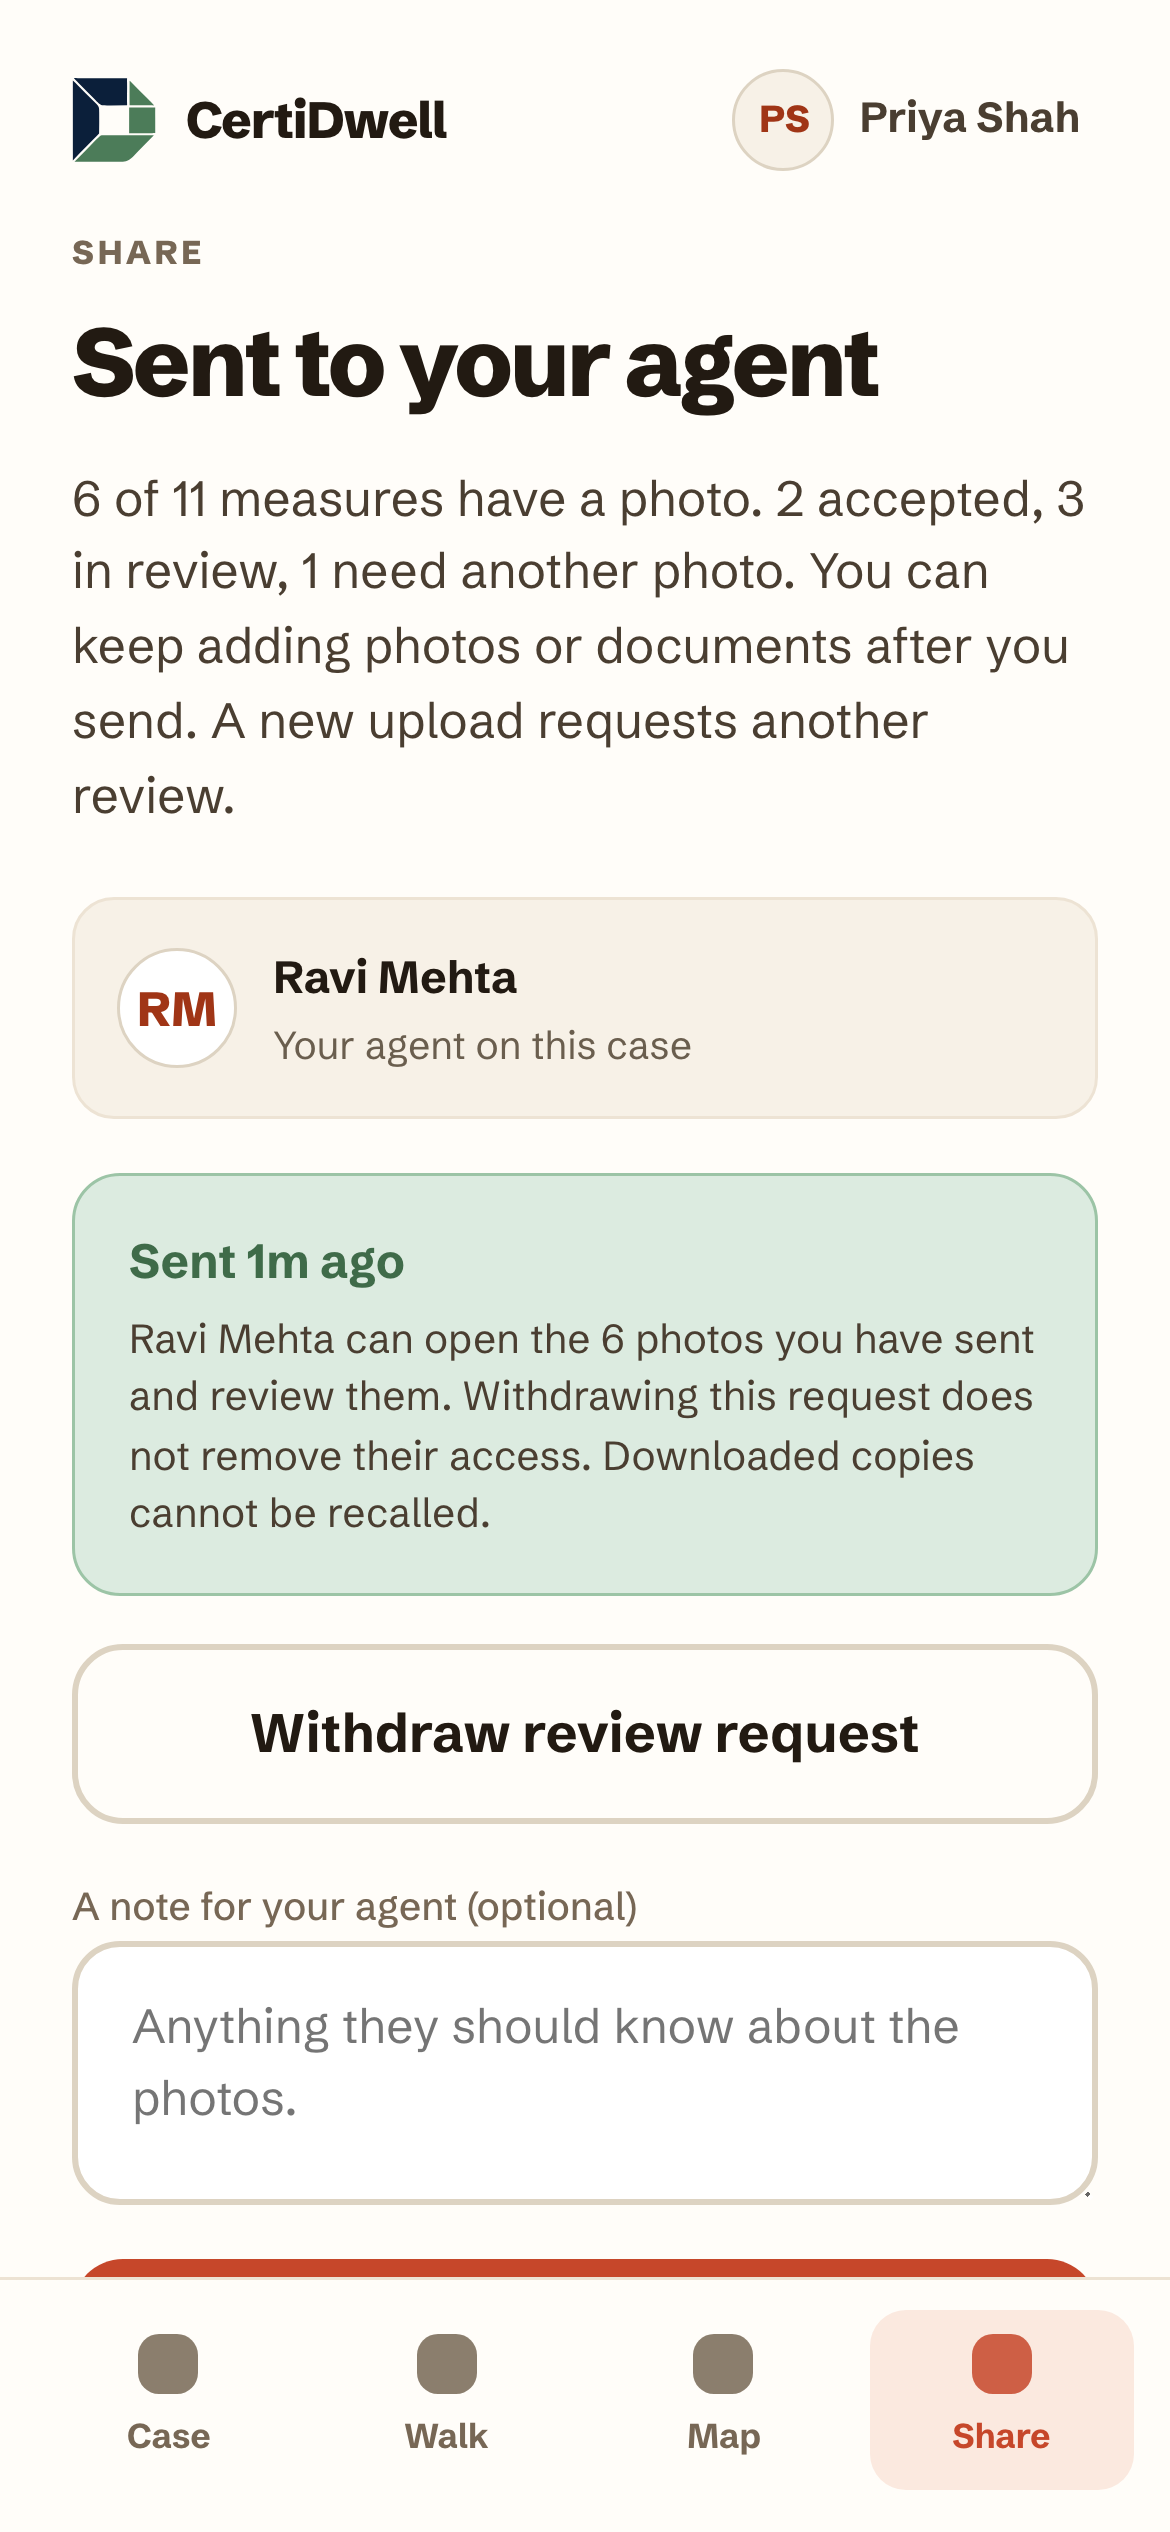
On a phone the easier way in is the Walk tab. It shows one measure per screen: where to stand, what to get in frame, and a shutter button that opens the phone's own camera, so the date and location the camera records travel with the photo. Below the shutter you can instead upload an original document or existing image — the roofing invoice, the vent specification — which is better evidence than a photo of it. Say whether the measure applies, add a note, and Save & next. Skip moves on without saving; the walk always resumes at the next measure that is still unresolved, so you can stop and come back. The last stop lands on Share.
Measures are collapsed by default so a phone screen presents one focused task at a time; items awaiting review or better proof open automatically. Use the status buttons above the list to show only the work that matters now. Evidence older than two years receives Refresh suggested as a conservative working assumption. The carrier's actual freshness requirement controls.
Tracking a wildfire classification appeal
From Case overview, open Classification appeal when a policyholder or applicant disputes an insurer's wildfire risk score or classification. Record the date received, insurer, policy or application reference, current and requested classification, and supporting notes. Sensitive insurer, reference and notes fields are encrypted at rest.
For an assigned agent, the page calculates a forwarding target five days after receipt. Once forwarding is recorded, it shows the 30-day insurer response target described in California Department of Insurance guidance. The agent can record the response and outcome; every transition is written to the audit log. These are workflow prompts, not legal advice or a guarantee that a classification will change. Verify current requirements for the case and keep supporting evidence in the checklist.
Automated checks on every upload
Each document is checked automatically as it arrives, and the result appears as a chip underneath it. These are suggestions for triage — they never change a measure's status and never approve anything. The agent still decides.
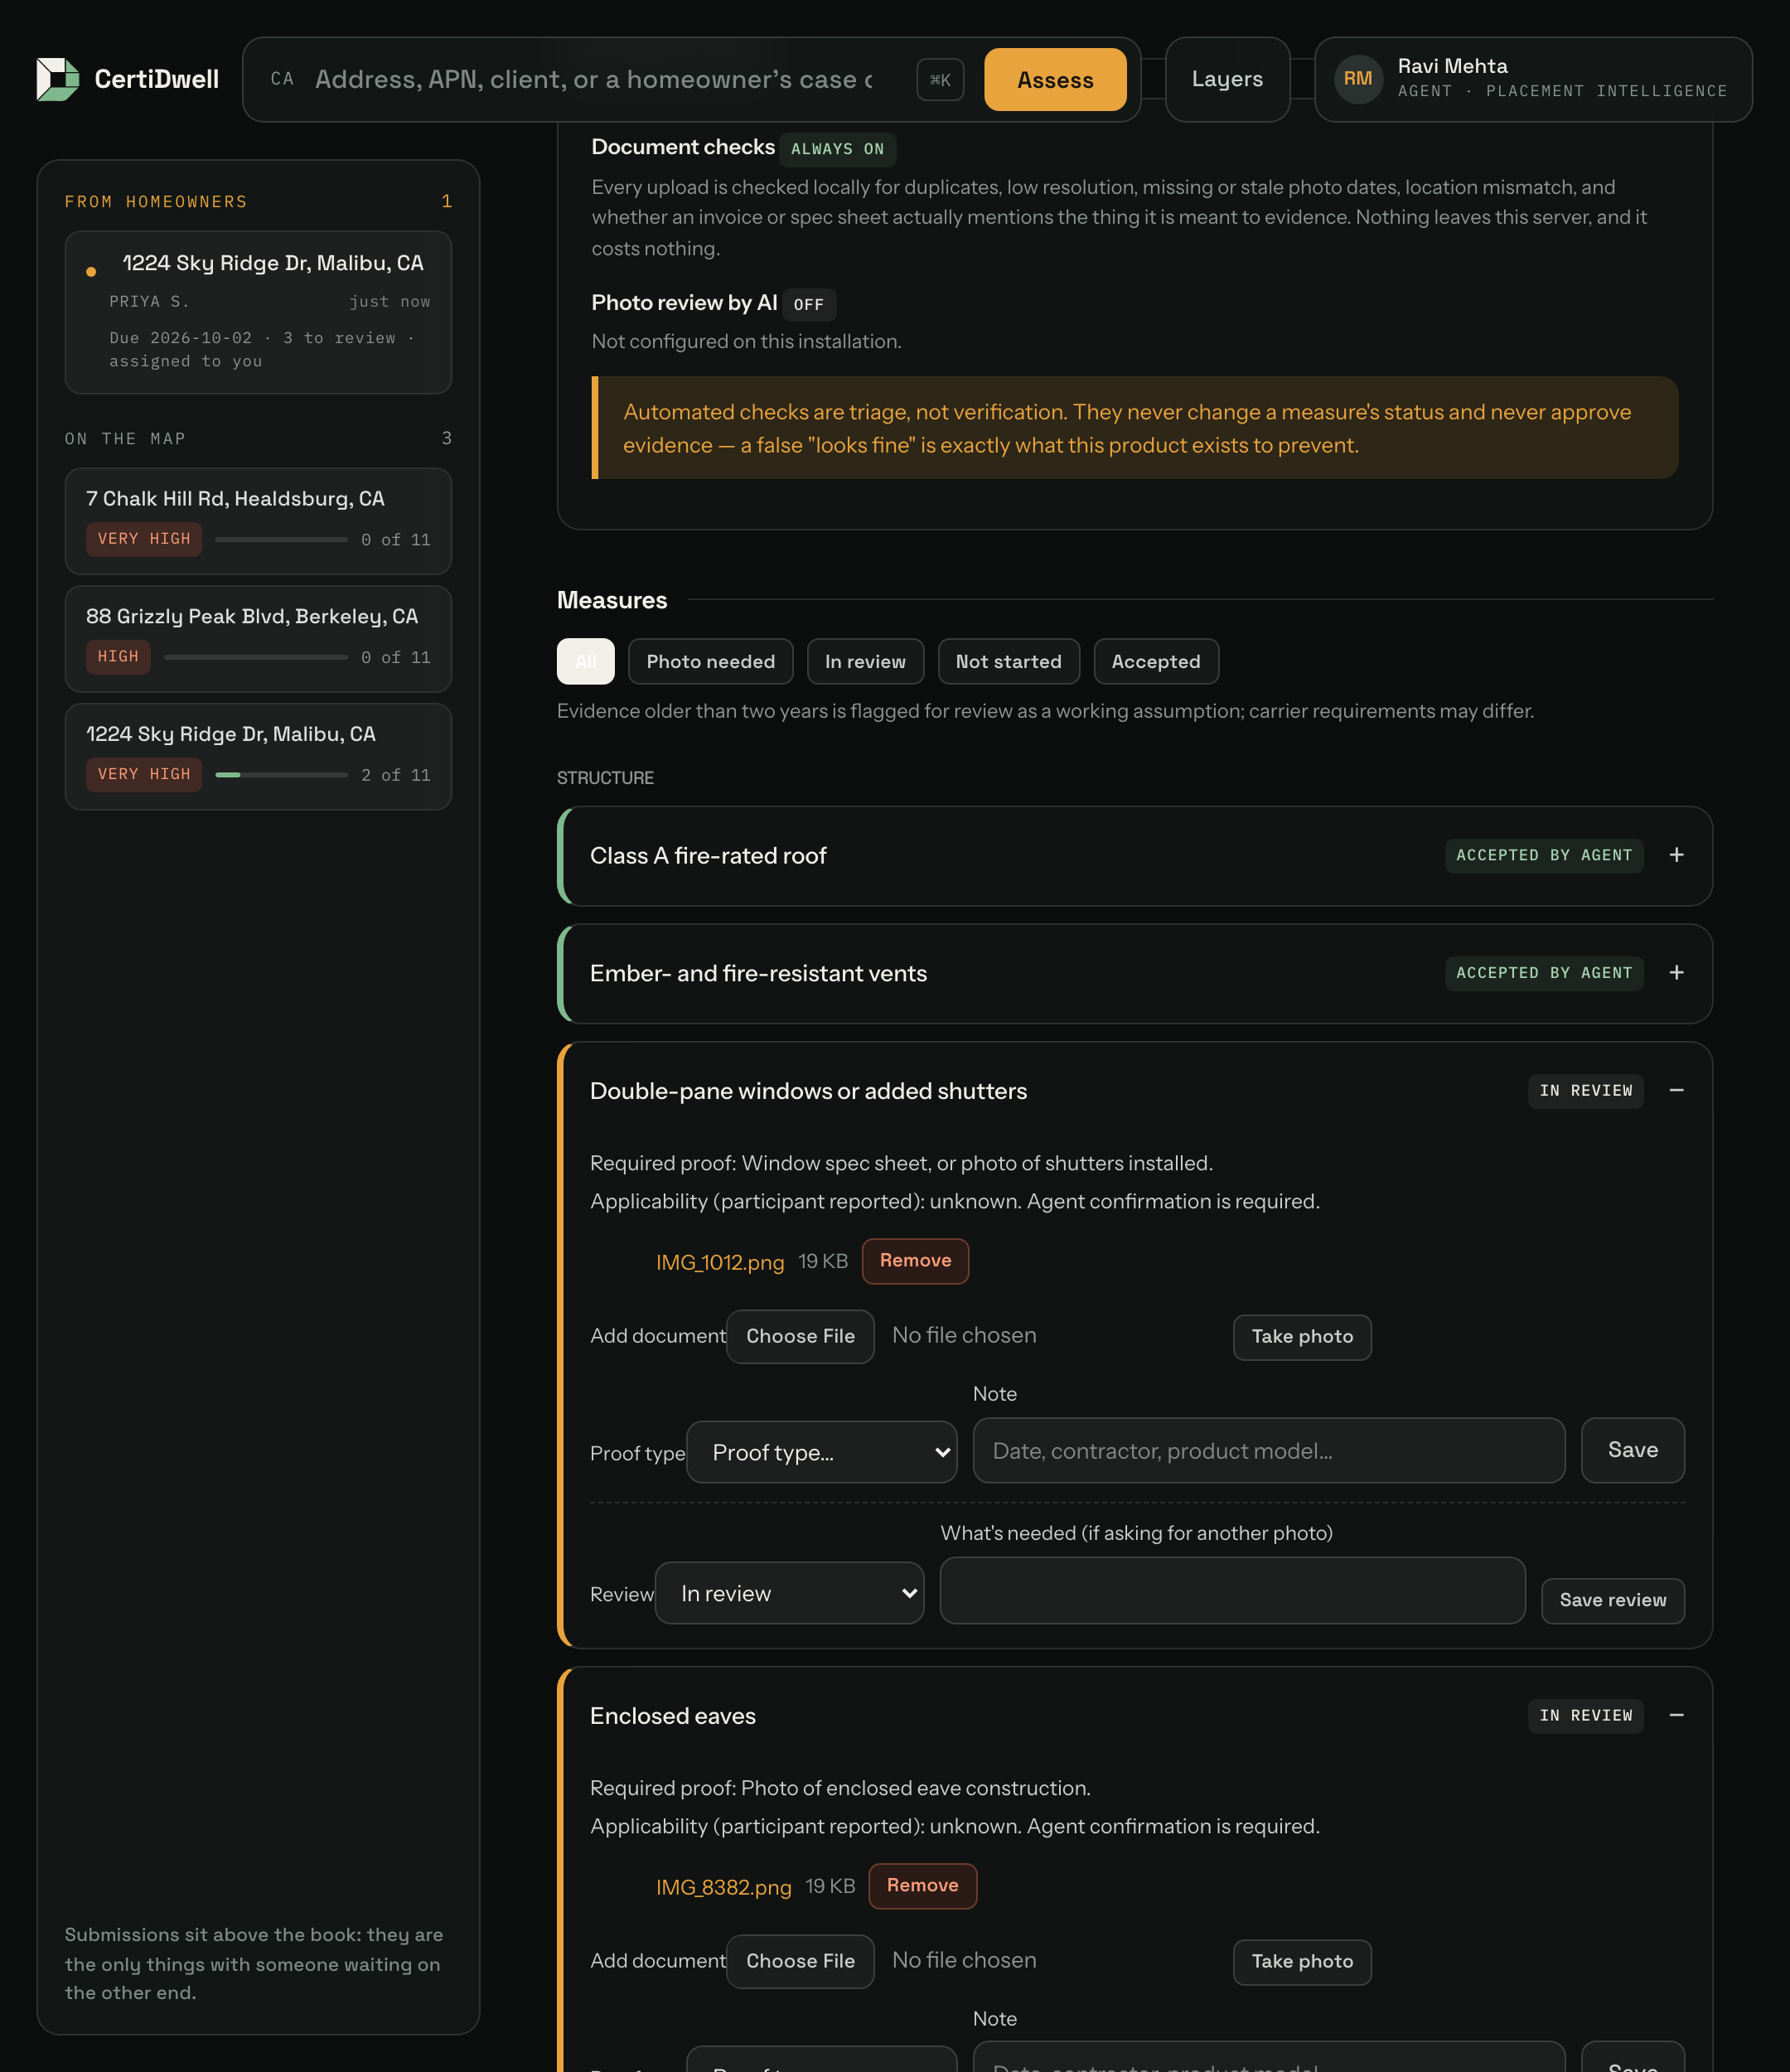
| Layer | What it does | Availability |
|---|---|---|
| Document checks | Duplicate detection, low resolution, missing or stale photo date, photo taken far from the property, and whether an invoice or spec sheet actually mentions the thing it is meant to evidence. Photographed documents are read with local OCR, so a snapped invoice gets checked too | All plans, always on |
| AI photo review | Sends photos to an AI service, which suggests whether the image plausibly shows the measure and what to re-shoot | Paid plans, opt-in per property |
Document checks run entirely on the server — nothing leaves it, and there is no cost. They catch a surprising amount: the same photo attached to five measures, a screenshot with no capture date, a photo taken two years ago, or a roofing invoice filed under "vents" that never mentions embers.
Turning on AI photo review
On a paid plan, open the Automated checks panel and tick the consent statement. It applies to one property at a time, is recorded in that property's consent record, and can be switched off whenever you like. Document checks keep running either way.
If the service has not yet been enabled by the administrator, this option is hidden. That does not prevent evidence collection or review: the free local document and OCR checks continue, uploads remain available, and the agent reviews every item. AI Photo Review is an optional triage aid, not a requirement for producing a report or placement packet.
What it is not. A suggestion is not verification. The AI can be wrong about a photo, and a false "looks fine" is exactly the failure this product exists to prevent — so it can never mark a measure accepted. When the service is unavailable the document is simply left unassessed; uploads are never blocked.
When you agree or disagree with a suggestion, click Yes or No. That is how we measure whether the checks are actually worth trusting.
Reviewing (agents only)
Review from the console's panel or from this page; both write the same record. Each item shows the photo or document, the capture date and whether the camera recorded a GPS position (NO GPS is shown in red because it is the first thing an underwriter will question), and two buttons. Accept marks it accepted by you. Ask again needs a one-line note saying what you need; the note is emailed to the homeowner and shown on their walk and case screens. Applicability the homeowner reported is shown beside the item for you to confirm; it never accepts anything on its own.
Accept all & build packet accepts every item that is in review and has a file, then freezes the folder into a hashed packet snapshot — the same snapshot Generate packet makes. You tick a box first confirming you reviewed the pending documents; the tick records your evidence review, not insurer approval. Measures that still need proof, or were never started, are left as they are and stay in the packet as open.
Sending it to your agent (homeowners)
Open the Share tab and tap Send to my agent, with a note if you like. This emails your agent and puts the case at the top of their rail. It is a request for review, not a grant of access: your agent could already see the property from the moment they accepted the invitation. Withdraw review request takes the request back and nothing else; Remove agent access ends their access to the property, its documents and its snapshots. You can keep adding photos after sending — each new upload asks for another look.
If you have no agent yet
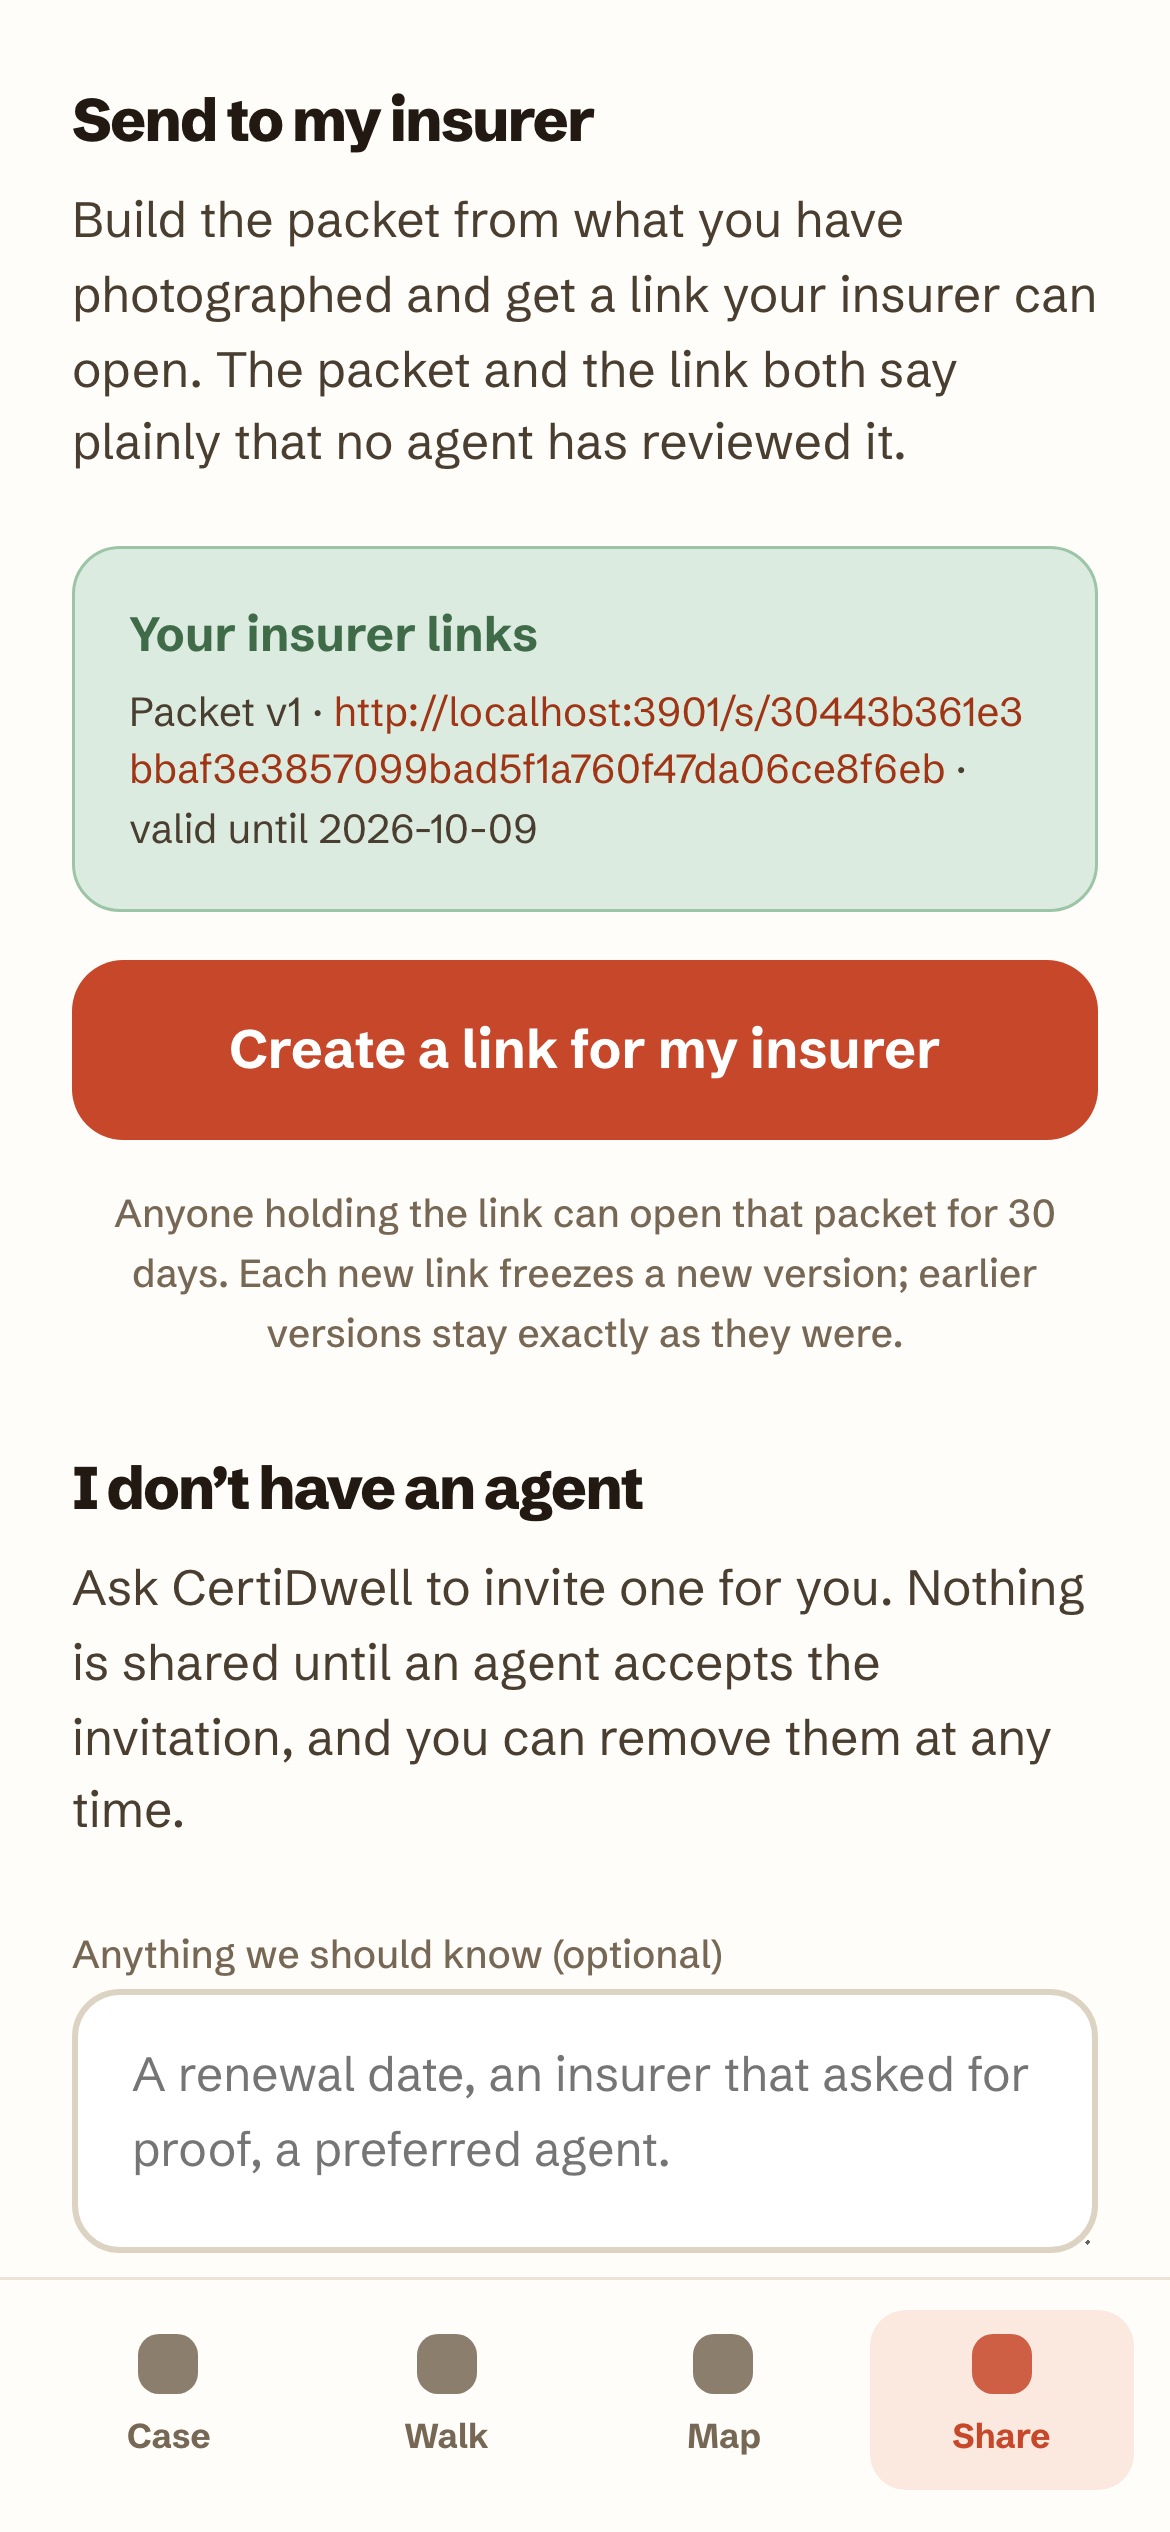
Until an agent has accepted your invitation, Send to my agent stays disabled. The Share tab then offers two ways forward:
- Send to my insurer. Tap Create a link for my insurer and CertiDwell freezes your folder into a packet, exactly as an agent's Generate button would, and gives you a link that needs no account. The packet's cover and the link's page both say Homeowner attested, not agent reviewed, so nobody can mistake your own record for an agent's review. Each new link freezes a new version; earlier ones stay as they were, and every link expires after 30 days.
- I don't have an agent. Tap Ask CertiDwell to find an agent, with a note if you like. CertiDwell invites an agent to your case with the same invitation you could have sent yourself. Nothing is shared until that agent accepts and consents; when they do, they appear on the Share tab and you can send to them, and you can remove their access at any time.
If the agent does not respond
- An invited agent who never accepts. The Share tab shows Agent invited and how long ago. Invitations last 14 days; if it lapses, the ask reappears and you can request again. You can send to your insurer at any point in between.
- An agent who never reviews what you sent. After a week with no reply, CertiDwell emails your agent once to say you are waiting, and the Share tab says so and offers Send to my insurer alongside your agent. The packet's cover then states how many measures your agent accepted, and that the rest are your own record. You can also Remove agent access and ask CertiDwell for another agent.
Attestation — replacing the blank signature line
Each party attests separately, to different things:
| You are the… | You attest that… |
|---|---|
| Homeowner | The work described is in place at your property and your documents are true records of it. |
| Agent | You assembled the packet from documents the homeowner provided and reviewed them for completeness. Not that the work was done — you did not inspect it. |
Attesting prints a dated record in the packet in place of an empty signature line. Anyone who has not attested still gets a printed line, so wet-ink signing remains possible.
An attestation records who asserted what, and when. It is not a verification by CertiDwell, and some insurers will still require their own signed forms.
Generating a packet
Click Generate packet. This creates an immutable snapshot — version-numbered, with a SHA-256 content hash — while the folder itself stays editable. Add more documents later and generate v2; v1 is untouched, so you always know exactly which version went to which carrier.
Sharing with an underwriter
Next to any packet version, click Share link. That produces a read-only web link, valid 30 days, that needs no account — the underwriter opens it in a browser.
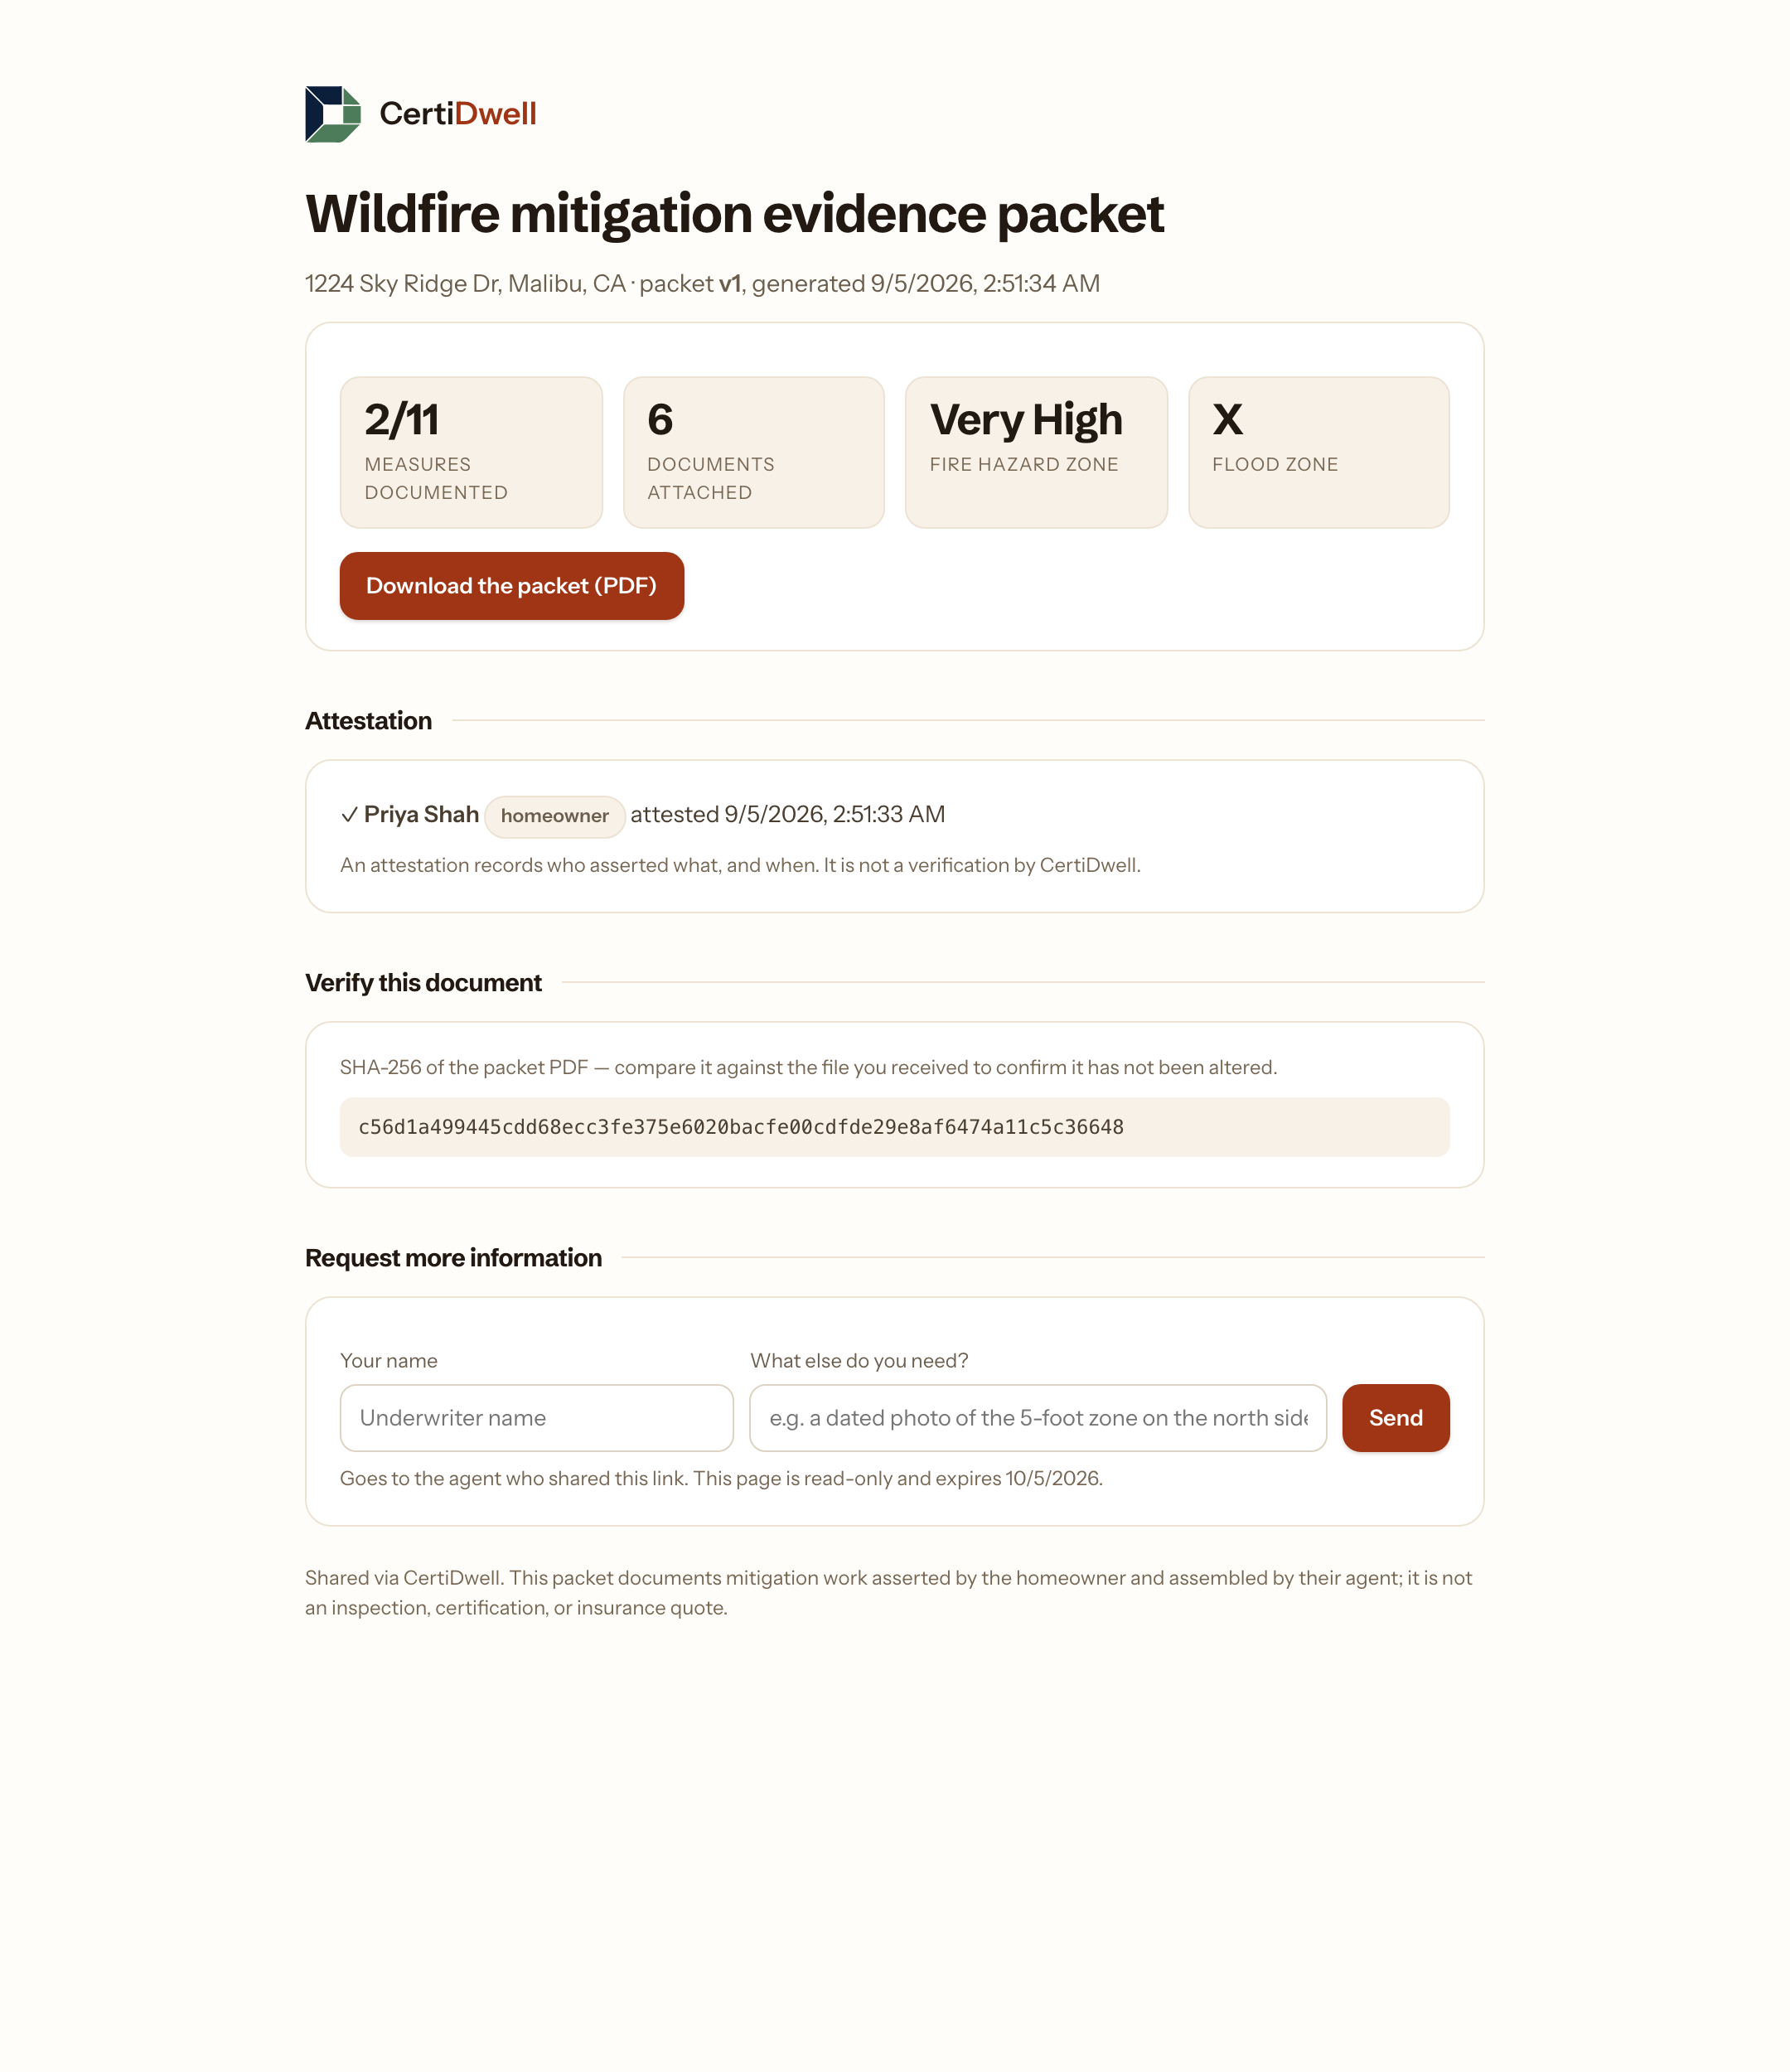
Comments they leave come back to you in the folder under Underwriter comments. You can revoke a link at any time, which kills it immediately.
Treat a share link like a password. Anyone holding it can view that packet until it expires or you revoke it.
8. Build the evidence packet (single-sitting flow)
The original one-shot flow is still available from a report via Build evidence packet — useful when you already have every document to hand. For anything gathered over time, prefer the mitigation checklist above.
This produces the document you actually hand to underwriting. From the report, click Build evidence packet.
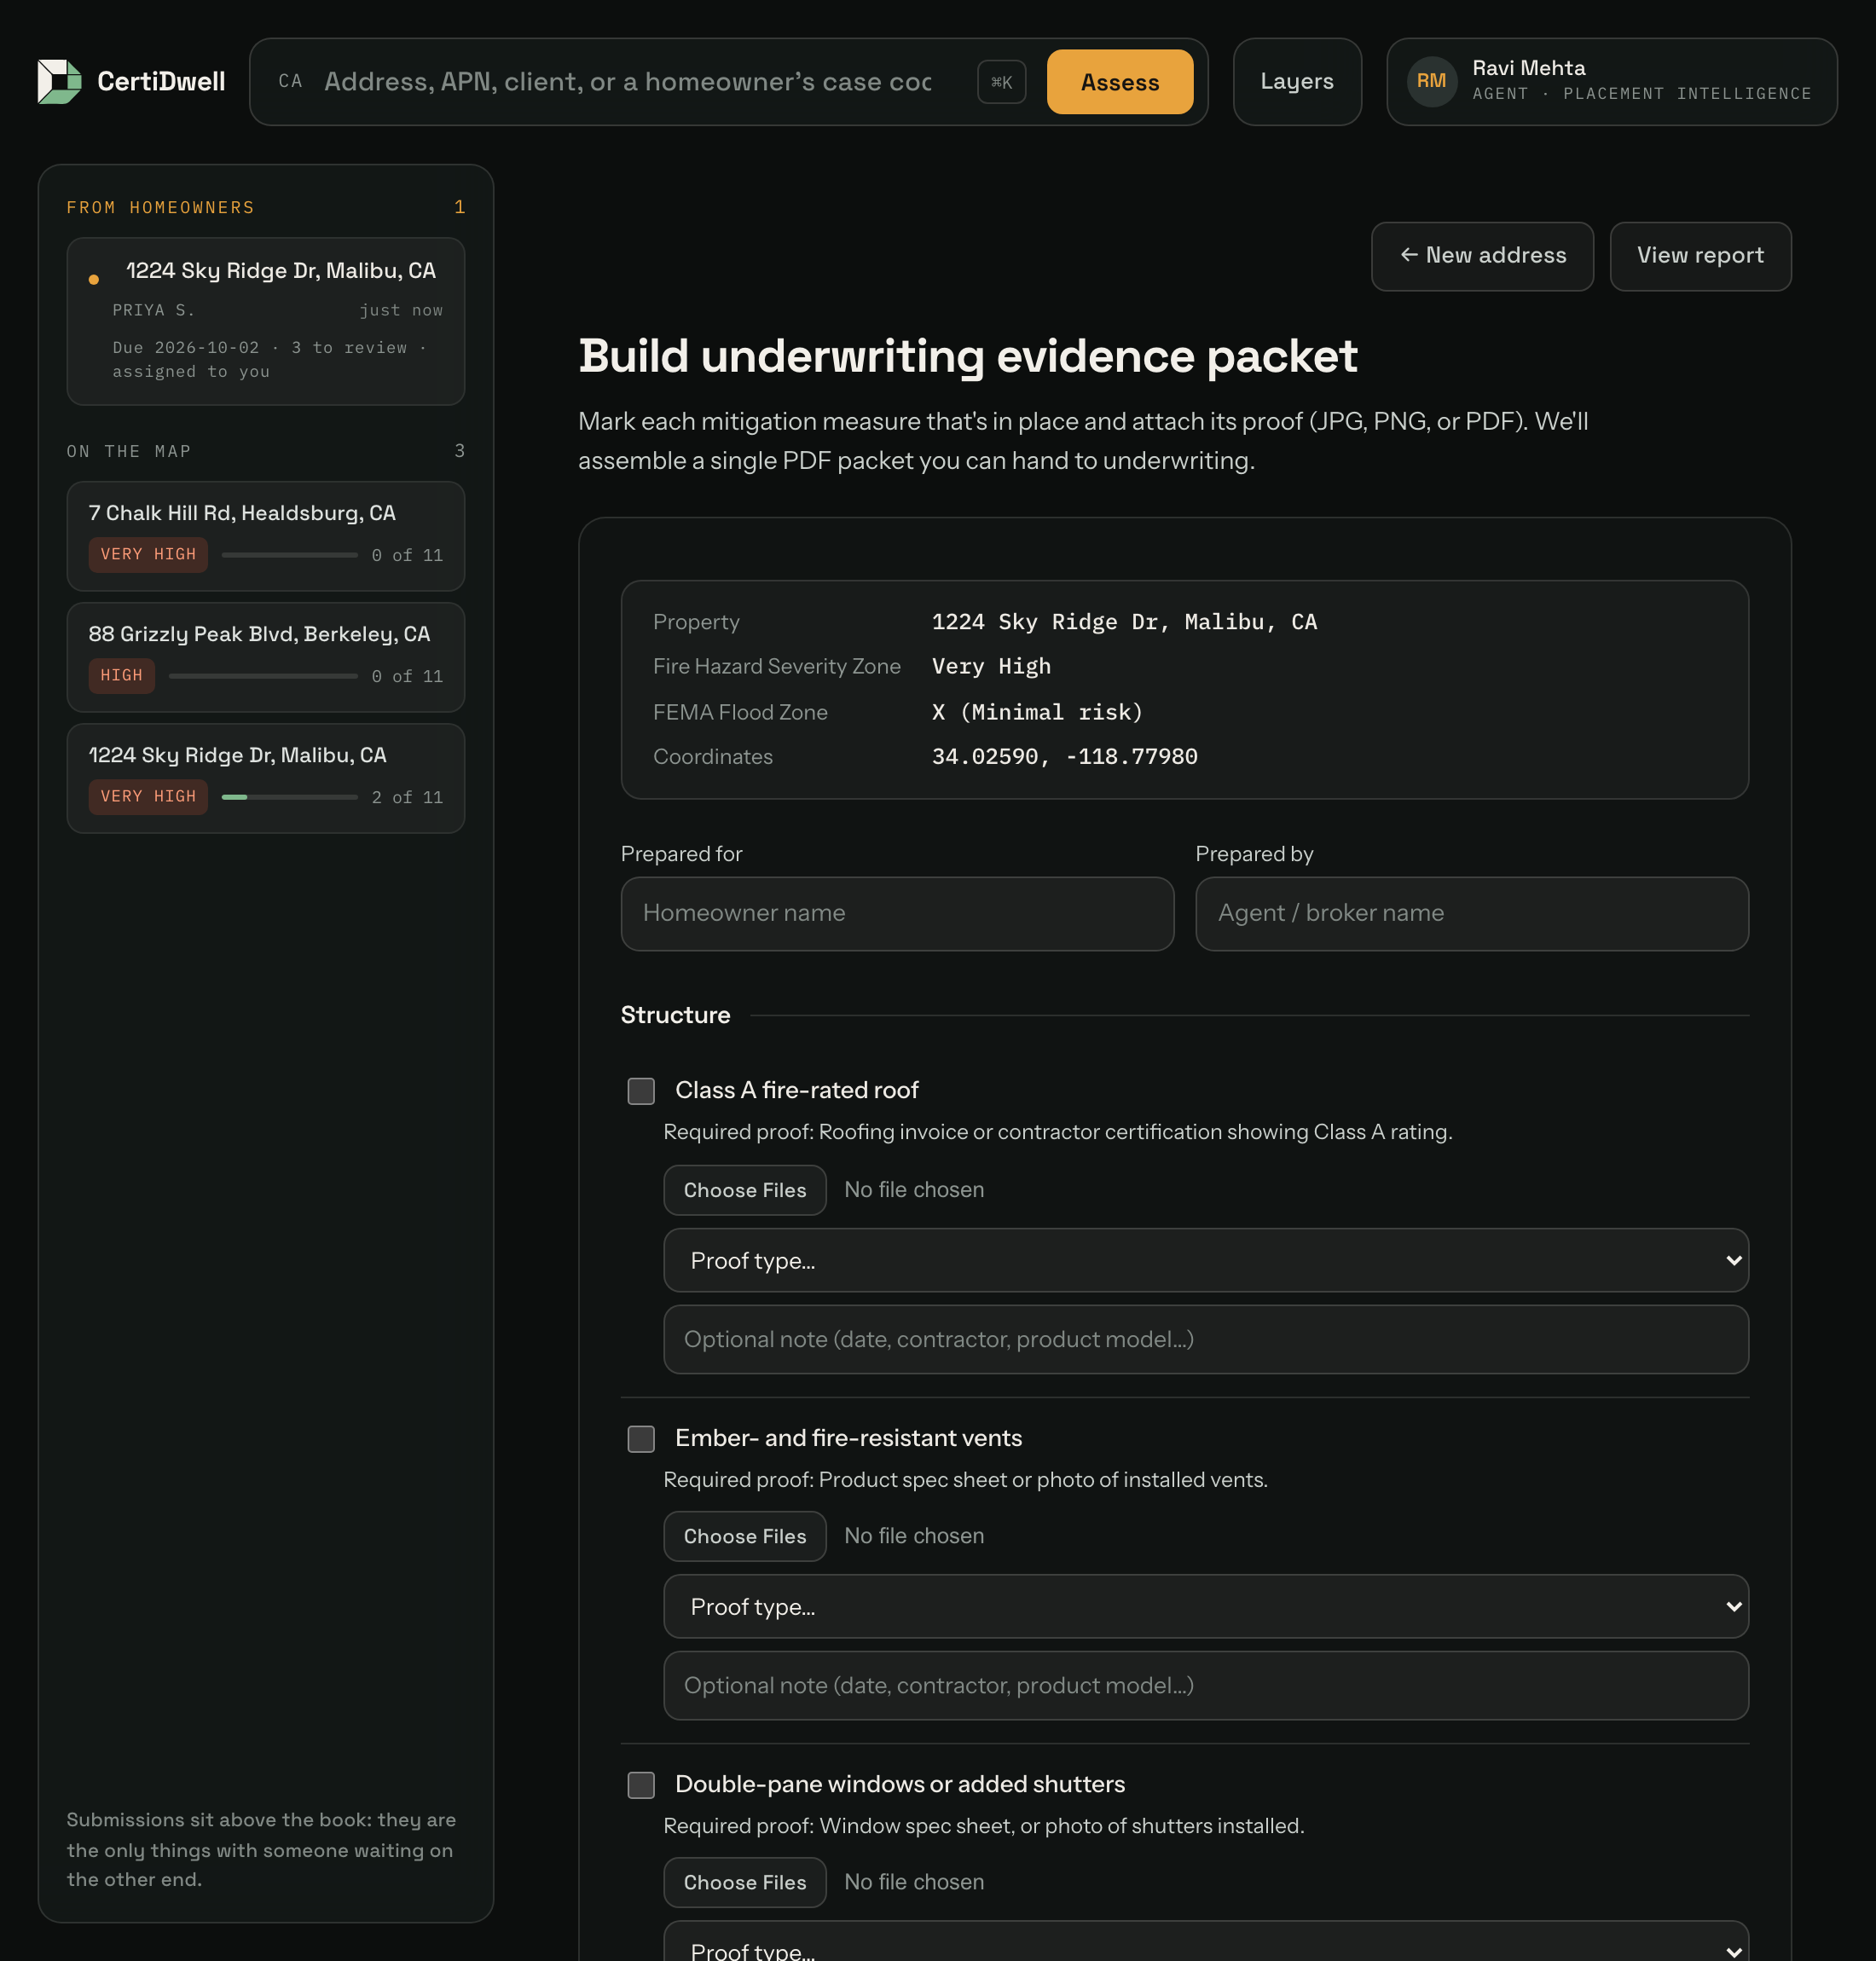
Fill in the header
Prepared for — the homeowner's name. Prepared by — your name. Both appear on the packet's cover sheet.
Work down the measures
For each one that is genuinely in place: tick the box, attach the file, choose the proof type, and add a note if it helps (a date, a contractor name, a product model).
Leave the rest unticked
Anything not done stays unticked and is reported honestly as incomplete. That is the point — the packet is credible precisely because it does not overstate.
Generate
Click Generate evidence packet (PDF). The file downloads automatically.
The five proof types
| Type | Use it for |
|---|---|
| Photo | Visible work — cleared zones, installed vents, enclosed eaves |
| Contractor invoice | Paid work, with the contractor named |
| Product spec sheet | Proving a product meets a rating, such as a Class A roof |
| Certification letter | Formal confirmation from a body or jurisdiction |
| Self-certification | The homeowner attesting, where no other proof exists — the weakest, so use it sparingly |
What comes out
One PDF with three parts: a cover sheet (property, agent, both hazard zones, completion summary), an evidence log (every measure with status, proof type, note and attached files), and the attachments — each photo as a page, each PDF merged in, labelled with the measure it supports.
| Limit | Value |
|---|---|
| Accepted file types | JPG, PNG, PDF |
| Maximum size per file | 20 MB |
| Maximum files per packet | 60 |
iPhone photos. Photos in Apple's HEIC format cannot be embedded. The packet notes them rather than dropping them silently, but convert to JPG first for a clean result.
9. Your saved records
Click My records. Reports and packets are saved automatically as you create them.
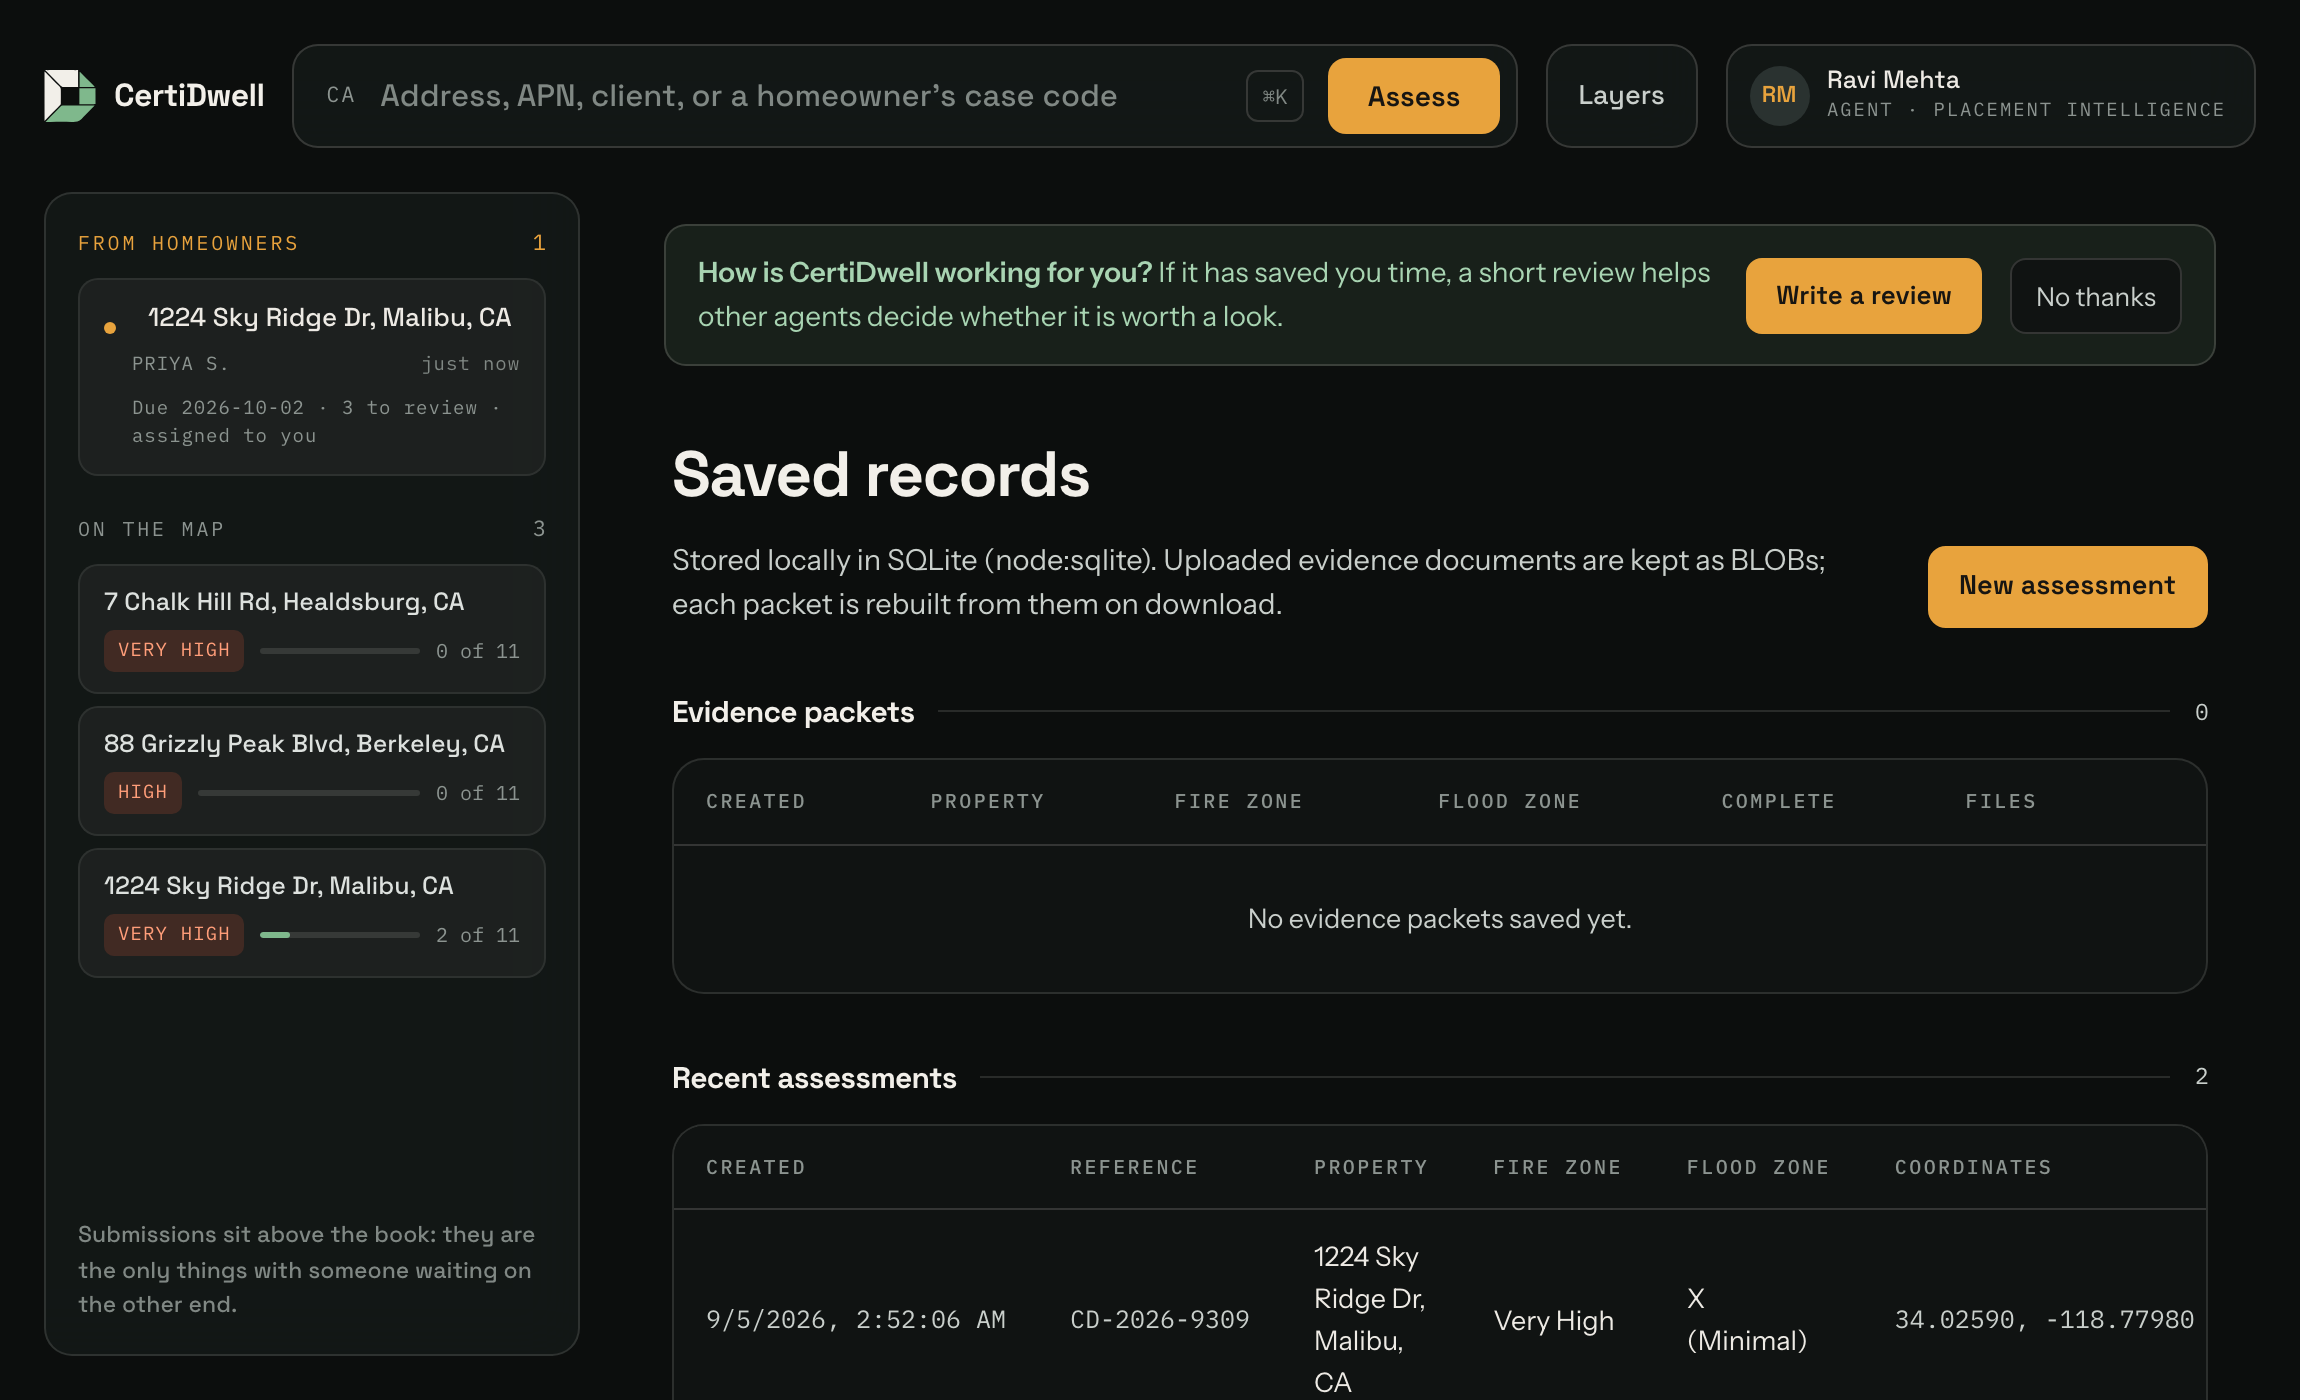
- Evidence packets — date, property, both zones, completion count and file count. Download PDF rebuilds the packet from its stored documents at any time, so you never need to keep a local copy.
- Recent assessments — every report you have generated. If you are on the Placement intelligence plan, each row also has a Placement button.
10. Leaving a review
Once you have run an assessment or built a packet, My records may offer to take a short review. It is entirely optional: choose No thanks and it never appears again, and nothing in the product depends on answering it.
Your account can leave one review. You pick a rating from one to five stars, write the review, and choose the name published alongside it; your email address is never shown. The label next to your name (Insurance agent or Homeowner) comes from your account type rather than something you type, so it cannot be inflated.
Reviews do not appear on the site immediately. A person reads each one first, and it is then published exactly as written or not published at all. You can check the status of yours at any time at /review.
11. Plans, credits and pay-per-report
Click Pricing.
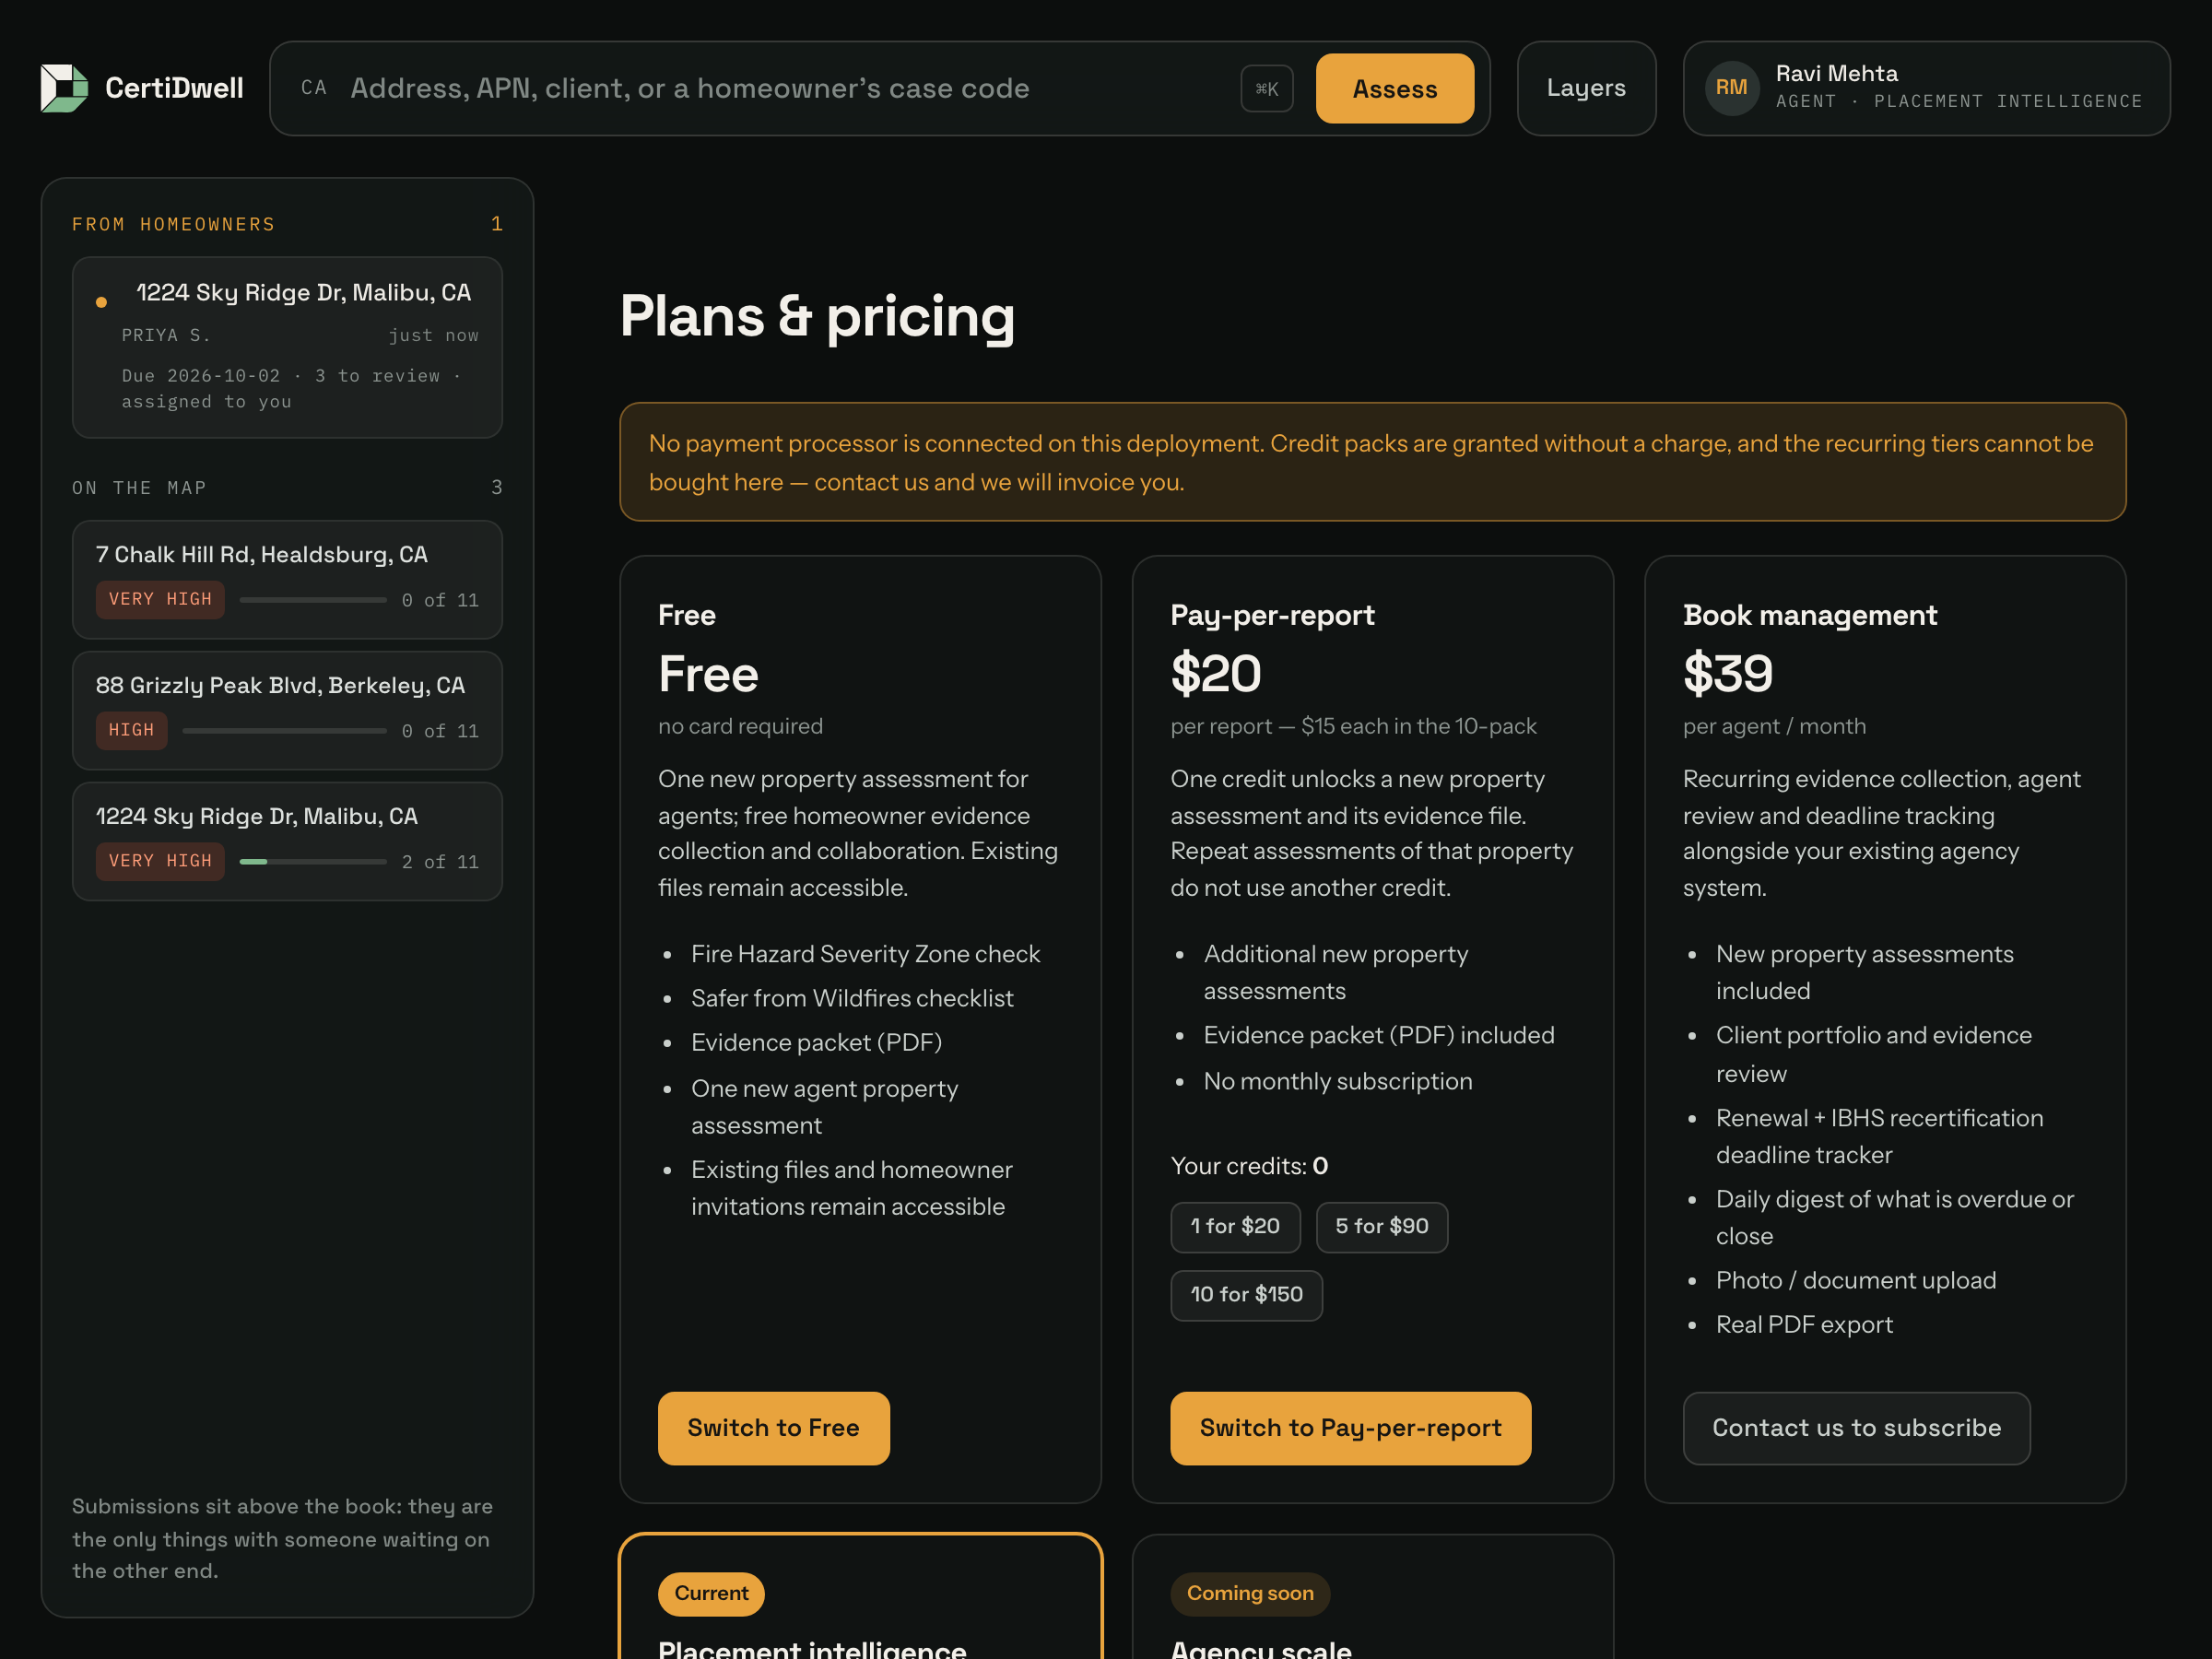
Buying credits charges your card. Checkout is hosted by Stripe, so your card details never reach this application, and the note under the page heading confirms it. A deployment that is not taking real payments replaces that note with a banner, and the two cases it names are genuinely different: card payment is not connected at all, so credits are granted without a charge; or Stripe is running in test mode, where checkout works end to end but only Stripe's test cards are accepted and no real card is charged.
Paying by card
Choosing a credit pack or subscribing to a tier takes you to Stripe's own payment page. Your card details are entered there and never touch CertiDwell. After paying you are returned to the Pricing page.
Credits appear a few seconds after payment, not always the instant you land back. The confirmation comes from Stripe rather than from your browser returning, which is what makes it reliable if you close the tab or lose your connection mid-payment. Refresh the page if the balance looks unchanged. Paying by bank debit rather than card can take longer to clear, and the credits arrive when it does.
Once you have bought something, a Manage billing & invoices button appears on the Pricing page. It opens Stripe's portal, where you can update your card, download receipts and invoices, and cancel a subscription.
Agencies can be invoiced instead of paying by card — ask us and we will raise one, payable on 30-day terms. Whatever it covers is added to the account when the invoice is paid.
How pay-per-report credits work
- The free trial includes one new property assessment for an agent. The second new address sends you to Pricing.
- Buy credits from the Pay-per-report card — 1, 5 or 10 at a time.
- On that plan, a report for a new address costs one credit, whether you assess it by address, by coordinates, or by adding it as a property.
- Re-opening a property you already looked up is free — you are never charged twice for the same house, and a failed lookup never charges at all.
- Book management and the tiers above it include new assessments.
- Properties a homeowner invites you to never count, and nothing you have already unlocked is lost if you change plan.
- At zero credits you are sent to the Pricing page to top up.
- Your balance shows on both the Pricing and Account pages.
- Homeowners are never charged.
To change tier, click the button on the card you want. Only the free tier and pay-per-report credits can be bought today; all three recurring tiers are marked Coming soon and their buttons register interest instead. When a recurring tier does go on sale it runs through Stripe checkout and starts when payment succeeds; cancelling one in the Stripe portal returns the account to the free tier at the end of the period you have paid for, and your properties, packets and history all stay exactly where they are. An administrator can also assign a plan or grant credits directly.
12. Placement intelligence
This tier is not on sale. It appears on the Pricing page as Coming soon, because carrier matching and evaluator referral still run on sample rules rather than real carrier data. Administrators always have it, and an administrator can assign it to an account by hand — which is why the Placement button may not be on your records.
Available on the Placement intelligence plan. This is the part that helps you decide where to send the risk. Open it from My records → Placement on any saved assessment.
Read this first. Everything on this page is decision support — not a quote, not a binder, and not a guarantee of eligibility. Carrier fit and credit ranges come from rules your administrator maintains. Always confirm appetite and credits with the carrier before relying on them.
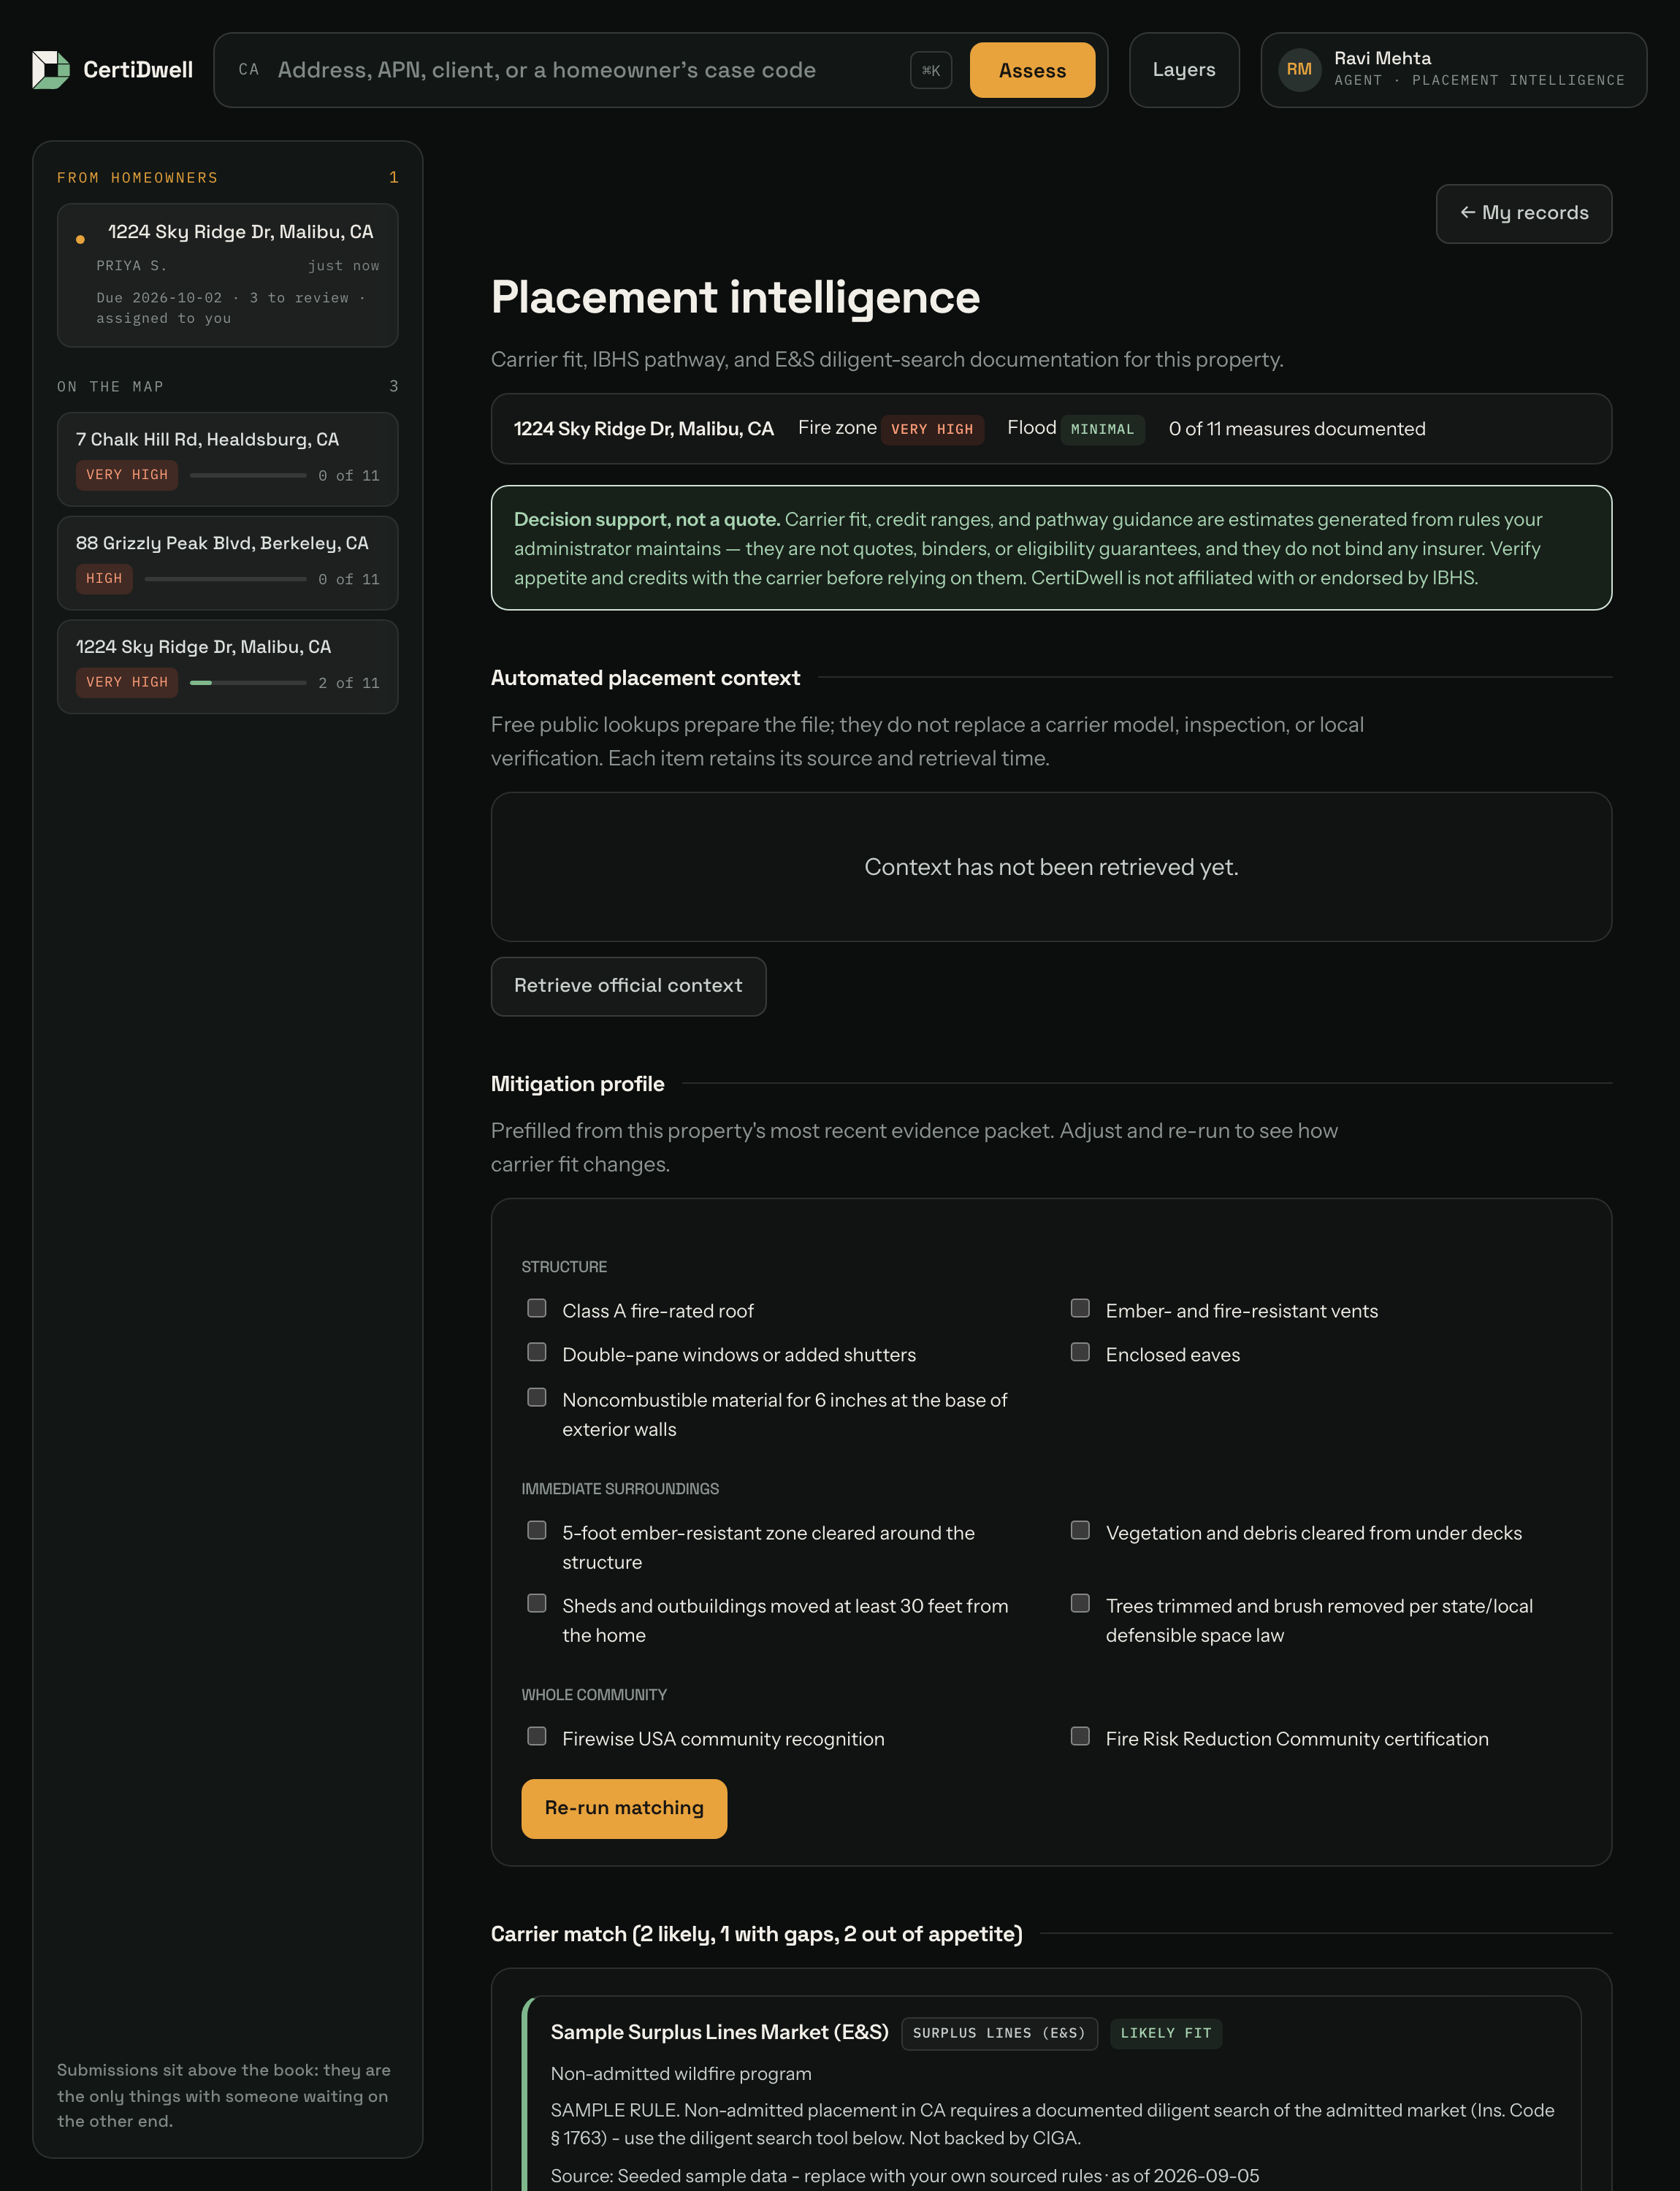
9a · Retrieve official placement context
Click Retrieve official context. CertiDwell queries free public sources for Census jurisdiction, a CAL FIRE regional WUI classification and CAL FIRE's regional secondary-egress review layer. Every result shows its source and retrieval time. The WUI and egress layers are regional, so no polygon returned is never presented as a statewide clearance. Community mitigation remains Verification required until an authoritative address-boundary feed is available; use the linked CDI guidance to confirm Firewise USA or Fire Risk Reduction Community recognition.
9b · Set the mitigation profile
Tick the measures the property has completed. This is prefilled from that property's most recent evidence packet, so if you have already built a packet there is usually nothing to change. Click Re-run matching to update the results below.
This is the most useful thing on the page: tick a measure the homeowner is considering, re-run, and see whether it actually moves them into a carrier's appetite. That turns a vague "you should do more" into "this specific job gets you here."
9c · Read the carrier match
| Result | What it means and what to do |
|---|---|
| Likely fit | Meets the stated requirements. Start your calls here |
| Fit with gaps | Would likely qualify once the listed gaps are closed. The gaps are spelled out — this is your action plan with the homeowner |
| Out of appetite | The property's fire zone exceeds what the program writes. Mitigation alone will not change this — these become your diligent-search starting points |
Each card also shows the market (Admitted, Surplus lines, or Residual), the estimated credit range, and — importantly — where the rule came from and when it was last verified.
9d · The IBHS Wildfire Prepared Home pathway
Two panels: the base designation and the stricter WPH+. Each requirement is marked:
| Marker | Meaning |
|---|---|
| Met | You have evidence for it |
| Not met | Still to do |
| Verify | Part of the IBHS standard this application does not collect evidence for — check it separately. It is never counted as met on your behalf |
The pathway identifies the 2025 Technical Standard, effective June 1, 2026, and links to the official standard. Use Open official IBHS application to leave CertiDwell for IBHS. CertiDwell does not submit the application or read its status. After working in the official portal, record the minimum follow-through information—status, application reference, submitted date, last checked date and notes—back in CertiDwell. The reference and notes are encrypted at rest.
9e · Request an evaluator referral
Choose an evaluator, add the homeowner's name and email, and click Request referral.
This records the request and sends a notification. It does not schedule or book an inspection — the evaluator confirms separately. Only IBHS and its approved evaluators can grant the designation; CertiDwell is not affiliated with IBHS.
9f · E&S diligent search
If no admitted insurer will take the risk, California requires you to document that you genuinely tried before placing it in the surplus-lines market.
- The page suggests which admitted carriers came back out of appetite. Start with those.
- For each rejection, record the carrier, date declined, method (email, phone, portal, written), contact and reason given, then click Add declination. Repeat for each one.
- At the bottom, enter your name and license number, tick the attestation box, and click Generate diligent search report (PDF).
The PDF contains the property details, every declination, your attestation and a signature block.
This is your own record — not a regulatory filing, and it does not by itself satisfy any requirement. Confirm the current rule, including how many declinations are needed and any export-list exemption, with the Surplus Line Association of California.
13. Book management
On the Book management plan — and on the tiers above it — Book appears under Layers in the console. It answers one question: across every property you are the agent for, what needs attention and when.
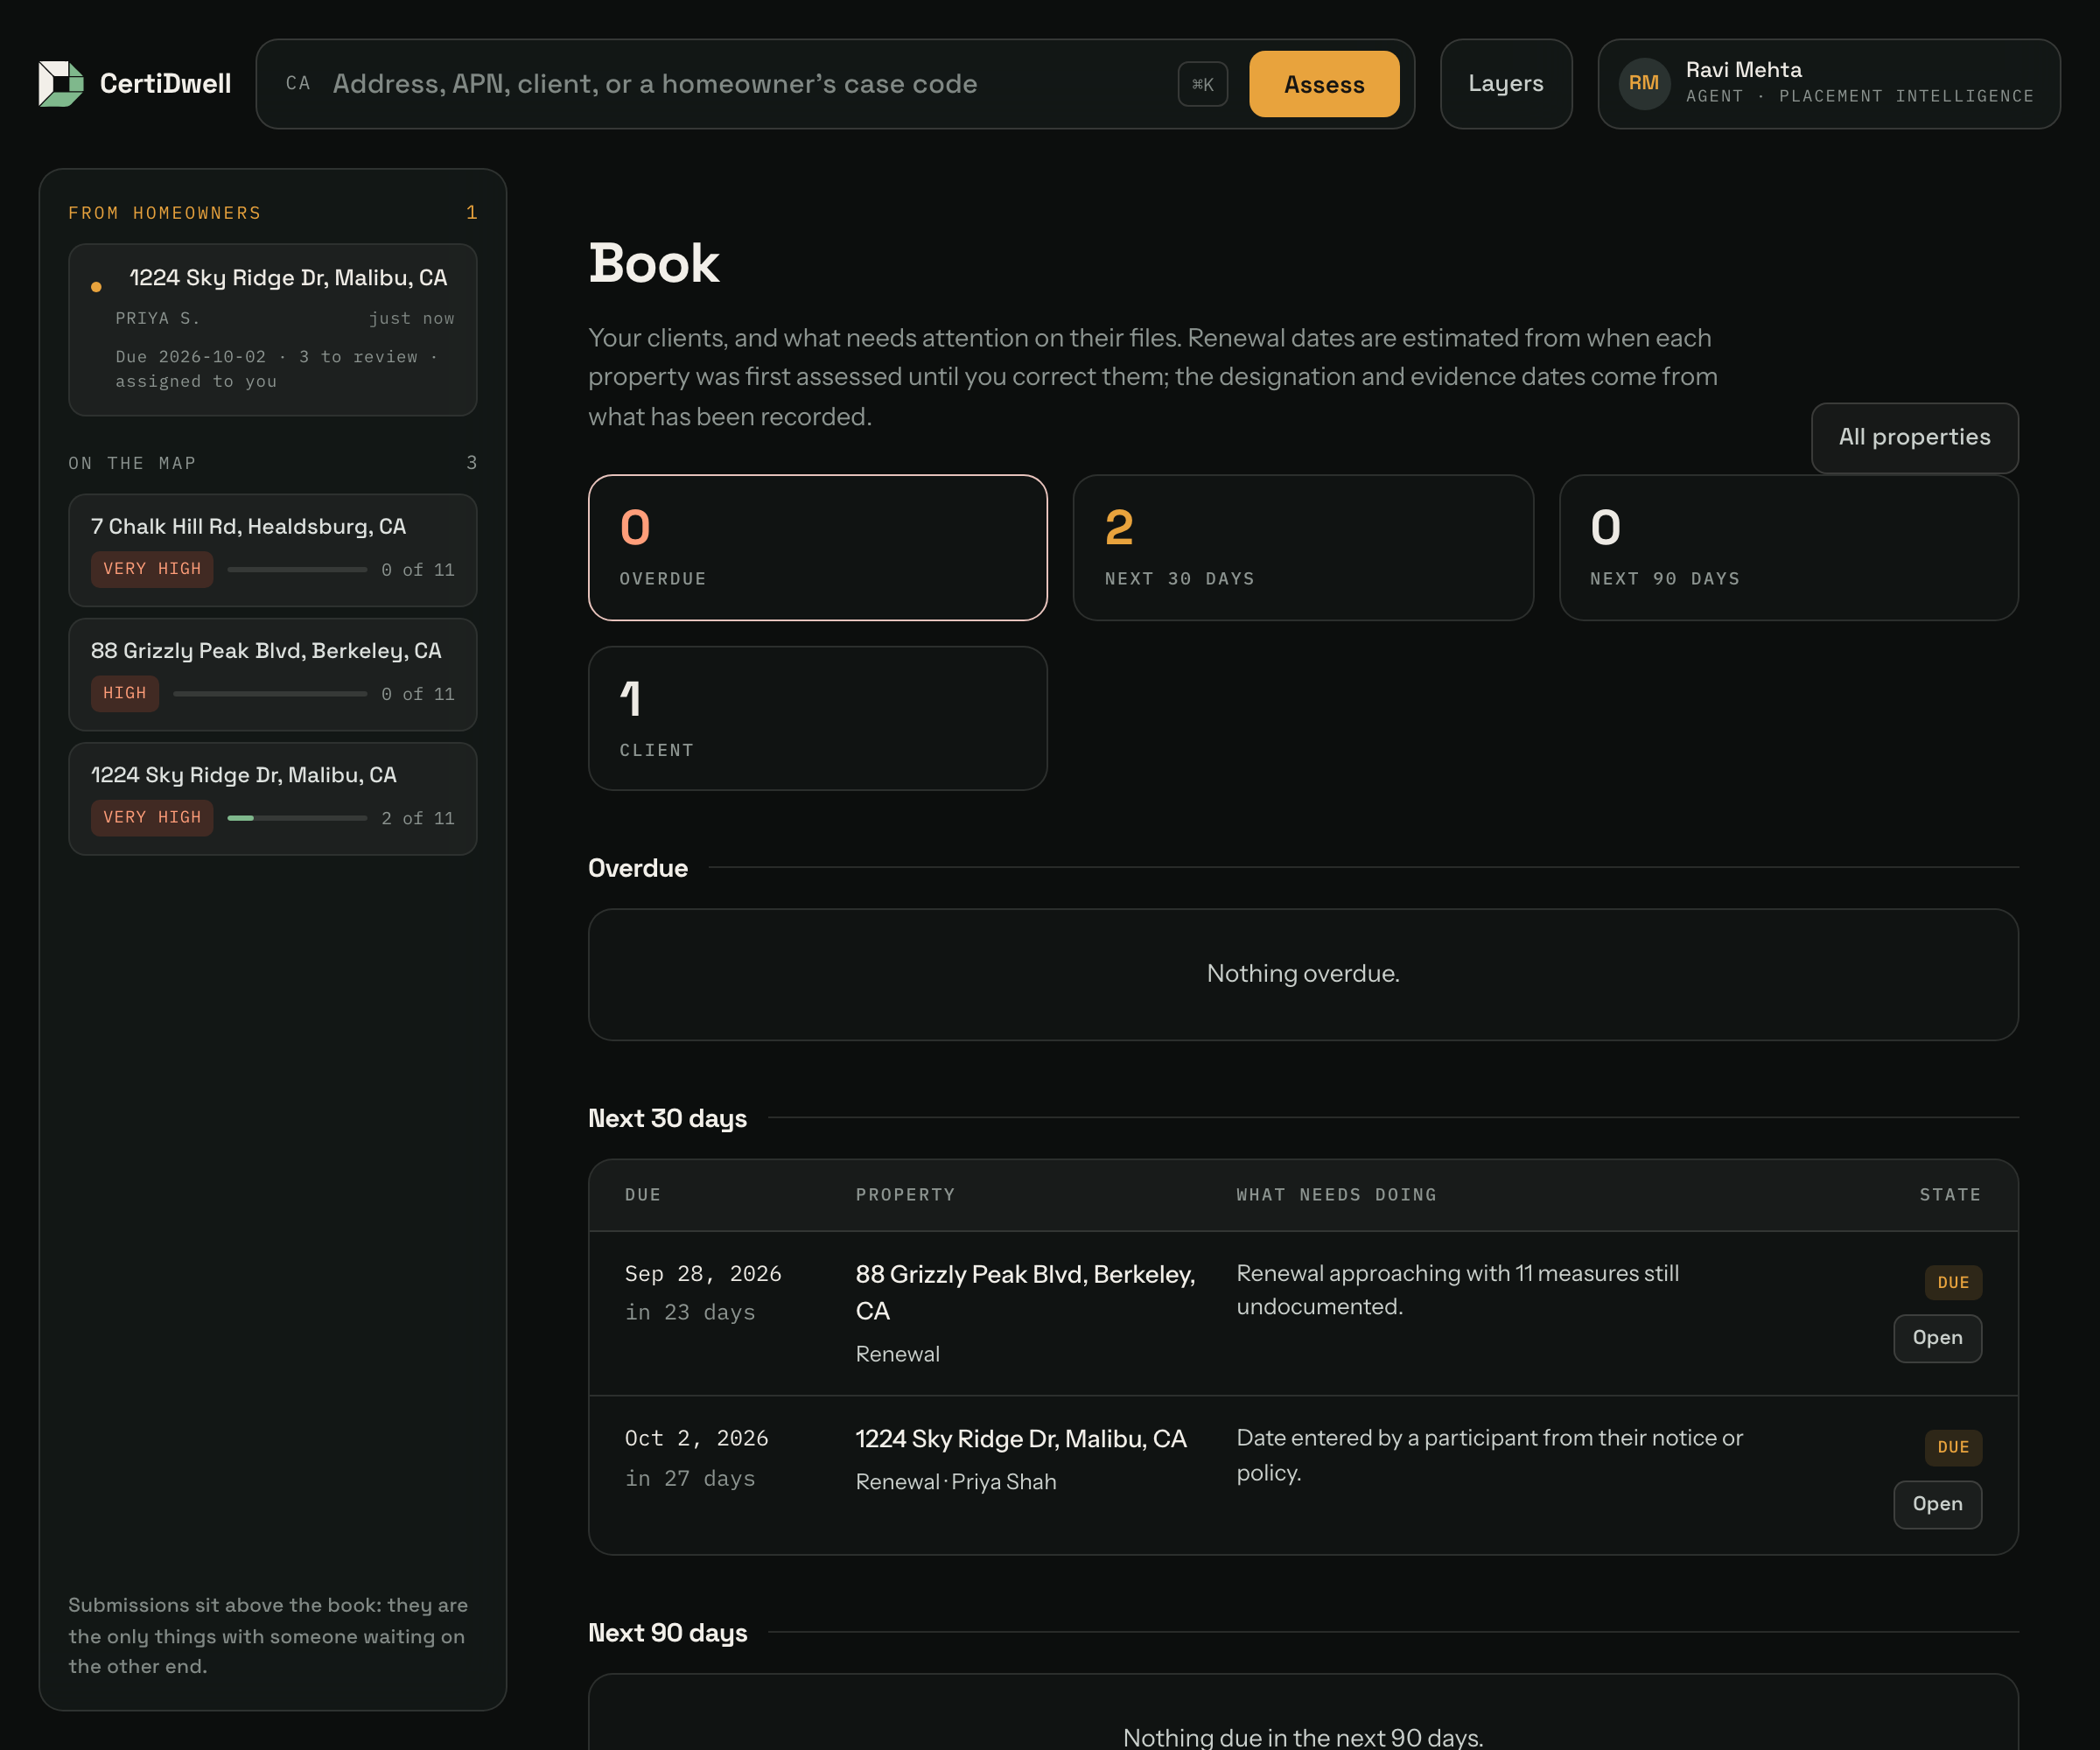
Clients
A client here is your own record. Adding one does not create an account, send anything, or give anyone access to a property — invite a homeowner from the property itself when you want that. File a property under a client from the client's page, or from the Book & renewal panel on the property.
Archiving a client never deletes their properties, packets or documents. The link is cleared and the properties return to your unfiled list.
Entered deadlines first, estimates as the fallback
A renewal or non-renewal deadline entered on the case (or imported at /deadlines) is the date the book uses, labelled as entered by a participant. Only when no date has been entered does CertiDwell estimate one — a year after the property was first assessed, on the assumption that a file gets opened when the renewal is in front of you — and it marks that Estimated wherever it appears along with what it was estimated from.
Enter the real date and it stops being a guess. Clear the field and it goes back to the estimate. A date you entered is never quietly replaced, even after it has passed — a stale date is a prompt to re-enter it, not a licence for us to guess over the top of you.
Nothing in this panel is read from a carrier or checked against one. It is your own record of what you know, and it is only as current as what you have entered.
IBHS designations
Record a Wildfire Prepared Home designation by copying the dates from the IBHS letter. If you leave the expiry blank, a 12-month term is assumed from the grant date and shown as Assumed until you enter the real one.
CertiDwell does not grant, verify or renew a designation — IBHS and its approved evaluators do. The assumed term is our own default, not the IBHS standard; confirm it with IBHS.
Evidence going stale
Two years after the oldest accepted proof on a property, the book raises it: underwriters discount photographs that old, and it is worth re-shooting before the next submission. This is the deadline a management system cannot raise, because it does not hold your evidence.
The daily email
A daily message lists anything overdue or close. Each deadline is sent once rather than repeated nightly, and nothing is sent at all on a day when nothing is due. Turn it off at the bottom of the book page.
An email that does not arrive is not an all-clear. If mail fails, nothing about the deadline changes and the book page is still current — the page is the record, the email is a nudge.
The Agency scale tier (management-system integrations, white-label multi-seat accounts, bulk CSV screening) remains a placeholder.
14. Common questions and problems
| What you see | What it means |
|---|---|
| An error page instead of a report | The address could not be matched. Include city and state, and a ZIP if you have one |
| "… did not respond. That is usually brief — try again in a moment." | One of the public map services the report depends on did not answer. Nothing is wrong with the address, and the request was already retried once for you. Wait a moment and run it again |
| Fire zone says Unknown | The property may sit in a Federal Responsibility Area, which is not in the state layers searched. Not a fault — the zone genuinely is not in that dataset |
| Flood zone says not mapped | FEMA has not mapped that area. Also not a fault |
| "Your session or form token was invalid" | The page sat open too long. Reload it and resubmit — this is the security protection doing its job |
| "Too many attempts. Try again in N seconds" | Too many failed sign-ins. Wait for the time shown |
| The reset email never arrived | Email may not be configured on your installation — ask whoever runs the system |
| A file would not attach | Only JPG, PNG and PDF are accepted, up to 20 MB each |
| The app shows an offline page | Reconnect and try again. Private property and evidence pages are deliberately not kept in the offline cache |
| Device notifications are unavailable | The operator has not configured VAPID keys, the browser does not support Web Push, or permission was declined. Email reminders still work |
| No Placement button on my records | Placement intelligence needs that plan, and the tier is not on sale — ask an administrator to assign it |
| "Your free agent trial includes one new property assessment" | You have used the trial's one new address. Buy a report credit or subscribe; everything you already assessed stays open |
| "Choose one photo or document at a time" | The walk offers a camera shutter and a document picker; use one of them per save |
| "Describe what additional proof you need" | Ask again needs a note — the homeowner is told exactly that, so it cannot be blank |
| "Confirm that you reviewed the pending evidence" | Accept all & build packet needs the acknowledgement ticked first |
| "No case with that code in your book" | A case code is CD- plus the first four characters of the property's id; it only resolves for properties you are on |
| The hazard map is missing from the console | It is off by default so the evidence stays readable; click Show hazard map |
15. Quick reference
The typical run-through
Pages
| Page | Address | Who can see it |
|---|---|---|
| Sign in / register | /login, /register | Everyone |
| Forgot password | /forgot | Everyone |
| Console (agents, admins) / Doorstep verdict (homeowners) | / | Signed in |
| A case in the console | /?case=<property id> | The agent on it + admin |
| Properties | /properties | Signed in |
| Deadline import | /deadlines | Signed in |
| The walk | /property/<id>/walk | Its participants + admin |
| Share | /property/<id>/share | Its participants + admin |
| Case overview (default property page) | /property/<id> | Its participants + admin |
| People and property settings | /property/<id>/manage | Its participants + admin |
| Classification appeal | /property/<id>/appeal | Its participants + admin |
| Invitation | /invite/<token> | Anyone with the link |
| Mitigation checklist | /property/<id>/evidence | Its participants + admin |
| Shared packet | /s/<token> | Anyone with the link, 30 days |
| Evidence packet builder | /evidence | Signed in |
| My records | /records | Signed in |
| Account | /account | Signed in |
| Account-deletion instructions | /delete-account | Everyone; deletion requires sign-in |
| Offline safety screen | /offline.html | Everyone, no private data |
| Plans and pricing | /pricing | Signed in |
| Placement intelligence | /placement/<report id> | Placement plan or admin |
| Admin dashboard | /admin | Administrators |
| Pilot scorecard | /admin/growth | Administrators |
| Roadmap and action register | /admin/enhancements | Administrators |
| Preparation guides | /guide/wildfire-evidence, /guide/photograph-mitigation, /guide/hazard-map-vs-insurance, /guide/renewal-preparation, /guide/sample-packet | Everyone |
| Sample packet PDF and preparation CSV | /sample-packet.pdf, /preparation-checklist.csv | Everyone |
Limits worth remembering
| Thing | Limit |
|---|---|
| Password | 8 characters minimum |
| Evidence file size | 20 MB each |
| Evidence file types | JPG, PNG, PDF — one file per save |
| New property assessments | One on the free agent trial; then one credit each, or included with a subscription |
| Deadline import | 200 rows per file |
| Files per packet | 60 |
| Password reset link | Valid one hour, single use |
| Sign-in attempts | 10 per 15 minutes |
| How long you stay signed in | 30 days |
| Share link validity | 30 days, revocable at any time |
| Invitation validity | 14 days, single use |